This chapter describes installation and management of the HyTrust DataControl Policy Agent (the Policy Agent) on Linux platforms. We also describe DataControl features that are specific to Linux.
For basic architecture and operational aspects common to both Windows and Linux, see Encryption Within Virtual Machines Using the Policy Agent.
For details, see the platforms list in Encryption Within Virtual Machines Using the Policy Agent.
We currently require access to OpenSSL.
We also require access to the curl command if you plan to use hcs3 for S3 storage. For more information, see The hcs3 Interface.
The following sections describe how to install, upgrade and uninstall the Policy Agent on Linux. (For Windows, see Downloading and Installing the Policy Agent on Windows.)
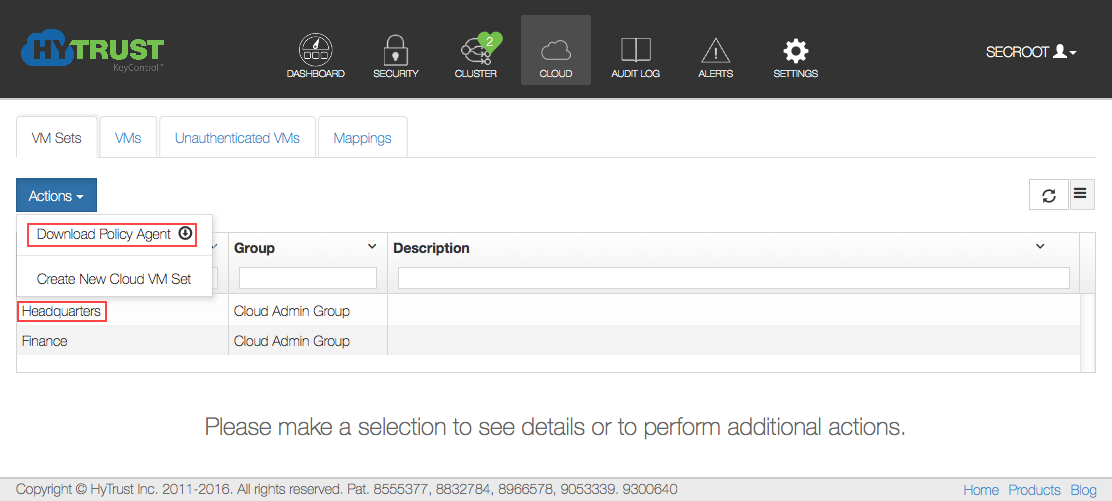
The Policy Agent software is embedded within the KeyControl cluster. Click on the Cloud Icon in the webGUI, click the Actions button, and then click Download Policy Agent.
The download screen appears below:
The download process will start and you will get a file called hcs-client-agent.zip placed in your default download directory. There are three directories, one for Linux, one for Windows, and an API directory. Within the Linux directory is the hcs-client-agent-3.4.run package for Linux. This should be copied to the VM.
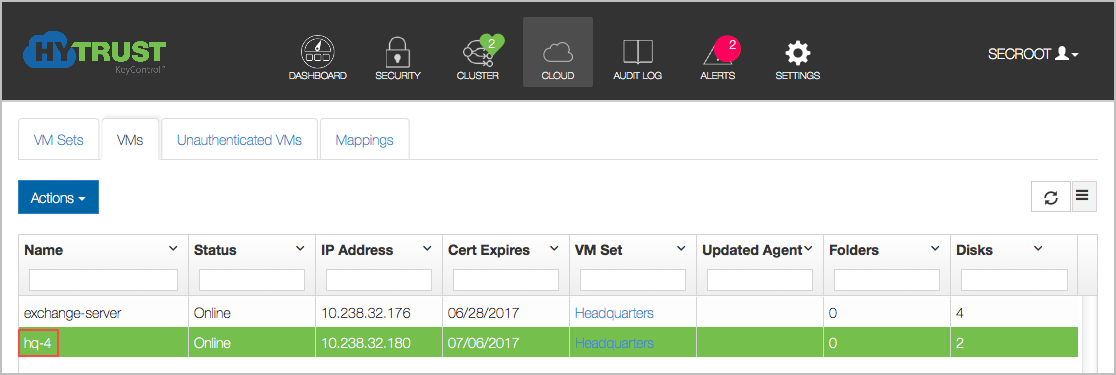
If you are not using simplified registration you also need to generate a certificate that will be used during registration of the VM. To obtain a certificate, select the Cloud VM Set to which you want to associate the VM. For example, let's assume that we wish to generate a certificate for the "Headquarters" group, highlighted in the image above. An alternative, which removes the need to generate a certificate by hand, is to use the “-a” option when running "hcl register".This will be described soon.
Click the Cloud Icon, then choose a VM set for which you want a certificate. Select that VM, then click the Actions button and then Create new certificate, as shown below:
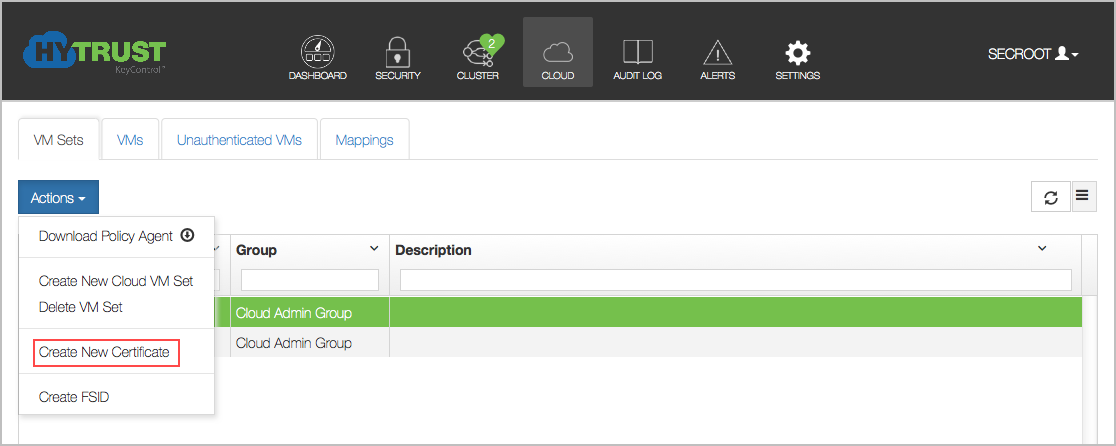
The Create New Certificate dialog box appears:

You should get a .cert file downloaded to your browser's default download folder. For example, the certificate file will have a name similar to 24bcc80a-9096-11e1-b701-000c29de5d41_120427182353.cert.
| Warning: | Do not rename the downloaded certificate. The name of the certificate has additional information, and a renamed certificate will fail. |
The next stage is to copy both the files (the VM Policy Agent software and the certificate .cert file) obtained from the KeyControl cluster to the VM. You then need to log on to the VM with root privileges. The rest of this document assumes that you have logged in as root. If you are not logged in as root, you must prefix each command with sudo so that all commands are run with root privileges.
If you have copied the software zip file to the Linux VM on which you will install it, unzip it and navigate to the directory where the package is located:
$ unzip hcs-client-agent.zip
Archive:  hcs-client-agent.zip
   creating: hcs-client-agent/
   creating: hcs-client-agent/linux/
   inflating: hcs-client-agent/linux/hcs-client-agent-3.4.run
   creating: hcs-client-agent/windows/
   inflating: hcs-client-agent/windows/hcs-client-agent-3.4.exe
   extracting: hcs-client-agent/hcs-api-3.4.tgz
You can check the version of the packed software as follows:
# sh hcs-client-agent-3.4.run version
Verifying archive integrity... All good.
Uncompressing hcs-client-agent-3.4.run........................
HyTrust Agent version 3.4 (b9355M)
To run the installer:
root. Run the installer by navigating to the directory containing hcs-client-agent-rel.number.run and typing the following command:
# sh hcs-client-agent-rel.number.run [install -y]
Where install -y tells the installer to use the default installation directory (/opt/hcs) without prompting.
The following examples both install the Policy Agent in the directory /opt/hcs, but in the first one the user is prompted for the installation directory and in the second the installer uses that directory without prompting:
# sh hcs-client-agent-4.0.run
Verifying archive integrity... All good.
Uncompressing hcs-client-agent.run.............
HyTrust Agent will be installed in /opt/hcs
Specify location for installing HyTrust Agent (/opt/hcs): <Enter>
Run once hcld
Starting hcld... done
Installation successful
# sh hcs-client-agent-4.0.run install -y
Verifying archive integrity... All good.
Uncompressing hcs-client-agent.run.............
HyTrust Agent will be installed in /opt/hcs
Run once hcld
Starting hcld... done
Installation successful
Note that the exact output displayed will depend on the version of Linux used. On some versions, the output will be less verbose.
To register the VM, see Registration of the VM.
Be sure that your Agent version is not higher than the version of your KeyControl node. Upgrading an Agent to a version higher than your KeyControl is not supported. Registration of an Agent version higher than the KeyControl version will not work.
Upgrade of the Policy Agent is VM is achieved simply by running the new .run script. The existing configuration is preserved. You can check the current version of the software as follows:
# hcl version
3.4 (b9355)
And to upgrade, simply run the installer as follows and enter y when prompted to upgrade. You can check:
# sh hcs-client-agent-3.4.run
Creating directory hcs-agent-agent
Verifying archive integrity... All good.
Uncompressing hcs-agent-agent.run.............
HyTrust Agent version 3.4 already installed
Upgrade existing install? (y/n): y
Stopping hcld... done
Run once hcld
Starting hcld... done
Installation successful
You can verify the version of the software as follows:
# hcl version
3.4 (b9355)
Uninstalling the VM agent software is done simply by running the .run script and passing the uninstall option. This is shown below:
# sh hcs-client-agent-3.4.run uninstall
Creating directory hcs-agent-agent
Verifying archive integrity... All good.
Uncompressing hcs-agent-agent.run.............
Data on all encrypted volumes will be lost. Proceed with uninstall? (yes/no) yes
Encrypted device /dev/sdb1 detached; decrypted contents no longer visible
Encrypted device /dev/sdc1 detached; decrypted contents no longer visible
Encrypted device /dev/sdd1 detached; decrypted contents no longer visible
Stopping hcld... done
Uninstall successful
| Note: | When you uninstall the Policy Agent software, all configuration information is lost including access to all encrypted devices. |
In the following sections, we describe the operations that can be performed on the VM including registration, authentication, encrypting devices, and obtaining and understanding status messages. The instructions for creating a new certificate appear just above. To review, you click the Cloud icon, select a VM Set, click the Actions button, and then click Create New Certificate.
| Note: | VM management is almost the same for Windows computers. For details, see VM Management on Windows Computers. |
Creating a new certificate will prompt you to create a certificate password. Type the Password for the certificate, and confirm it by typing it again. You will be prompted to re-type this Password when you register the VM. You can also specify the expiration date for the certificate. By default this is one year from the current date, but you can type a new date or pick from the calendar box on the right. Next, click the Create button. The certificate is created and is available to be downloaded to your host machine. If you decide not to create the certificate, simply click Clear.
There are three methods of registration:
hcl command line, which allows you to automate the registration process. This method is the least secure and should be used with extreme caution due to the username and password being sent in plain text.Standard authentication is described below, For simplified authentication, see Simplified Registration. For automated authentication, see Automated Registration of New VMs.
The hcl command is your gateway to VM encryption services. To register a VM, start up an xterm or other suitable terminal window.
You can view the options by typing man hcl.
The manual pages are also available in the Programmer's Reference Guide.
First we explain the primary form of registration, which requires typing a passphrase on the VM and authenticating, using that passphrase, within the KeyControl cluster.
Run the following command to register the VM with the KeyControl cluster. Note that you must first copy the certificate to the VM from which you will register, and make sure that you switch to the directory where you place the certificate.
# hcl register -h hq-4 -d "hq-4" 10.238.32.74 \
    ad85837b-9862-11e1-afd5-000c29de5d41_120507163538.cert
Enter Import Password: ***************
Enter passphrase (min 16 characters): onetimepassword16chrsmin
Registered as hq-4 with KeyControl node 10.238.32.74
Please login to the KeyControl node to complete the authentication of this node
The -h and -d arguments are optional. The name of the VM (the -h argument) is any user-selected name. In this case, we just entered the name hq-4. It will appear in the webGUI next to this VM. If the argument is omitted, the hostname will be used by default. The IP address references the KeyControl node and the certificate filename is the last parameter. The -d argument is optional, and will appear in the webGUI as the description of the VM.
In the example above, the ad85....cert file was the certificate file obtained from the Create new certificate step.
The Import Password is the password used to encrypt the certificate while generating it.
The Passphrase is the one-time password used to authenticate the VM with the KeyControl node. This must be a minimum of 16 characters.
You can perform this in a single step as follows:
# hcl register -h VM_name -d Description -p CertPass -o OneTimePass \ kps1:443,kps2:443,kps3:443 /path/to/cert.cert
In the example here, we are registering with a cluster of three KeyControl nodes. It is important to maintain the KeyControl list correctly. If KeyControl nodes are added or removed, you should call hcl updatekc with the new list, or use KeyControl mappings.
Once you have issued the register command, go back to the KeyControl cluster. There, you should see an entry labeled hq-4 in the Unauthenticated VMs list under the Cloud Icon.
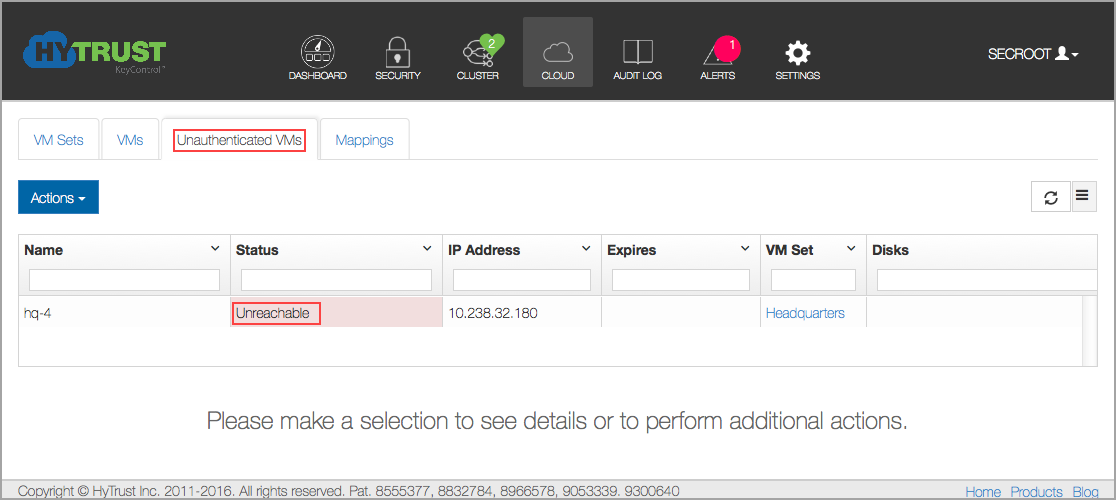
Select the VM, click the Actions button, and then click Authenticate.
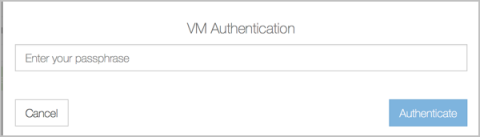
Enter the correct passphrase (the one passed to hcl register or typed on the command line) and click Apply, and the VM is now accessible.
Click on the VM and you will see the VM details (such as OS, IP address) as shown below. You can edit the Description, Heartbeat, Grace Period, Reauthenticate on..., and Rekey Interval parameters.

Description of the fields shown for each VM are shown in VM Fields Shown in the WebGUI.
If a VM is already registered and you attempt to register again, you will see the following warning:
# hcl register -p rootroot -o HyTrust -h ubuntu-15.04 -d "This is my 10.04 VM" 192.168.140.151 *cert
Already registered, remove from server and cleanup locally (hcl destroy)
If this is a clone of a VM that is already registered and you wish to access the encrypted devices, you must register this as a clone VM. For details, see Deploying Clone VMs.
A simpler form of registration is available by which you do not need to manually create a certificate and copy it to the VM.
You can quickly register and authenticate a VM by providing your KeyControl credentials and selecting the Cloud VM Set.
For example, in this case pass the -a option to hcl:
# hcl register -a -h "Ubuntu-15.04" -d "My Ubuntu test VM" 192.168.140.151
Please provide the KeyControl login details
username: spate
password:  ********

Available Cloud VM Sets
---------------------------------------------------
Microsoft_Azure
Amazon_AWS
ENKI
---------------------------------------------------

Please specify Cloud VM Set to which this VM should be added: ENKI

Certificate passphrase might be required
Certificate successfully unpacked
Registered as Ubuntu-15.04 with KeyControl node(s) 192.168.140.151

Completing authentication for Ubuntu-15.04 on KeyControl node(s) 192.168.140.151
Authentication complete, machine ready to use
Here, we invoke hcl register as before, but pass the -a option. First, hcl prompts for your username and password. It authenticates against KeyControl and then lists the available Cloud VM Sets. All you need to do now is to select the Cloud VM Set in which to place the VM. A certificate is created, copied to the VM and registration/authentication takes place. You can then find your VM in the webGUI VM list, as the following figure shows:
For Administrators with a need to automate the registration of new VMs, you can use the hcl register -a command with variables that enable automation of the registration process. Details of the hcl register -a parameters are below:
The command:
# hcl register -a [-c] [-h myname] [-d description]
	[-n KC_Mapping] [-u KC_user [-s KC_password]] [-z cvmset]
	 KC_hostname[:port],KC_hostname2[:port2],...
where:
-u — username for KeyControl-s — password for KeyControl-z — cvmset to add VM to-n — name of cluster mappingEach option overrides the input. For example, if username is specified, but password is not, then it prompts for password. This permits interactivity where you choose to have it.
Here is a fully automated example, with the password passed as an argument:
# hcl register -a -h Ubuntu-15.04 -u secroot -s 'Hytrust123!' -z headquarters -n hqmap 192.168.154.156
Certificate passphrase might be required
Certificate successfully unpacked
Registered as Ubuntu-15.04 with KeyControl node(s) 192.168.154.156

Completing authentication for Ubuntu-15.04 on KeyControl node(s) 192.168.154.156

Authentication complete, machine ready to use
Getting KeyControl Mapping information

KeyControl Mapping
server description hqmap, ip 192.168.154.156, port 443
Updated KeyControl list with KeyControl nodes 192.168.154.156:443
Here is an example with an interactive password:
# hcl register -a -h Ubuntu-15.04 -u secroot -z headquarters -n hqmap 192.168.154.156
password: <user enters password>
Certificate passphrase might be required
Certificate successfully unpacked
Registered as Ubuntu-15.04 with KeyControl node(s) 192.168.154.156

Completing authentication for Ubuntu-15.04 on KeyControl node(s) 192.168.154.156

Authentication complete, machine ready to use
Getting KeyControl Mapping information

KeyControl Mapping
server description hqmap, ip 192.168.154.156, port 443
Updated KeyControl list with KeyControl nodes 192.168.154.156:443S
The status of the VM can be checked at any time using the hcl command. For example, following
a successful registration, run the command as follows:
# hcl status
Summary
---------------------------------------------------
KeyControl: 10.238.32.74:443
KeyControl list: 10.238.32.74:443
Status: Connected

Registered Devices
---------------------------------------------------
Disk Name    Clear         Cipher            Status
---------------------------------------------------

Available Devices
---------------------------------------------------
Disk Name    Device Node                Size (in MB)
---------------------------------------------------
sdc           /dev/sdc                        2048
sdb           /dev/sdb2                       1027

Other Devices
---------------------------------------------------
Disk Name           Device Node      Status
---------------------------------------------------
sda5                /dev/sda5        Mounted (/boot)
sda1                /dev/sda1Mounted (/)
The status is shown as Connected. The list of devices detected is shown along with information about whether the device is available or in use. It displays all physical devices and logical volumes (LVMs) that are in use or available. LVMs are treated in a manner similar to using a whole disk (such as /dev/sdb or /dev/sdc).
Please see the following figure. A free disk can be in one of two stages. Either the disk is free or it is under HyTrust control, in which case it must be attached before applications can access it.
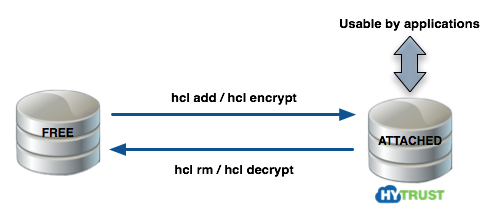
| Important: | You can use hcl add if you are starting with a new disk. If you already have data on your disk (for example, a filesystem with files) you can use hcl encrypt which will encrypt the contents. |
You should partition disks before using hcl add or hcl encrypt. HyTrust DataControl requires disks to be self-identifying. This is achieved by writing a private region near the start of the disk through which we can associate keys and key versions. You can use a non-partitioned disk but we strongly recommend that you do not. If disks are removed, for example, /dev/sdb is removed, /dev/sdcwill then become /dev/sdbafter the next reboot and we will not be able to retrieve the correct keys for the device. If disks are partitioned, you will not see this problem.
To add a new disk for encryption, you simply invoke hcl add as follows. Note that we add, attach and make an ext3filesystem on the disk by default. You can change the filesystem type by specifying -F fstype or you can avoid creation of a filesystem by specifying -F none.
Please note that you should only specify the short form of the device name. Here it is sdb1 and not /dev/sdb1. The short form is displayed when running hcl status.
# hcl add sdb1
WARNING: This operation will destroy the contents of the disk.
If you wish to preserve them, run "hcl encrypt" instead.
Do you want to proceed? (y/n) y

In case of error remove the disk using "hcl rm" and run "hcl add" again

Encrypted device sdb1 (/dev/sdb1) attached; decrypted contents visible at /dev/mapper/clear_sdb1

Creating file system ext3 on /dev/mapper/clear_sdb1
---------------------------------------------------
mke2fs 1.41.11 (14-Mar-2010)
...
This filesystem will be automatically checked every 22 mounts or
180 days, whichever comes first.  Use tune2fs -c or -i to override.
---------------------------------------------------
Once you have added disks for encryption you can go to the KeyControl GUI and see the disks encrypted by checking the my_ubuntu VM and then clicking the Disks tab. By default we will use AES-XTS-512 but you can also specify other ciphers as an option to hcl add using the -c option. An example is shown below with /dev/sdb1. (For details on ciphers, see Key Management Capabilities.)
# hcl add -c AES-128 sdb1
WARNING: This operation will destroy the contents of the disk.
If you wish to preserve them, run "hcl encrypt" instead.
Do you want to proceed? (y/n) y
Once devices have been added, they are listed when running hcl status as follows:
# hcl status
Summary
---------------------------------------------------
KeyControl: 10.238.32.74:443
KeyControl list: 10.238.32.74:443
Status: Connected

Registered Devices
---------------------------------------------------
Disk NameClearCipher      Status
---------------------------------------------------
sdb2/dev/mapper/clear_sdb2    AES-XTS-512     Attached
  '--> auto_attach=ENABLED, attach_handler=DEFAULT, detach_handler=DEFAULT
sdb1/dev/mapper/clear_sdb1    AES-128    Attached
 '--> auto_attach=ENABLED, attach_handler=DEFAULT, detach_handler=DEFAULT

Available Devices
---------------------------------------------------
Disk NameDevice NodeSize (in MB)
---------------------------------------------------
sde/dev/sde2048
sdd/dev/sdd2048
sdc/dev/sdc2048

Other Devices
---------------------------------------------------
Disk NameDevice NodeStatus
---------------------------------------------------
sda5/dev/sda5Mounted (swap)
sda1/dev/sda1Mounted (/)
The unencrypted path to the /dev/sdb1 disk is through /dev/mapper/clear_sdb1. Note however that the unencrypted path is not accessible when a disk is detached. The following figure summarizes the layers at which encrypted and unencrypted data is available:
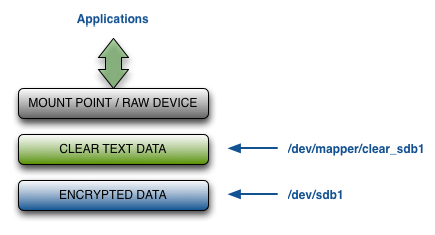
Once the encrypted device has been set up you should NOT access the unencrypted device through /dev/sdb1. The Linux kernel caches data in the kernel which may be periodically flushed. If you write to the raw device without going through the /dev/mapper interface, you could end up with corrupted data.
There is an extra option to hcl encrypt that allows us to query the filesystem, get the list of allocated blocks and only encrypt those blocks.
For example, running hcl status, we have a 2 GB disk (sdb1).
# hcl status
Available Devices
------------------------------------------------------------
Disk NameDevice NodeSize (in MB)
------------------------------------------------------------
sde/dev/sde2048
sdd/dev/sdd102
sdc1/dev/sdc19
sdb1/dev/sdb12047
Let's put a filesystem on /dev/sdb1 and add a single file to it:
# mkfs /dev/sdb1
# mount /dev/sdb1 /mnt
# cp /etc/passwd /mnt
# df -h /mnt

Filesystem      Size  Used Avail Use% Mounted on
/dev/sdb12.0G     3.1M  1.9G       1%   /mnt
# umount /dev/sdb1 /mnt
We have only used 1% of the 2GB disk. Now let's encrypt it and measure the amount of time it takes:
# time hcl encrypt sdb1
All the data on sdb1 will be encrypted
The cleartext data will be available on /dev/mapper/clear_sdb1
This operation may take long time
Do you want to proceed? (y/n) y

Encrypted device sdb1 (/dev/sdb1) attached; decrypted contents visible at /dev/mapper/clear_sdb1

total device size 2096128 KB

Processing: 100% Time left: 00:00:00
Completed encryption of sdb1 successfully

real0m49.663s
user0m0.052s
sys0m10.313s
49 seconds is not a lot of time but for real-life situations, we are often dealing with terabytes of data so downtime can be significant.
Now let's repeat the operation with the -s option:
# time hcl encrypt -s sdb1
All the data on sdb1 will be encrypted
The cleartext data will be available on /dev/mapper/clear_sdb1
This operation may take long time
Do you want to proceed? (y/n) y

Encrypted device sdb1 (/dev/sdb1) attached; decrypted contents visible at /dev/mapper/clear_sdb1

total device size 2096128 KB

Processing:   2% Time left: 00:00:49
Completed encryption of sdb1 successfully

real0m2.203s
user0m0.018s
sys0m0.267s
Note that the encryption takes only 2.2 seconds this time! And of course, since we are only encrypting the blocks that the filesystem has allocated, it will be 2.2 seconds whether the disk is 2 GB or 4 TB!
The -s option currently works for ext2, ext3 and ext4 filesystems.
On Linux, it is normal to add entries to /etc/fstab to have the filesystems automatically mount on boot. Since the HyTrust daemons start later in the boot cycle, we require a different procedure for automatically mounting filesystems on encrypted devices.
After you have added a device (hcl add/encrypt) you need to call hcl to specify the mount point and mount options. For example:
# hcl set mntpt=/my_mountpoint sdb1
# hcl set mntopts="-o rw" sdb1
hcl will check to make sure that the mount point exists and then mount the filesystem on each boot. The mntopts are passed to the mount command so if you wish to make a call such as:
# mount -t ext4 -o ro,noatime /dev/mapper/clear_sdb1 /my_mountpoint
You need to set mntopts as follows:
# hcl set mntpt=/my_mountpoint sdb1
# hcl set mntopts="-t ext4 -o ro,noatime" sdb1
You can check for the mount point and options using hcl status as follows:
# hcl status
Summary
--------------------------------------------------------------------------------
KeyControl: 192.168.140.151:443
KeyControl list: 192.168.140.151:443
Status: Connected
Last heartbeat: Fri Oct  7 09:42:58 2016 (successful)
Registered Devices
--------------------------------------------------------------------------------
Disk Name          Clear                              Cipher       Status
--------------------------------------------------------------------------------
sdb1               /dev/mapper/clear_sdb1             AES-XTS-512  Attached
'--> auto_attach=ENABLED, mntpt=/my_mountpoint, mntopts="-t ext4 -o ro,noatime", attach_handler=DEFAULT, detach_handler=DEFAULT
The default mount order is same as the order in which devices are added. On Linux, if the mntpt property is set on the device then it is also automatically mounted when they are initially registered.
This order can be changed using the devorder command. The devorder print command shows the current device order.
The devorder <up | down> diskname command enables the admin to manipulate the device attach order. If the up option is used, then the device "diskname" is shifted up in the attach order. If the down option is used, then the device is shifted to a lower position in the attach order.
If you have a device that already contains data that you want to be encrypted, you can run the hcl encrypt command instead of running hcl add. To demonstrate how this works, let's make a filesystem on /dev/sdb2, mount it, create a file and unmount it:
# mkfs /dev/sdb2
mke2fs 1.41.11 (14-Mar-2010)
Filesystem label=
OS type: Linux
Block size=4096 (log=2)
...
This filesystem will be automatically checked every 22 mounts or
180 days, whichever comes first.  Use tune2fs -c or -i to override.
# mount /dev/sdb2 /mnt
# echo hello > /mnt/my_file
# umount /mnt
Next, we call hcl encrypt. This both encrypts the device and then adds/attaches it:
# hcl encrypt sdb1
All the data on sdb1 will be encrypted
The cleartext data will be available on /dev/mapper/clear_sdb1
This operation may take long time
Do you want to proceed? (y/n) y

Encrypted device sdb1 (/dev/sdb1) attached; decrypted contents visible at /dev/mapper/clear_sdb1

total device size 1044193 KB

Processing: 100% 	Time left: 00:00:00
Completed encryption of sdb1 successfully
At this point, the encrypted device is now ready to use, so it can be mounted as follows:
# mount /dev/mapper/clear_sdb2 /mnt
# ls /mnt
lost+found/ my_file
# cat /mnt/my_filehello
If the operation did not complete because it was interrupted or the system crashed unexpectedly, running hcl encrypt again will produce the following warning:
# hcl encrypt sdb1
All the data on sdb1 will be encrypted
The cleartext data will be available on /dev/mapper/clear_sdb1
This operation may take long time
Do you want to proceed? (y/n) y

Device sdb1 already registered
WARNING: Incomplete encryption operation detected for device sdb1
Continue encryption
...and the operation will continue.
We highly recommend that before you encrypt production data you become familiar with these commands. Make sure you back up your data before encrypting devices.
If you have a device that is encrypted and you wish to remove it from HyTrust control and decrypt the contents, the process is outlined below. First of all, make sure that the disk is not mounted. While still under HyTrust control, you should run hcl decrypt as shown below:
# hcl decrypt sdb1

All the data on /dev/mapper/clear_sdb1 will be decrypted
The clear text data will be available on /dev/sdb1
This operation may take long time

Do you want to proceed? (y/n) y

total device size 1044193 KB

Processing: 100% 	Time left: 00:00:00
Completed decryption of sdb1 successfully
Removed device sdb1
At this point the disk is available as a standalone device and can be mounted using /dev/sdb1.
If you do not wish to preserve the contents of the disk, you can simply remove it as follows:
# hcl rm sdd1
WARNING: Removal of devices will cause any data stored on them to be permanently lost.
Do you want to proceed? (y/n) y

Removed device sdd1
| Important: | This operation is destructive. You will lose all data that is stored on the disk. |
There are times that you need to resize a device, for example, to increase the filesystem size. If the device is under HyTrust management, for example, /dev/sdb1, you would take the following steps, detaching the volume, resizing it, and then reattaching it and resizing the file system on top of it.
# hcl detach sdb1
Resize the underlying volume.
# hcl attach sdb1
Resize the filesystem on top of dev/mapper/clear_sdb1.
Note that you do not need to reboot the OS for these effects to take place. Remember that resizing does not work for root devices.
If you wish to resize an active disk which might contain filesystem / data on it, you can use the resize command. This will resize the crypto mapping for this disk. The resize command will match the mapping to the size of underlying device. Note that this is a Linux-only command.
The -y option to the resize command makes the command non-interactive.
For logical volumes, if you have an ext2/ext3/ext4 file system on the device myvg-myvol (an LVM volume), you can use the following sequence of operations to extend the volume and file system online.
># lvextend -L<new size> /dev/myvg/myvol
# hcl resize myvg-myvol
# resize2fs /dev/mapper/clear_myvg-myvol
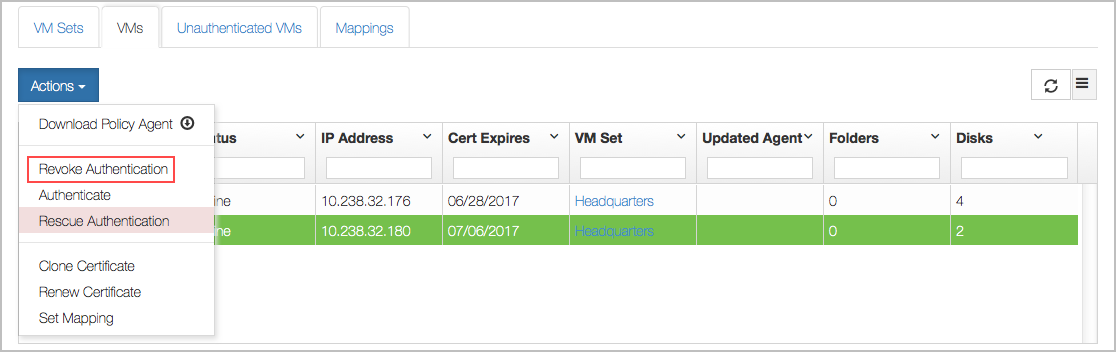
You can revoke access to all devices for a VM and prevent further access between this VM and the KeyControl cluster until it is re-authenticated. Click the Cloud Icon, and select the VM for which you want to revoke access. Then click the Actions button and Revoke Authentication, as shown below:
This VM will immediately be moved to the Unauthenticated list.
On the VM, hcl status still shows that everything's fine (Connected).
# hcl status
KeyControl: 10.238.32.74:443
KeyControl list: 10.238.32.74:443,192.168.140.152:443
Status: Connected
However, after the next heartbeat (5 minutes), the status changes as follows:
# hcl status
Summary
---------------------------------------------------
KeyControl: 10.238.32.74:443
KeyControl list: 10.238.32.74:443,192.168.140.152:443
Status: Reauth needed (Virtual Machine not authenticated)
Registered Devices
---------------------------------------------------
Disk Name    ClearCipherStatus
---------------------------------------------------
sdb1/dev/mapper/clear_sdb1AES-256     Not attached
 '--> auto_attach=ENABLED, attach_handler=DEFAULT, detach_handler=DEFAULT
sdb2/dev/mapper/clear_sdb2AES-256     Not attached
 '--> auto_attach=ENABLED, attach_handler=DEFAULT, detach_handler=DEFAULT
Filesystems on /dev/mapper/sdb1/2 have been force-unmounted and the devices have been detached. The VM needs to be re-authenticated again before the encrypted devices can be accessed. This is achieved as follows:
# hcl auth

Enter passphrase (min 16 characters): onetimepassword16chrs
Sent an authentication request to KeyControl 10.238.32.74

Please log on to the KeyControl node to complete the authentication of this node
Return to the webGUI on the KeyControl cluster, select the VM, click the Actions button, and then click Reauth VM. Give the same passphrase (onetimepassword16chrs), and it will go back to its usual place in the Cloud VM Set.
On the VM, you can now do an hcl attach -a to access your encrypted disks again.
After the VM has been moved to the Unauthenticated VMs list, if you now delete the VM (by selecting the VM and choosing Delete from the Actions menu) it will be permanently deleted from the KeyControl cluster. No re-authentication is possible, all keys are destroyed, and thus all storage using those keys is effectively useless.
There are scripts that are invoked when a device is either attached or detached. These scripts can be found under the /opt/hcs/handlers directory. The attach handler (default.attach) is invoked when a new device is attached and the detach handler (default.detach) is invoked when a new device is detached.
The default attach handler is shown below:
#!/bin/sh

# Post-attach handlers are called with at least 2 and at most 4 arguments:
# 1. the absolute path of the cleartext device e.g. /dev/mapper/clear_sda
# 2. the absolute path of the encrypted_device e.g. /dev/sda
# 3. (optional) mountpoint
# 4. (optional) mount options
# If the mountpoint and mount options are supplied, then the default handler
# will fsck and mount the cleartext device on the given mount point.

if [ $# -lt 2 -o $# -gt 4 ]; then
    exit 1
fi
if [ $# -eq 2 ]; then
    exit 0
fi

cleardev=$1
if [ $# -ge 3 ]; then
    mntpt=$3
fi
if [ $# -eq 4 ]; then
    mntopts=$4
fi

fsck -a "$cleardev"
if [ $? -eq 0 ]; then
    mount $mntopts "$cleardev" "$mntpt"
else
    exit 2
fi
The mount point and mount options are collected along with the clear-text path to the device and a mount call is made.
The handlers can be changed freely. We recommend that you back up your handlers, using your preferred backup solution.