KeyControl Installation on Amazon Web Services
Introduction
This document provides you with detailed steps to deploy the full range of KeyControl instances in Amazon Web Services (AWS).
Deploying a KeyControl node into Amazon Web Services (AWS) requires setting up several components depending on the type of the deployment. The following topics provide step-by-step directions for each of the deployment types, starting with the initial KeyControl node, then adding an Elastic Load Balancer and adding nodes in the same Availability Zone, a different Availability Zone, and a different Region.
NOTE: In addition to encrypting regular data partitions, you can also encrypt your root and swap partitions. Encrypting root and swap partitions ensures that clear-text data never leaves the VM on its way to storage. This prevents virtualization and storage admins from being able to view the data. For details, see Encrypting Root and Swap Drives on AWS
- Deploying an Initial KeyControl Node
- Deploying an Elastic Load Balancer (ELB)
- Adding a KeyControl Node to a Cluster in the Same Availability Zone
- Adding a KeyControl Node to a Cluster in a Different Availability Zone
- Adding a KeyControl Node to a Cluster in a Different Region
Deploying an Initial KeyControl node
To begin with, you need to have an existing account on Amazon Web Services. You will start by logging in to that account.
Log on to Amazon Web Services with an Existing Account
- Point your browser at: https://aws.amazon.com/
- On the menu bar, click My Account from the My Account / Console drop-down menu. Your company name should already be filled in.
- Enter the User Name and Password that your Security Administrator supplied to you. Note that your User Name does not have a domain (@companyname.com, for example). The Services menu appears.
- Click Services > EC2.

Select a region
- Log on to your EC2 account.
- Navigate to the EC2 Console Dashboard.
- At the top right of the EC2 Dashboard, click your deployment region from the drop-down list. In the example below, US West (Oregon) is chosen, but you should choose based on your needs.

Create a Key Pair
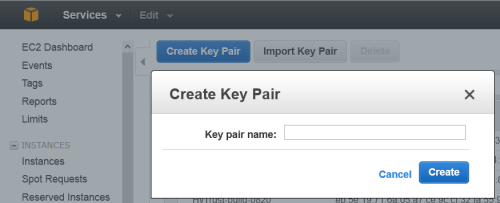
- From the EC2 Dashboard, click Key Pairs from the navigation panel.
- Click Create a Key Pair.
- Create a name for the Key Pair.
- Click Create.
- The private key file is created and you may get the option to Open it or Save it. Choose Save File, if you have that option. The likelier case is that it is downloaded automatically. The screen shot below shows the Firefox download dialog box.
The Key Pair is automatically downloaded by your browser as a
.pemfile into the default download location for your system. Save your.pemfile. The base file name is the name you specified as the name of your Key Pair, and the file name extension is.pem. Save the private key file in a safe place; you will refer to it at various points in your interaction with your system.

Create a VPC
- Navigate to Console Home (yellow cube) at top left of the Dashboard.
- Under Networking, click VPC (Isolated Cloud Resources).
- From the VPC Dashboard, click Start VPC Wizard.
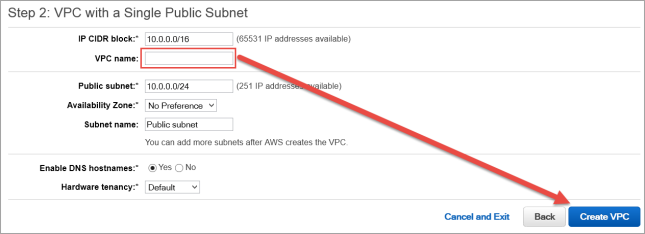
- Click Select to set up VPC with a Single Public Subnet.
- By default, when a VPC is created, an Internet Gateway is automatically assigned to it. If the assigned gateway and/or IP block is insufficient, you can modify the IP block and subnet information according to your needs. You can also create a new Internet Gateway and assign it to your VPC. Note: In order for two VPCs to communicate, there should not be any overlapping IP addresses between the two VPCs. A good example is
50.0.0.0/16and100.0.0.0/16. - Give your VPC a name.
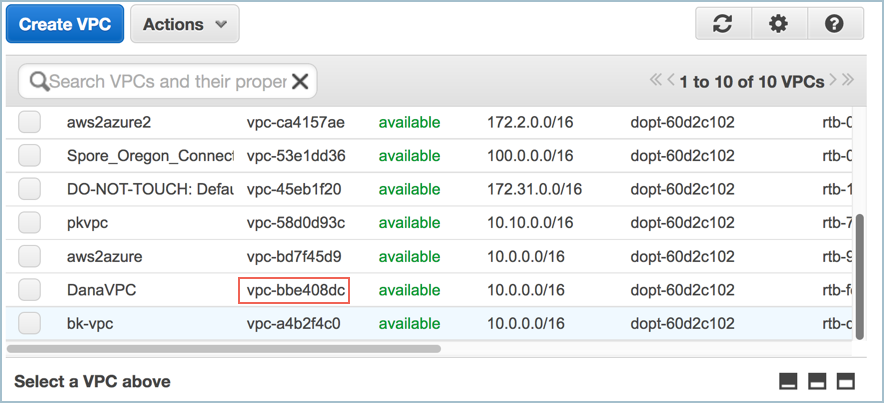
- Click Create VPC, and then click OK. Note the VPC ID.


Create a Security Group
As part of VPC creation a default Security Group is assigned to your VPC. For KeyControl communication, it is recommended to create a Security Group that only enables certain inbound services/ports.
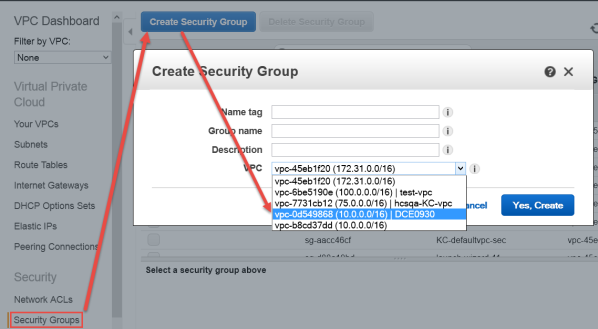
- From the VPC Dashboard, under Security, click Security Groups.
- Click Create Security Group.
- Create a Name and Description for the Security Group.
- Select the VPC ID from the drop-down list, selecting the VPC that was just created above. Make sure No VPC is NOT selected.
- Click Yes, Create.
Add rules to your Security Group
- In the Security Group page, click the Security Group that was just created.
- Click the Inbound Rules tab.
-

- Click Edit.
The Edit inbound rules dialog box appears.
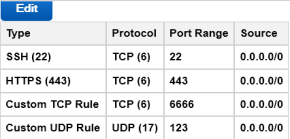
- Click SSH from the drop-down Type menu.
- For Source, enter
0.0.0.0/0 - Click Add another rule.

- Click HTTPS from the drop-down Type menu.
- For Source, enter
0.0.0.0/0 - Click Add another rule.
- Click Custom TCP rule from the drop-down Type menu.
- Type 6666 as the Port Range.
- For Source, enter
0.0.0.0/0 - Click Add another rule.
- Click Custom UDP Rule.
- Type 123 as the Port Range.
- For Source, enter
0.0.0.0/0 - Click Save.
The end result should look like this:
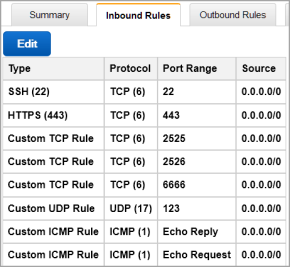
If this KeyControl instance will be deployed in a cluster, the following rules must be implemented in addition to the above list:
- ICMP Echo Reply
- ICMP Echo Request
- TCP port 2525
- TCP port 2526
- TCP port 8443
The final result should look like this:
NOTE: The above is an example of inbound traffic rules for an AWS Security Group. These ports are open to the world, as indicated by their 0.0.0.0/0 CIDR notation, merely for demonstration purposes. Important: It is the responsibility of the administrator to open these ports only to the IP addresses that are absolutely necessary to connect to the KeyControl instance.
Create an EIP address
AWS has two separate pools for Elastic IP (EIP) addresses: one pool is for EC2-Classic, and the other for EC2-VPC. It is crucial to allocate the EIP for KeyControl from the EC2-VPC pool.
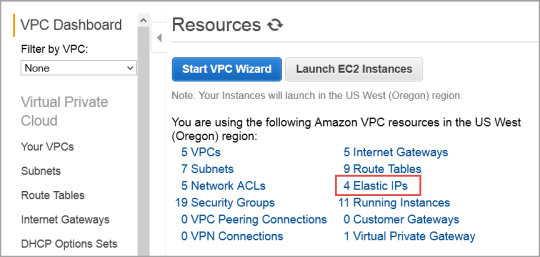
- From the VPC Dashboard (Services > VPC ),click Elastic IPs.
- Click Allocate New Address.
- Click Yes, Allocate. Make a note of the allocated EIP.

It should display that the EIP is for VPC usage and not EC2. This appears in the Scope column.

Launch an instance
- From VPC Dashboard, click Launch EC2 Instances.
- From Step 1: Choose an Amazon Machine Image (AMI) dialog box, click AWS Marketplace, and type HyTrust in the search box. Press Enter:

- A list of HyTrust DataControl AMIs appears. Read the descriptions, and pick one by clicking Select. For this tutorial, we clicked the first one listed, HyTrust DataControl for AWS 5VM.
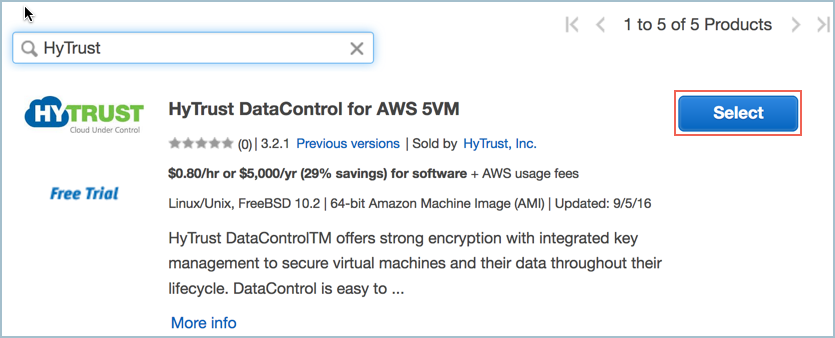
- The Pricing Details page appears, which outlines the costs of various instances. Click Continue.
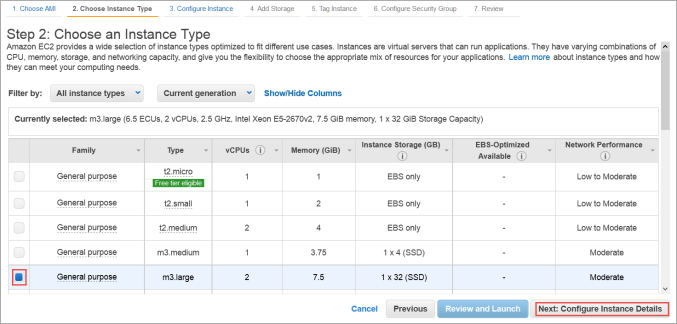
- The Step 2: Choose an Instance Type dialog box appears.
- From the list of Instance Types, click m3.large or whatever best fits the bandwidth/latency requirements you desire.
- Click Next: Configure Instance Details.
- The Step 3: Configure Instance Details dialog box appears.
- Select your VPC ID as the Network used for launch.
- Number of instances should be 1.
- Make sure Auto-assign Public IP is NOT set. Click Disable.
- Click Next: Add Storage.
- The Step 4: Add Storage dialog box appears.
- Root device with all defaults works fine. There is no need to change anything.
- Click Next: Tag Instance.
- The Step 5: Tag Instance dialog box appears.
- If you wish to add key-value tags to your instance, do so.
- Click Next: Configure Security Group.
- The Step 6: Configure Security Group dialog box appears.
- In Assign a Security Group click Select an existing Security Group.
- Select the Security Group you created above.
- Click Review and Launch.
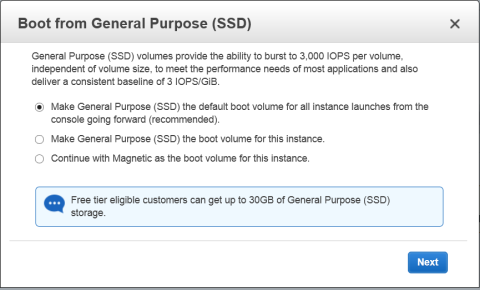
- The Boot from General Purpose (SSD) dialog box appears.
- Click on your choice of boot volume for this instance, and then click Next.
- The Step 7: Review and Launch dialog box appears.
- Review your settings, paying particular attention to the IP address ranges you have open to external browsers. Your current settings, set at
0.0.0.0/0, are "open to the world." - When you are satisfied with your settings, click Launch.
- The Select an existing key pair or create a new key pair dialog box appears:




- When asked to click a Key Pair, click Choose an existing Key Pair.
- Select the Key Pair that you created earlier.
- Click the checkbox acknowledgment that you have access to this Key Pair.
- Click Launch instances.

Associate the EIP address to the instance
- Once the newly launched instance is in initializing state, note its Instance ID.
- From the VPC Dashboard, in the center of the screen, click Elastic IPs.
- The Allocate New Address dialog box appears.
- Click Allocate New Address. You are asked to confirm. Click Yes, Allocate.
- The Allocate New Address appears again, but this time with a new address filled in.
- Click Associate Address.
- The Associate Address dialog box appears.
- In the instance drop-down box, click the instance ID that was launched above.
- Click Yes, Associate.
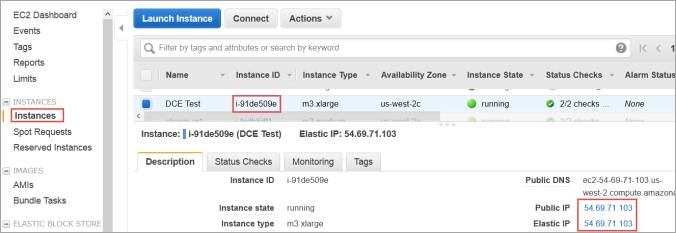
- Click Instances from the EC2 Dashboard.
- Click the Instance ID.
- When the Elastic IP of the instance appears, it indicates that the EIP is now associated with the instance. Note that the public IP has the same address, which you will use after completing the next steps in the KeyControl system menus.



Connect to the KeyControl system menus
Use ssh to log into the new KeyControl menu system. You will use the key pair associated with the VPC and the EIP associated with the instance. Use the login ID sysmenus. The initial password is sysmenus. Issue the following command from your UNIX shell:
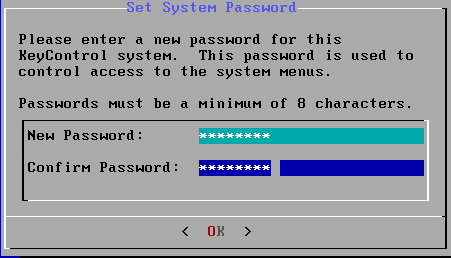
#ssh -i <my_key> -l sysmenus <my_EIP>- You will first be prompted to change the KeyControl menu system's password (you cannot continue to use the initial
sysmenus password). You will be required to enter the password twice. Passwords must be a minimum of eight characters.
- The
menus to which the root/password combination enables access are where diagnostics and settings can be manipulated for this system during its lifetime. Without the password, access to the system for these tasks is impossible. It is critical that the password be stored safely somewhere.
- The last step in configuration is choosing whether
you are going to add this new KeyControl instance as a new node to an existing cluster:
- If you choose to add this new KeyControl instance as a new node in an existing cluster, follow the directions
here: Joining a KeyControl Cluster
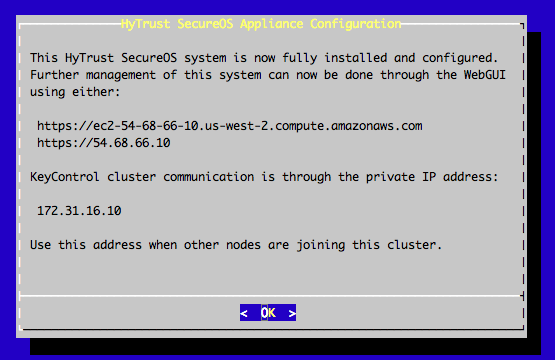
- If this is your first KeyControl system and you respond No to this prompt, your system is fully configured and you will
see the last of these post-install menus pointing you to the webGUI interface:
- After this, you are brought to the main menu for the system menuing. At this point you can choose to log out. Remember that further access to the system menus requires the password that you just set up.
Note that this is not a general login account. Since this is a secure node, you cannot get a shell prompt, and only have access to a basic menu system that allows for hardware change, network setup and general debugging capabilities. We cover these topics later.

The next step: the webGUI
Further configuration takes place in the webGUI. Instructions appear here: Logging into the webGUI for the First Time You will use the IP address of your instance.
Note on upgrading: Upgrades for AWS users must be done using the webGUI, shown here: Upgrading a Single KeyControl Node Using the WebGUI You may read elsewhere of upgrading using an ISO image. That form of upgrade is not available for AWS installations.