Adding a KeyControl Node to a Cluster in the Same Availability Zone on Amazon Web Services
Introduction
The following components are required prior to adding a new KeyControl node to an existing KeyControl cluster.
- One or more running KeyControl nodes.
- ID of the VPC where the existing KeyControl node runs.
- ID of the Security Group of the existing KeyControl server.
- Key Pair of the existing KeyControl node/cluster.
- Internal IP address of a KeyControl server in the existing cluster.
Log on to Amazon Web Services with an existing account
To begin with, you need to have an existing account on Amazon Web Services. You will start by logging in to that account.
For details, see Log on to Amazon Web Services with an Existing Account, elsewhere in this guide.
Select the region where your existing KeyControl node resides
- Log on to your EC2 account.
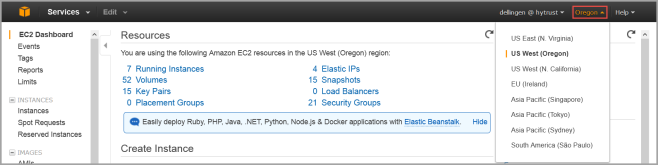
- Navigate to the EC2 Console Dashboard.
- At the top right of the EC2 Dashboard, click your deployment region from the drop-down list. In the example below, US West (Oregon) is chosen, but you should choose based on the location of your existing KeyControl Node.
Modify your Security Group
- In order to allow communication between KeyControl servers, certain rules must be added to the Security Group of the existing KeyControl cluster.
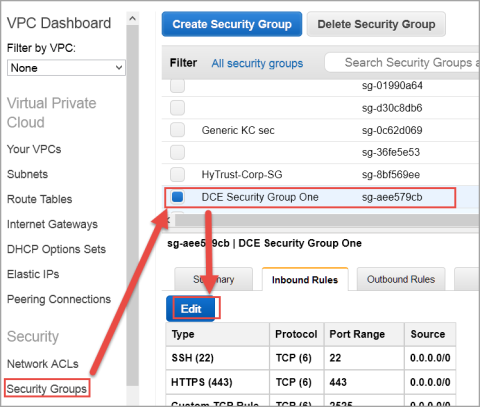
- From the VPC Dashboard, click Security Groups.
- From the list of Security Groups in the table, click the Security Group of the existing KeyControl server.
- Click the Inbound tab, and review the rules that exist. If they do not look like the following image, add more rules, as shown below.
- If there is no Custom ICMP rule with Echo Reply in the Port Range column in the rules table on the right, create one, as follows:
- Click Edit.
- Click Add Rule.
- Click Custom ICMP Rule from the drop down menu.
- Click Echo Reply as Port Range.
- Select a Source of Anywhere or enter an IP range that includes all members of the cluster.
- If there is no Custom ICMP rule with a Port Range of Echo Request in the rules table on the right, create one, as follows:
- Click Add Rule.
- Click Custom ICP Rule from the drop down menu.
- Click Echo Request as the Port Range.
- Select a Source of Anywhere or enter an IP range that includes all members of the cluster.
- If there is no Custom TCP rule with a Port Range of 2525 in the rules table on the right, create one, as follows:
- Click Add Rule.
- Click Custom TCP rule from the drop down menu.
- Click 2525 as the Port Range.
- Select a Source of Anywhere or enter an IP range that includes all members of the cluster.
- If there is no Custom TCP rule with a Port Range of 2526 in the rules table on the right, create one, as follows:
- Click Add Rule.
- Click Custom TCP rule from the drop down menu.
- Click 2526 as the Port Range.
- Select a Source of Anywhere or enter an IP range that includes all members of the cluster.
- If there is no Custom TCP rule with a Port Range of 6666 in the rules table on the right, create one, as follows.
- Click Add Rule.
- Click Custom TCP rule from the drop down menu.
- Click 6666 as the Port Range.
- Select a Source of Anywhere or enter an IP range that includes all members of the cluster.
- Click Save, and review your end result to ensure that it looks like this:


NOTE: The above is an example of inbound traffic rules for an AWS Security Group. These ports are open to the world, as indicated by their 0.0.0.0/0 CIDR notation, merely for demonstration purposes. Important: It is the responsibility of the administrator to open these ports only to the IP addresses that are absolutely necessary to connect to the KeyControl instance. When restricting inbound network traffic for security purposes and your KeyControl nodes do not reside in the same VPC (that is, if they reside in different availability zones, or different regions, or on a different VPC in the same availability zone) you must add rules to your Security Group so that each node allows inbound network traffic from the VPC subnet of other KeyControl nodes.
- For example if your KeyControl_Node1 resides in a VPC with subnet 172.31.68.0/24 and KeyControl_Node2 resides in another VPC with subnet 90.232.96.0/24, then the Security Group rule for KeyControl_Node1 must allow:
- Inbound network traffic from 90.232.96.0/24 (or a range containing KeyControl_Node2) for protocols/ports TCP/2525, TCP/2526, ICMP/Echo Request, and ICMP/Echo Reply.
- Similarly, KeyControl_Node2 must allow inbound network traffic from 172.31.68.0/24 (or a range containing KeyControl_Node1).
Create an EIP address
For step-by-step details, see Create an EIP address
Launch an instance
- From the VPC Dashboard, click Launch EC2 Instances.
-
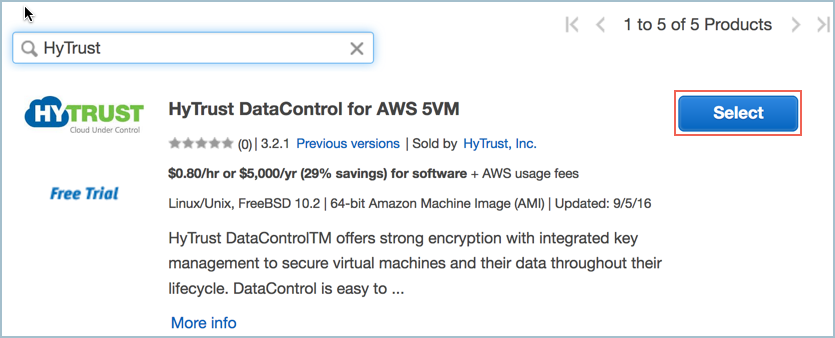
From Step 1: Choose an Amazon Machine Image (AMI) dialog box, click AWS Marketplace, and type HyTrust in the search box. Press Enter:

- A list of HyTrust DataControl AMIs appears. Read the descriptions, and pick one by clicking Select. For this tutorial, we clicked the first one listed, HyTrust DataControl for AWS 5VM.
- A list of HyTrust DataControl AMIs appears. Read the descriptions, and pick one by clicking Select. For this tutorial, we clicked the first one listed, HyTrust DataControl for AWS 5VM.
- The Step 2: Choose an Instance Type dialog box appears.
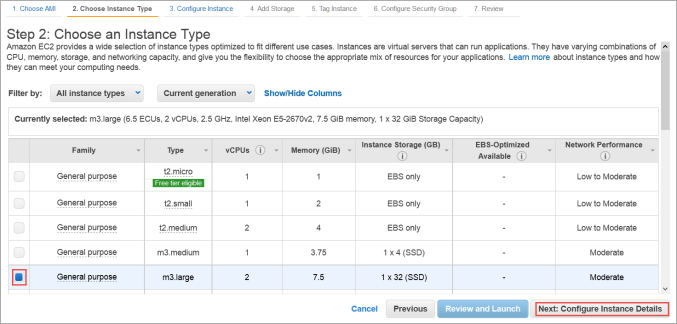
- From the list of Instance Types, click m3.large or whatever best fits the bandwidth/latency requirements you desire.
- Click Next: Configure Instance Details.
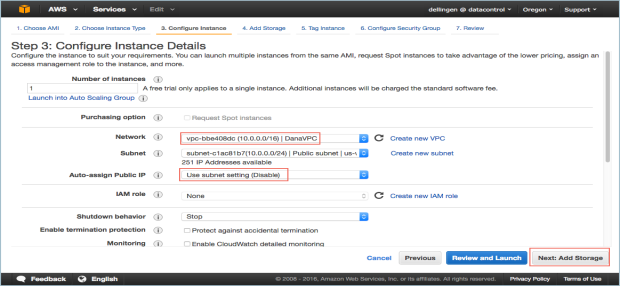
- The Step 3: Configure Instance Details dialog box appears.
- Click your VPC ID as the Network used for launch.
- Number of instances should be 1.
- Make sure Auto-assign Public IP is NOT set. Click Disable.
- Click Next: Add Storage.
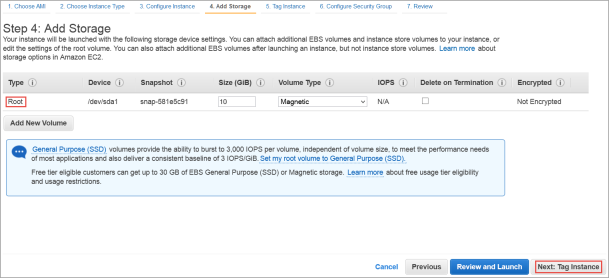
- The Step 4: Add Storage dialog box appears.
- Root device with all defaults works fine. There is no need to change anything.
- Click Next: Tag Instance.
- The Step 5: Tag Instance dialog box appears.
- If you wish to add key-value tags to your instance, do so.
- Click Next: Configure Security Group.
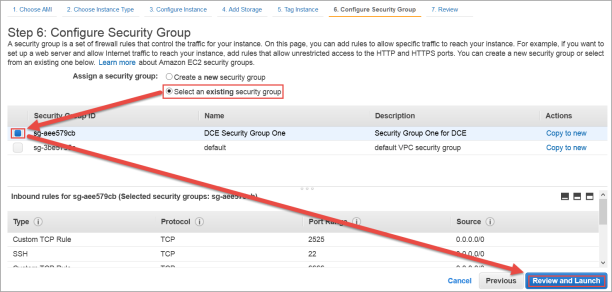
- The Step 6: Configure Security Group dialog box appears.
- In Assign a Security Group click Select an existing Security Group.
- Select the Security Group of the existing KeyControl node.
- Click Review and Launch.
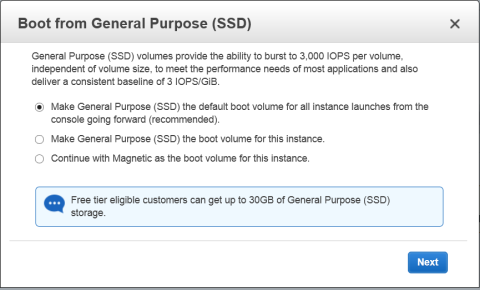
- The Boot from General Purpose (SSD) dialog box appears.
- Click on your choice of boot volume for this instance, and then click Next.
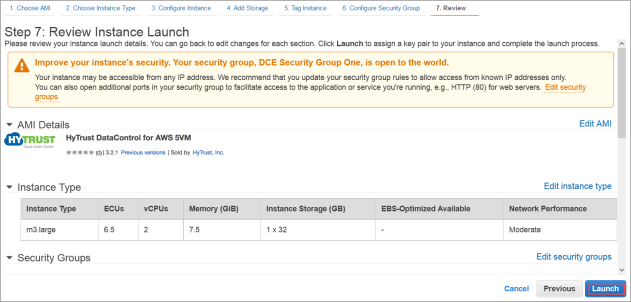
- The Step 7: Review and Launch dialog box appears.
- Review your settings, paying particular attention to the IP address ranges you have open to external browsers. Your current settings, set at
0.0.0.0/0, are "open to the world." - When you are satisfied with your settings, click Launch.
- The Select an existing key pair or create a new key pair dialog box appears:
- When asked to click a Key Pair, click Choose an existing Key Pair.
- Select the Key Pair used for the existing KeyControl node.
- Click the checkbox acknowledgment that you have access to this Key Pair.
- Click Launch instances.


Associate the EIP to the instance
- Once the newly launched instance is in initializing state, note its Instance ID.
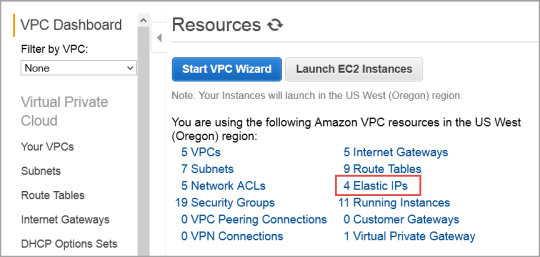
- From the VPC Dashboard, in the center of the screen, click Elastic IPs.
- Click Associate Address.
- The Associate Address dialog box appears.
- In the instance drop-down box, click the instance ID of the new KeyControl node.
- Click Yes, Associate.
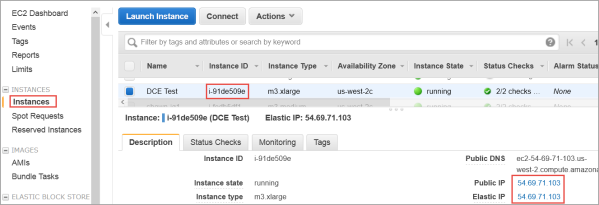
- Click Instances from the EC2 Dashboard.
- Click the Instance ID.
- When the Elastic IP of the instance appears, it indicates that the EIP is now associated with the instance. Note that the public IP has the same address, which you will use after completing the next steps in the KeyControl system menus.


Connect to the Instance console and install
Use ssh to log into the new KeyControl menu system. You will use the key pair associated with the VPC and the EIP associated with the instance. Use the login ID sysmenus. The initial password is sysmenus. Issue the following command from your UNIX shell:
#ssh -i <my_key> -l sysmenus <my_EIP>- You will first be prompted to change the KeyControl menu system's password (you cannot continue to use the initial
sysmenus password). You will be required to enter the password twice. Passwords must be a minimum of eight characters.

- The
menus to which the root/password combination enables access are where diagnostics and settings can be manipulated for this system during its lifetime. Without the password, access to the system for these tasks is impossible. It is critical that the password be stored safely somewhere.
- Note that this is not a general login account. Since this is a secure node, you cannot get a shell prompt, and only have access to a basic menu system that allows for hardware change, network setup and general debugging capabilities. We cover these topics later.
- The last step in configuration is choosing whether
you are going to add this new KeyControl instance as a new node to an existing cluster:
- You do want to add this system as a new node in an existing cluster, so you should click Yes, and follow the directions
here: Joining a KeyControl Cluster

Connect to GUI of first KeyControl node and authenticate the new KeyControl node
At this point you need to log on to the webGUI of first KeyControl node/cluster with Domain Administration privileges. The new KeyControl node will automatically appear as an unauthenticated node in the KeyControl cluster, as shown below, which appears when you click the Cluster Icon:
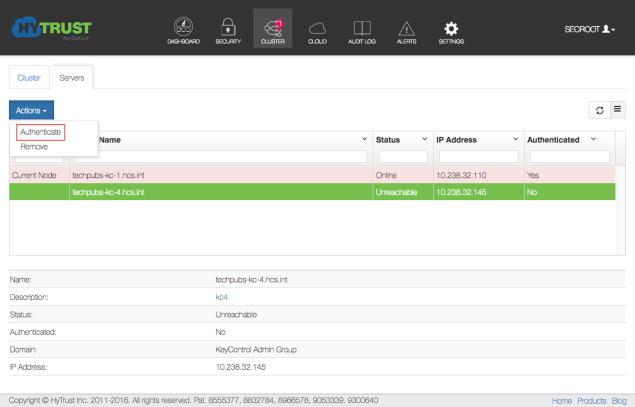
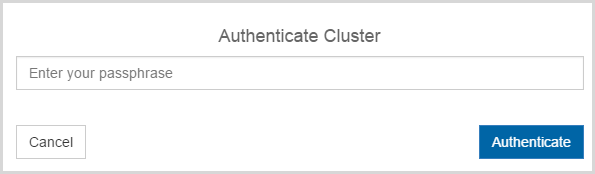
To authenticate this new node, click the Actions Button and then click Authenticate. This will take you to the authentication screen shown below. You are prompted to enter the Authentication Passphrase.
Once authentication completes, the KeyControl node is listed as Authenticated but Unreachable until cluster synchronization completes and the cluster is ready for use. This should not take more than a minute or two.
Once the KeyControl node is available, the status will automatically move to Online and the cluster icon will change from a red lightning bolt to a green heart with the number 2 inside of it, to indicate that there are two KeyControl nodes:

At this point, the new cluster/node is ready to use.
Resizing Your VM
1. To expand your VM on AWS, begin by following the AWS instructions, here:
http://docs.aws.amazon.com/AWSEC2/latest/UserGuide/ebs-expand-volume.html
Follow the instructions on the AWS side to extend the volume using the snapshot-create new volume-attach process given there.
2. On the Linux side, after you attach the extended EBS volume to the VM, power on the VM from console.
3. The further process is different for LVM and MBR partitions. Note that the rest of the process is valid for non-AWS VMs as well. The process for an MBR partition is more involved.
Process for MBR partition
1. MBR partitions do no allow you to extend the volume when the file system is mounted, so first you must unmount the file system.
2. We assume an EBS volume of “xvdb” and I create a partition using fdisk named “xvdb1”
3. Unmount the file system.
4. Run e2fsck -f /dev/mapper/clear_xvdb1”to clean the file system. Note that the device path of clear text device is used.
5. Run hcl detach xvdb1 to detach the device.
6. Run fdisk xvdb. Remove the existing xvdb1 and re-create a new xvdb1 with extended size. Note this is a very delicate change, you need to ensure that all partition parameters remain the same for the new partition, especially the “start” sector number.
7. Save this configuration and exit from fdisk.
The output for this case appears below:
[root@ip-172-31-47-53 centos]# fdisk /dev/xvdb
Welcome to fdisk (util-linux 2.23.2).
Changes will remain in memory only, until you decide to write them.
Be careful before using the write command.
Command (m for help): p
Disk /dev/xvdb: 2147 MB, 2147483648 bytes, 4194304 sectors
Units = sectors of 1 * 512 = 512 bytes
Sector size (logical/physical): 512 bytes / 512 bytes
I/O size (minimum/optimal): 512 bytes / 512 bytes
Disk label type: dos
Disk identifier: 0x53eed97f
Device Boot Start End Blocks Id System
/dev/xvdb1 2048 2097151 1047552 83 Linux
Command (m for help): d
Selected partition 1
Partition 1 is deleted
Command (m for help): n
Partition type:
p primary (0 primary, 0 extended, 4 free)
e extended
Select (default p):
Using default response p
Partition number (1-4, default 1):
First sector (2048-4194303, default 2048):
Using default value 2048
Last sector, +sectors or +size{K,M,G} (2048-4194303, default 4194303):Using default value 4194303
Partition 1 of type Linux and of size 2 GiB is set
Command (m for help): w
The partition table has been altered!
Calling ioctl() to re-read partition table.
7. run “partprobe” to update the kernel tables. Ensure that part probe returns success.
8. Attach the partition again using “hcl attach xvdb1”
9. resize the file system using "resize2fs /dev/mapper/clear_xvdb1”
10. mount the file system.
The process is much simpler if you are using LVM.
Process for an LVM volume
1. Extend (pvresize) the physical volume which was extended using the AWS EC2 console. We used xvdb.
[root@ip-172-31-21-113 centos]# pvsPV VG Fmt Attr PSize PFree
/dev/xvdb testvg lvm2 a-- 7.00g 164.00m
[root@ip-172-31-21-113 centos]# pvresize /dev/xvdb
Physical volume "/dev/xvdb" changed
1 physical volume(s) resized / 0 physical volume(s) not resized
[root@ip-172-31-21-113 centos]# pvs
PV VG Fmt Attr PSize PFree
/dev/xvdb testvg lvm2 a-- 9.00g 712.00m
2. Extend the volume using lvextend.
[root@ip-172-31-21-113 centos]# lvextend -L8500M /dev/testvg/testlv
Size of logical volume testvg/testlv changed from 6.84 GiB (1750 extents) to 8.30 GiB (2125 extents).
Logical volume testlv successfully resized.
3. Resize the attached volume using hcl resize.
[root@ip-172-31-21-113 centos]# hcl resize testvg-testlv
Warning: Resizing active device incorrectly can cause any data stored on them to become inaccessible
Do you want to proceed? (y/n) y
Device testvg-testlv was successfully resized
Updating the KC with the size (8704000 KB) of the device
Successfully updated the KC with size (8704000 KB) of the device testvg-testlv
4. Extend the file system using resize2fs.
[root@ip-172-31-21-113 centos]# resize2fs /dev/mapper/clear_testvg-testlv
resize2fs 1.42.9 (28-Dec-2013)
Filesystem at /dev/mapper/clear_testvg-testlv is mounted on /mnt; on-line resizing required
old_desc_blocks = 1, new_desc_blocks = 1
The filesystem on /dev/mapper/clear_testvg-testlv is now 2176000 blocks long.
[root@ip-172-31-21-113 centos]
# df -h /mnt
Filesystem Size Used Avail Use% Mounted on
/dev/mapper/clear_testvg-testlv 8.1G 16M 7.7G 1% /mnt