Contents
- Introduction
- KeyControl Clusters and Nodes
- Installing Additional KeyControl Nodes
- Upgrading KeyControl Nodes
Introduction
This chapter covers adding new nodes to the KeyControl cluster and upgrading nodes in the cluster.
KeyControl Clusters and Nodes
KeyControl nodes can operate singly, but usually operate as part of an active-active cluster. We support any number of nodes in the cluster. Most customers deploy two nodes which can often be in different geographic environments. For example, we have a customer with a KeyControl node in Atlanta and one in Dallas.
You can log into any node in the cluster and make changes that will be automatically replicated across all other nodes in the cluster. If you log out of one node and into another, everything will look identical. Adding or removing nodes from the cluster is a very simple operation and will only take a few minutes for adding and a few seconds for deleting.
One question that comes up often is “What happens if there is a network break between the nodes?” The cluster has a "cluster operation timeout value”. Each node is heartbeating the others constantly. If communication is lost after the timeout, the cluster goes into “degraded mode”. You can review cluster configuration and timeout setting by clicking the Cluster icon, and then clicking on the cluster you want to check. The health of the KeyControl cluster shows on the Cluster Icon, as shown below:

Here you can see that the cluster Status is “Healthy.” The Cluster icon shows a green heart with the number "2" inside of it, to indicate that there are two nodes in the cluster.
If KeyControl nodes cannot talk to each other, the Status switches to “Degraded.” When the cluster is in degraded mode, you can still view everything, keys can be delivered, but changes cannot be made. You will also get an email alert to let you know that the cluster needs attention. If the cluster were in degraded mode, there would be a red "X" across the Cluster Icon. Here is a cluster in degraded mode:

Network latency can be managed by modifying the cluster operation timeout value. By default it is set to 5 seconds, which is a pretty high value. Typically, network latency is measured in milliseconds. Based on the clusters we have deployed at Amazon, N. California to Oregon was under ~100ms, North Virginia to Oregon was around ~200ms. N. California to Ireland was over ~280ms. The values varied based on time of day and the day of the week but the values are still considerably less than 5 seconds. If delays are consistently above 5 seconds, there is a network problem somewhere or the node is down.
To change the timeout value, click on the Settings icon and then click Cluster timeout. Deploying multiple nodes in a cluster is very simple. For customers who are concerned about network latency, just spin up another KeyControl VM and monitor to see if the cluster goes into degraded mode.
See also: Managing Clusters
Installing Additional KeyControl Nodes
The process for installing additional KeyControl node is similar to installing the first KeyControl node but has an additional authentication step.
Initial installation is described here: Managing KeyControl Nodes.
Once installation has completed and the system has rebooted, you will be prompted to select the system type as follows:

Select option 2 and confirm your selection and press Enter:

Next, you set up the console menu password and set up networking following the procedures you used in setting up the first KeyControl node.
Joining a KeyControl Cluster
At this point, the new KeyControl node needs to be authenticated with the KeyControl cluster. The following screen appears informing you of the need for authentication. You will need the IP address of another KeyControl node in the cluster.

The first thing to enter is a description ("hint") for this node. This allows you to specify information about
the new KeyControl node being installed. For example, it could be location information such as "This is the KeyControl in the Miami data center." When you go to the webGUI to authenticate this node, this description is displayed.

The next piece of information to enter is the IP address of any KeyControl node in the existing cluster:

The final piece of information required is the passphrase itself. We require a minimum of 16 characters. If you knowingly type a passphrase incorrectly, you can hit CTRL+C and select the Re-authenticate This System option in the console menu.

The node must now be authenticated through the webGUI, as the following message indicates:

At this point you need to log on to the webGUI with Domain Administration privileges. The new KeyControl node will automatically appear as an unauthenticated node in the KeyControl cluster, as shown below:
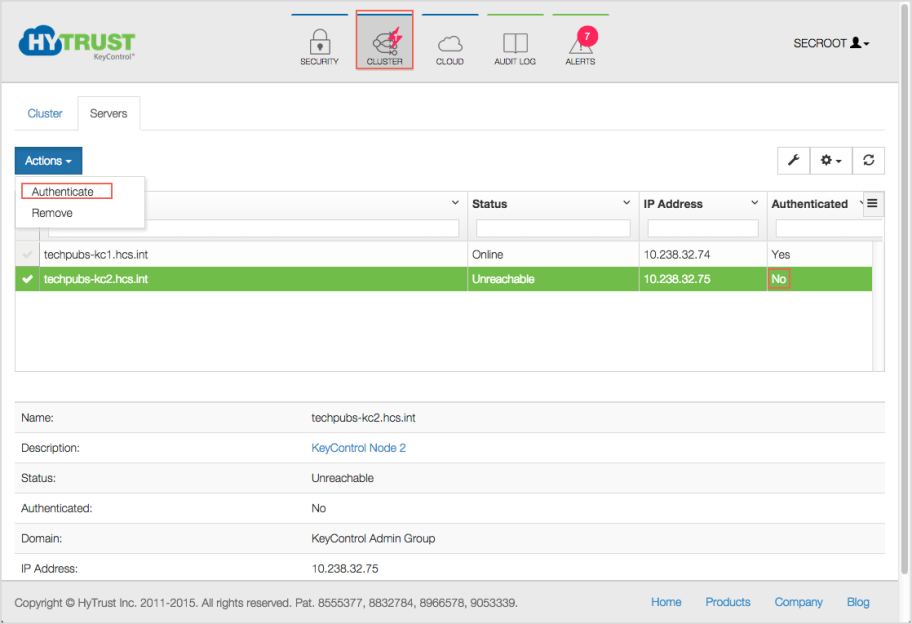
To authenticate this new node, click the Actions Button and then click Authenticate. This will take you to the authentication screen shown below. You are prompted to enter the Authentication Passphrase.

On the new KeyControl's console, you will see a succession of status messages, as shown here:

This is followed on the new KeyControl's console by the standard console menu:

Once authentication completes, the KeyControl node is listed as Authenticated but Unreachable until cluster synchronization completes and the cluster is ready for use. This should not take more than a minute or two. Then it will show as Authenticated and Online.

Once the KeyControl node is available, the status will automatically move to Online and the cluster status at the top right of the screen will change back to Healthy.
At this point, the new cluster/node is ready to use.

Upgrading KeyControl Nodes
All KeyControl nodes must operate at the same software version. Prior to upgrade, we recommend that you back up the KeyControl cluster. Please refer to the KeyControl Backup and Restore chapter for further information.
We only support upgrade of a single KeyControl node at this time. Also, you can only upgrade between successive versions. For example, upgrade from 2.7 or 2.7.1 to 3.0 is valid but 2.6 to 3.0 will be rejected. However, you can upgrade from 2.6 to 2.7.x, and from that version to 3.0.
Note on upgrading for AWS users: Upgrades for AWS users must be done using the webGUI, shown below. Other users can use the webGUI or the ISO upgrade. Instructions for the ISO upgrade appear in the Upgrading a Single KeyControl Node Using an ISO Image.
You should follow the steps listed below for upgrading your KeyControl nodes and clusters:
- Back up the KeyControl cluster. You can take a backup image from any node.
- Reduce the cluster to a single node. Removing cluster nodes is described below. Shut down all nodes that you have removed.
- Upgrade the remaining KeyControl node by following the appropriate instructions below:
- Upgrading a Single KeyControl Node Using the WebGUI
- Upgrading a Single KeyControl Node Using an ISO Image
- Install (from scratch) each additional node in the cluster. Adding the KeyControl nodes to the cluster will result in all objects being propagated to the newly joined nodes. Installing new KeyControl nodes in the cluster should only take a minute or two.
To remove a KeyControl node from the cluster, select the Cluster icon, select the Servers tab, and choose one of the KeyControl nodes to remove. Note that the node you are logged in on appears with a red-shaded background, which helps you to know which ones are safe to remove. Then click the Action button and click Remove, as the following figure shows:

NOTE - if you are using the Policy Agent, you need to make sure that you manage the KeyControl list on each agent. If you are upgrading an N-Node cluster and will return to the same N-Node cluster after upgrade, there is nothing that you need to do. However if you are changing IP addresses or changing the number of KeyControl nodes, please update the KeyControl list accordingly. Please refer to the Managing the KeyControl List of the Policy Agent chapter for further information.
Upgrading a Single KeyControl Node Using the WebGUI
Upgrading a KeyControl node is a very simple process that should take less than five minutes to complete. However, if your data connection is very slow and it is likely to take longer than five minutes to upload the upgrade bundle, a timeout will prevent completion. In that case, upgrade using an ISO image, as shown in Upgrading a Single KeyControl Node Using an ISO Image.
To upgrade using the webGUI, click the Settings icon and then click Upgrade.

The System Upgrade dialog box presents you with a information about the upgrade process, and prompts you to browse to your upgrade file. When you have found the file, click Upload file.

When the upgrade finishes, you are prompted to reboot to finalize the change.
Reverting to the Previous Version Using the webGUI
The process of reverting to the previous version follows the same process as shown above. Here is the System Upgrade dialog box for reverting:

Click the Revert Upgrade tab. A message appears that a Revert is Pending. It is only possible to revert to the previous version, nothing further back. As with Upgrade, a reboot is required to finalize the change.
Warning: Any changes to the KeyControl node will be lost if you revert. This includes any keys or other objects created since upgrade. They will no longer exist.
Upgrading a Single KeyControl Node Using an ISO Image
Upgrading a KeyControl node is a very simple process, whether done through the webGUI, shown above, or through using an ISO image, shown here.
Begin by shutting down the KeyControl node that you are going to upgrade.
The CD/DVD containing the ISO image must be inserted into the drive (or attached to the VM) and the system should be bootstrapped. Once the system comes up, you will see the following menu:

Select option 1 and press Enter. The installer will check to make sure that the system can be upgraded and then perform the upgrade, which should not take more than a minute or so. Prior to actually performing the upgrade you will see a screen similar to the following:

Note: You should back up your KeyControl nodes and remove all nodes from the cluster through the GUI with the exception of the node being upgraded. If another node still exists in the cluster you will see the following warning screen (HyTrust strongly recommends that you do NOT override. Consult with HyTrust Support before doing this.):

If another KeyControl node exists and you wish to continue with the upgrade, you will be prompted to confirm.
If you do have a single node in the cluster and you select OK to upgrade then the upgrade process will start. Once the upgrade has completed, you will see the following screen.

At this point, press Enter to reboot. For this KeyControl node, log back into the webGUI, click the Settings icon and then Upgrade. You should now see the new version number.

To add back the nodes that you removed, go through the installation as a fresh install. Then add each node into the cluster.
Reverting to the Previous Version Using an ISO Image
You can also revert to the previous release using an ISO. Boot from the ISO file as described in KeyControl Clustering and Upgrade, and you will be presented with the following screen. If you wish to revert, choose 3.

Warning: Any changes to the KeyControl node will be lost if you revert. This includes any keys or other objects created since upgrade. They will no longer exist..