KeyControl Installation on Amazon Web Services
Contents
- Introduction
- Deploying an initial KeyControl node
- Deploying an Elastic Load Balancer (ELB)
- Adding a KeyControl node to a cluster in the same availability zone
- Adding a KeyControl node to a cluster in a different availability zone
- Adding a KeyControl node to a cluster in a different region
Introduction
This document provides you with detailed steps to deploy the full range of KeyControl instances in Amazon Web Services (AWS).
Deploying a KeyControl node into Amazon Web Services (AWS) requires setting up several components depending on the type of the deployment. The following sections provide step-by-step directions for each of the deployment types.
- Deploying an Initial KeyControl node
- Deploying an Elastic Load Balancer (ELB)
- Adding a KeyControl node to a cluster in the same availability zone
- Adding a KeyControl node to a cluster in a different availability zone
- Adding a KeyControl node to a cluster in a different region
Deploying an initial KeyControl node
To begin with, you need to have an existing account on Amazon Web Services. You will start by logging in to that account.
Log on to Amazon Web Services with an existing account
- Point your browser at: https://aws.amazon.com/
- On the menu bar, click My Account from the My Account / Console drop-down menu. Your company name should already be filled in.
- Enter the User Name and Password that your security administrator supplied to you. Note that your User Name does not have a domain (@companyname.com, for example). The Services menu appears.
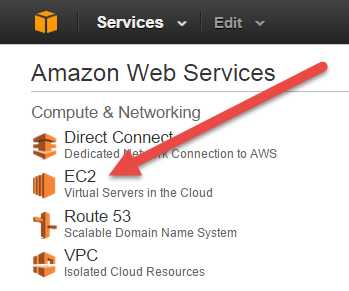
- Click Services > EC2.

Select a region
- Log on to your EC2 account.
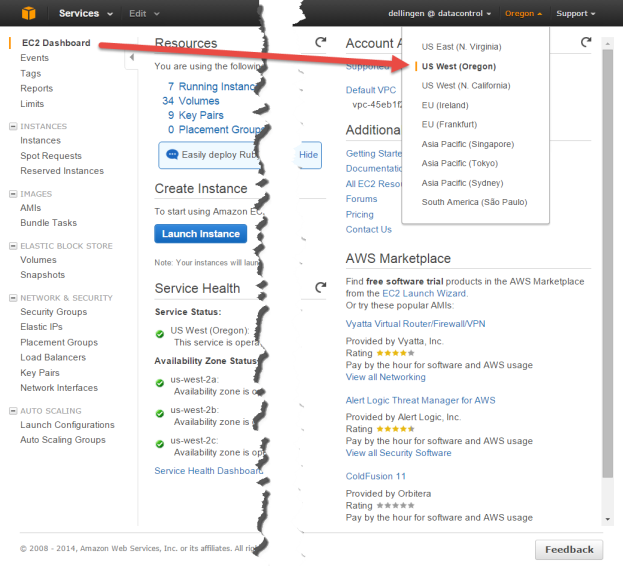
- Navigate to the EC2 Console Dashboard.
- At the top right of the EC2 Dashboard, click your deployment region from the drop-down list. In the example below, US West (Oregon) is chosen, but you should choose based on your needs.

Create a Key Pair
- From the EC2 Dashboard, click Key Pairs from the navigation panel.
- Click Create a Key Pair.
- Create a name for the Key Pair.
- Click Create.
- The private key file is created and you may get the option to Open it or Save it. Choose Save File if you have that option. The likelier case is that it is downloaded automatically. The screen shot below shows the Firefox download dialog box.
The Key Pair is automatically downloaded by your browser as a
.pemfile into the default download location for your system. Save your.pemfile. The base file name is the name you specified as the name of your Key Pair, and the file name extension is.pem. Save the private key file in a safe place; you will refer to it at various points in your interaction with your system.


Create a VPC
- Navigate to Console Home (yellow cube) at top left of the Dashboard.
- Under Compute & Networking, click VPC (Isolated Cloud Resources).
- From the VPC Dashboard, click Start VPC Wizard.
- Click Select to set up VPC with a Single Public Subnet.
- By default, when a VPC is created, an Internet Gateway is automatically assigned to it. If the assigned gateway and/or IP block is insufficient, you can modify the IP block and subnet information according to your needs. You can also create a new Internet Gateway and assign it to your VPC. Note: In order for two VPCs to communicate, there should not be any overlapping IP addresses between the two VPCs. A good example is
50.0.0.0/16and100.0.0.0/16. - Give your VPC a name.
- Click Create VPC, and then click OK. Note the VPC ID.


Create a Security Group
As part of VPC creation a default Security Group is assigned to your VPC. For KeyControl communication, it is recommended to create a Security Group that only enables certain inbound services/ports.
- From the VPC Dashboard, click Security Groups.
- Click Create Security Group.
- Create a Name and Description for the Security Group.
- Select the VPC ID from the drop-down list, selecting the VPC that was just created above. Make sure No VPC is NOT selected.
- Click Yes, Create.

Add rules to your Security Group
- In the Security Group page, click the Security Group that was just created.
- Click the Inbound Rules tab.
-
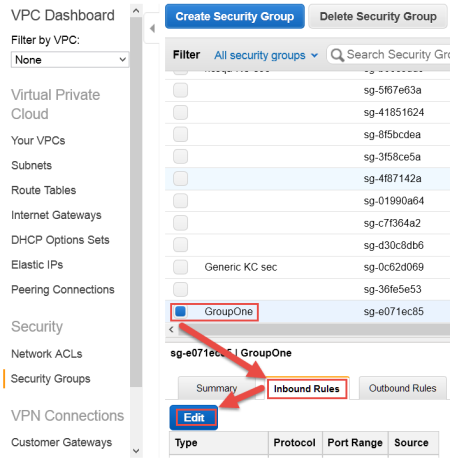
- Click Edit.
The Edit inbound rules dialog box appears.
- Click SSH from the drop-down Type menu.
- For Source, enter
0.0.0.0/0 - Click Add another rule.

- Click HTTPS from the drop-down Type menu.
- For Source, enter
0.0.0.0/0 - Click Add another rule.
- Click Custom TCP rule from the drop-down Type menu.
- Type 6666 as the Port Range.
- For Source, enter
0.0.0.0/0 - Click Add another rule.
- Click Custom UDP Rule.
- Type 123 as the Port Range.
- For Source, enter
0.0.0.0/0 - Click Save.
The end result should look like this:

If this KeyControl instance will be deployed in a cluster, the following rules must be implemented in addition to the above list:
- ICMP Echo Reply
- ICMP Echo Request
- TCP port 2525
- TCP port 2526
The final result should look like this:

NOTE: The above is an example of inbound traffic rules for an AWS Security Group. These ports are open to the world, as indicated by their 0.0.0.0/0 CIDR notation, merely for demonstration purposes. Important: It is the responsibility of the administrator to open these ports only to the IP addresses that are absolutely necessary to connect to the KeyControl instance.
Create an EIP address
AWS has two separate pools for Elastic IP (EIP) addresses: one pool is for EC2-Classic, and the other for EC2-VPC. It is crucial to allocate the EIP for KeyControl from the EC2-VPC pool.
- From the VPC Dashboard (Services > VPC ),click Elastic IPs.
- Click Allocate New Address.
- Click Yes, Allocate. Make a note of the allocated EIP.

It should display that the EIP is for VPC usage and not EC2. This appears in the Scope column.

Launch an instance
- From VPC Dashboard, click Launch EC2 Instances.
- Click HyTrust AMI from AWS Marketplace.
- The Choose an Instance Type dialog box appears.


From the list of Instance Types, click m3.large or whatever best fits the bandwidth/latency requirements you desire.
The following AWS instances support AES-NI:
m3.large
m3.xlarge
m3.2xlarge
c3.large
c3.xlarge
c3.2xlarge
c3.4xlarge
c3.8xlarge
g2.2xlarge
r3.large
r3.xlarge
r3.2xlarge
r3.4xlarge
r3.8xlarge
i2.xlarge
i2.2xlarge
i2.4xlarge
i2.8xlarge
hs1.8xlarg
Generally speaking, all "large" or "xlarge" instances support AES-NI while no micro or "medium" instances have AES-NI support.
- Click Next: Configure Instance Details.
- The Configure Instance Details dialog box appears.
- Click your VPC ID as the Network used for launch.
- Number of instances should be 1.
- Make sure Auto-assign Public IP is NOT set. Click Disable.
- Click Next: Add Storage.
- The Add Storage dialog box appears.
- Root device with all defaults works fine. There is no need to change anything.
- Click Next: Tag Instance.
- The Tag Instance dialog box appears.
- If you wish to add key-value tags to your instance, do so.
- Click Next: Configure Security Group.
- The Configure Security Group dialog box appears.
- In Assign a Security Group click Select an existing Security Group.
- Select the Security Group you created above.
- Click Review and Launch.
- The Boot from General Purpose (SSD) dialog box appears.
- Click on your choice of boot volume for this instance, and then click Next.
- The Review and Launch dialog box appears.
- Review your settings, paying particular attention to the IP address ranges you have open to external browsers. Your current settings, set at
0.0.0.0/0, are "open to the world." - When you are satisfied with your settings, click Launch.
- The Select an existing key pair or create a new key pair dialog box appears:


- When asked to click a Key Pair, click Choose an existing Key Pair.
- Select the Key Pair that you created earlier.
- Click the checkbox acknowledgment that you have access to this Key Pair.
- Click Launch instances.

Associate the EIP address to the instance
- Once the newly launched instance is in initializing state, note its Instance ID.
- From the VPC Dashboard, in the center of the screen, click Elastic IPs.
- The Allocate New Address dialog box appears.
- Click Allocate New Address. You are asked to confirm. Click Yes, Allocate.
- The Allocate New Address appears again, but this time with a new address filled in.
- Click Associate Address.
- The Associate Address dialog box appears.
- In the instance drop-down box, click the instance ID that was launched above.
- Click Yes, Associate.
- Click Instances from the EC2 Dashboard.
- Click the Instance ID.
- When the Elastic IP of the instance appears, it indicates that the EIP is now associated with the instance. Note that the public IP has the same address, which you will use after completing the next steps in the KeyControl system menus.


Connect to the KeyControl system menus
Use ssh to log into the new KeyControl menu system. You will use the key pair associated with the VPC and the EIP associated with the instance. Use the login ID sysmenus. The initial password is sysmenus. Issue the following command from your UNIX shell:
ssh -i <my_key> -l sysmenus <my_EIP>- You will first be prompted to change the KeyControl menu system's password (you cannot continue to use the initial
sysmenus password):
- You will be required to enter the password twice. Passwords must be a minimum of eight characters. The
menus to which the root/password combination enables access are where diagnostics and settings can be manipulated for this system during its lifetime. Without the password, access to the system for these tasks is impossible. It is critical that the password be stored safely somewhere.
- The last step in configuration is choosing whether
you are going to add this new KeyControl instance as a new node to an existing cluster:
- If you choose to add this new KeyControl instance as a new node in an existing cluster, follow the directions here: Joining a KeyControl Cluster.
- If this is your first KeyControl system and you respond No to this prompt, your system is fully configured and you will
see the last of these post-install menus pointing you to the webGUI interface:
- After this, you are brought to the main menu for the system menuing. At this point you can choose to log out. Remember that further access to the system menus requires the password that you just set up.
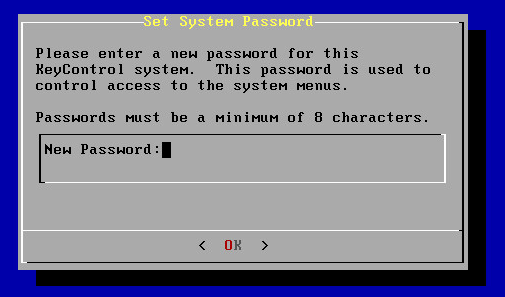

Note that this is not a general login account. Since this is a secure node, you cannot get a shell prompt, and only have access to a basic menu system that allows for hardware change, network setup and general debugging capabilities. We cover these topics later.


The next step: the webGUI
Further configuration takes place in the webGUI. Instructions appear here: logging into the webGUI for the First Time. You will use the IP address of your instance.
Note on upgrading: Upgrades for AWS users must be done using the webGUI, shown here: Upgrading a Single KeyControl Node Using the WebGUI. You will read elsewhere of upgrading using an ISO image. That form of upgrade is not available for AWS installations.
Deploying an Elastic Load Balancer (ELB)
An Elastic Load Balancer (ELB) enables you to share the impact of virtual machines on multiple KeyControl nodes in a KeyControl Cluster. It does this without your intervention after the initial setup phase. This material walks you through setting up your ELB.
Requirements for deploying an ELB
The following components are required prior to placing an Elastic Load Balancer (ELB) in front of a new KeyControl cluster:
- Two or more running KeyControl instances.
- A Security Group of KeyControl nodes.
Log on and select your region
Take the following steps:
- Log on to you EC2 account.
- Navigate to EC2 Console Dashboard.
- At the top right of EC2 Dashboard, select the region in which your existing KeyControl node/cluster resides.
Create your Load Balancer
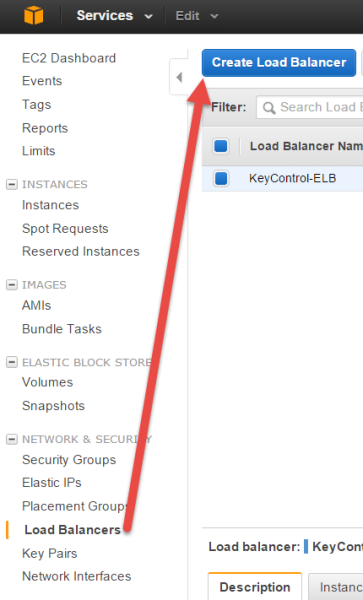
- From EC2 Dashboard under NETWORK & SECURITY, select Load Balancers from the navigation panel.
- Click Create Load Balancer.
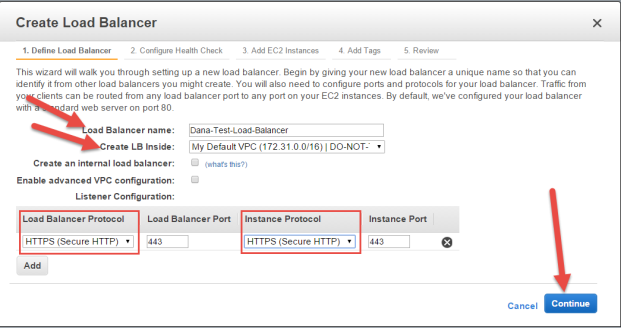
Define your Load Balancer
- In the Load Balancer wizard specify a name for the load balancer. Note that the name must be only alphanumeric. Hyphens are OK; spaces are not.
- From the drop-down menu in Create LB Inside select the VPC in which the two KeyControl
instances reside. In this instance the objective is to create an Internet-facing load balancer, so
that your KeyControl cluster can be accessed from outside the AWS network. Given that, do NOT check Create an internal load balancer.
In addition, Leave Advanced VPC configuration unchecked.
- Under Listener Configuration, make the following selections:
- Select HTTPS (Secure HTTP) for Load Balancer Protocol.
- Select HTTPS (Secure HTTP) for Instance Protocol.
- Click Continue.
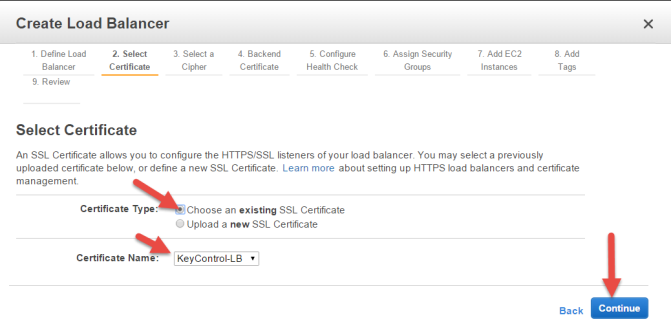
Select a Certificate for your Load Balancer
If you have already uploaded a certificate, you may use any of your existing certificates. Take the following steps:
- Click Choose an existing SSL Certificate as Certificate Type.
- Select your certificate from the drop-down menu of existing certificates.
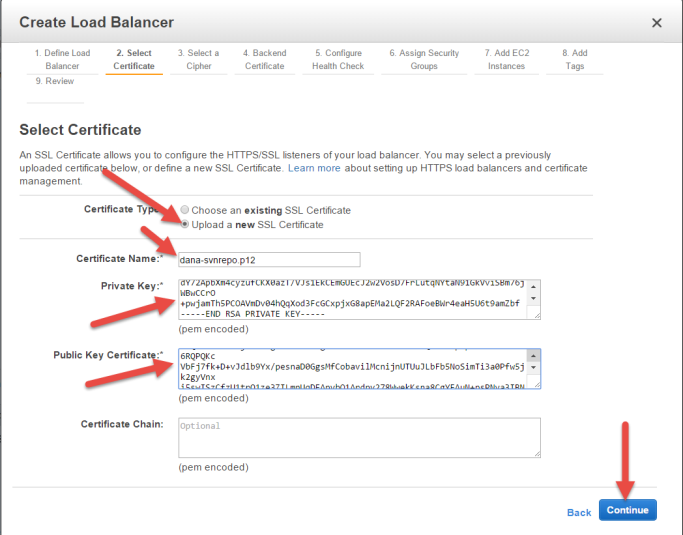
If you wish to assign a new certificate for your ELB, take the following steps:
- Click Upload a new SSL Certificate as Certificate Type.
- Enter the name of the certificate in Certificate name.
- Copy and paste the pem-encoded private key of your certificate into the Private Key box.
- Copy and paste the pem-encoded public key of your certificate into the Public Key Certificate box.
- If applicable, copy and paste the pem-encoded certificate chain into the Certificate Chain box.
- Click Continue.
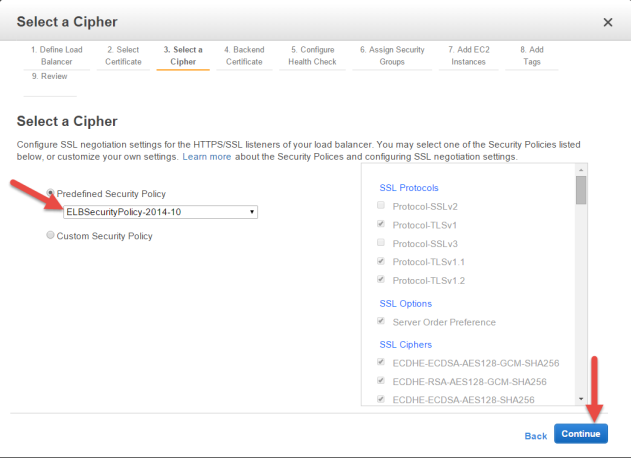
Select a cipher for your Load Balancer
You have the capability to customize the ELB's Security Policy at your
discretion, or you can pick a predefined Security Policy from the drop-down menu.
We recommend that you select ELBSecurityPolicy-2014-10 from the set listed in Predefined Security Policy.
Click Continue.
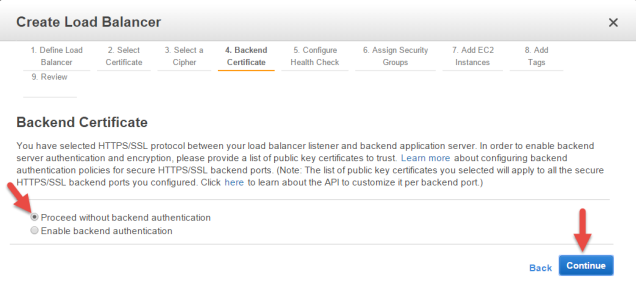
Provide a Backend Certificate (optional)
If you wish to provide a certificate for the backend instances, you may do so, Otherwise, check Proceed without backend authentication., and then click Continue
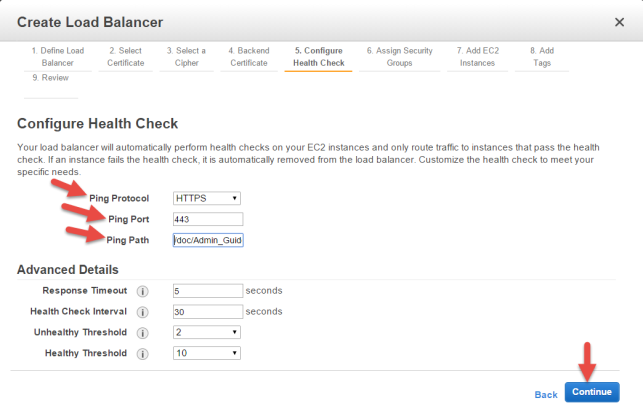
Configure a Health Check for your Load Balancer
Take the following steps:
- Accept HTTPS for Ping Protocol.
- Accept 443 for Ping port.
- Update Ping Path to be:
/doc/Admin_Guide/Admin_Guide.html.You may modify the parameters displayed under Advanced Details later, if there is a need for it.
- Accept the defaults, and then click Continue.
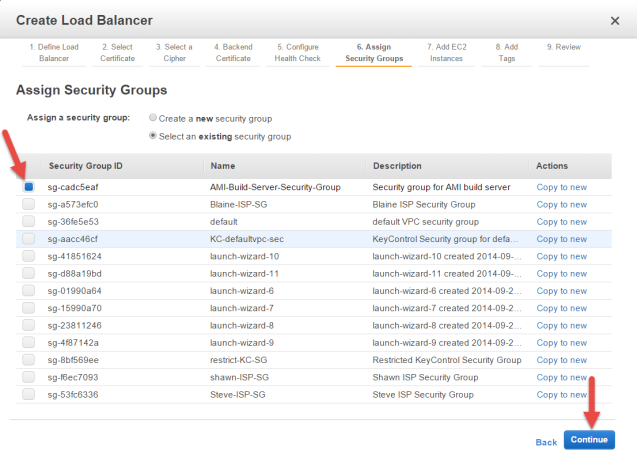
Assign a Security Group
Take the following steps:
- Click Select an existing Security Group.
- Select the Security Group that you have created for your KeyControl instances.
- Click Continue.
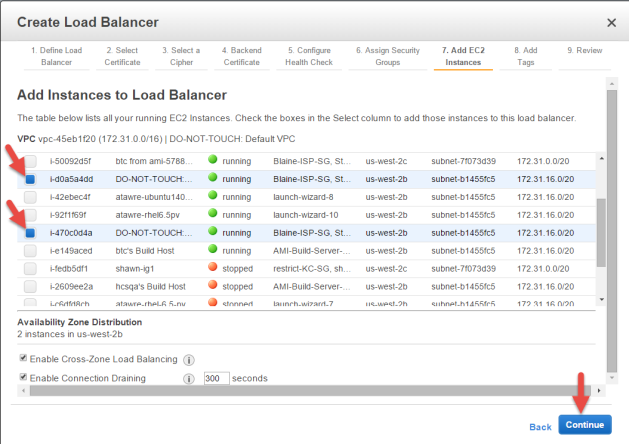
Add EC2 Instances
Take the following steps:
- From the list of instances, select all KeyControl instances that are to be used by this ELB.
- Accept the defaults for Availability Zone Distribution.
- Click Continue.
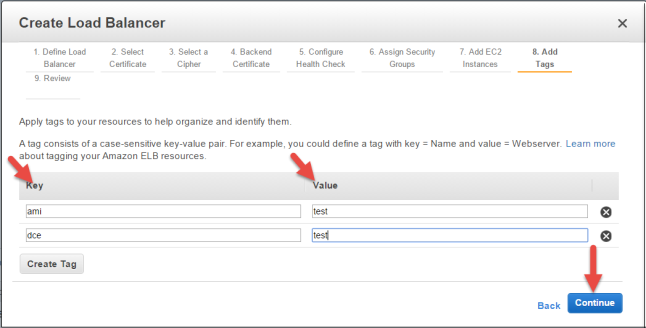
Add Tags to your Load Balancer (optional)
You may add as many tags as you wish to your ELB at this point. When you are finished, click Continue.
Preview your Load Balancer settings
Review the options you have chosen, edit and modify them if needed.
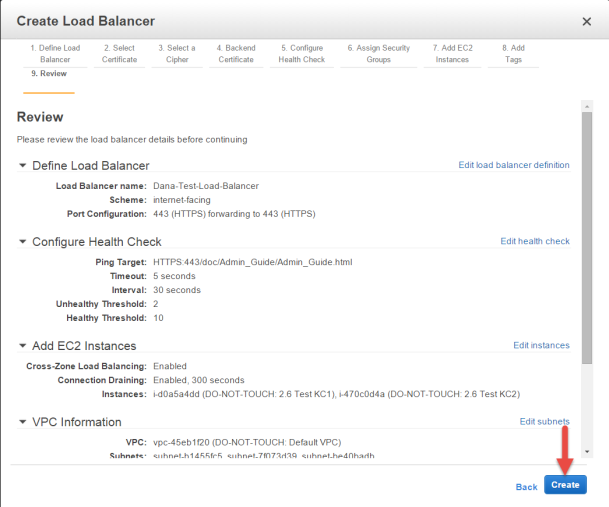
- Click Create.
- Click Close, after the load balancer is created.
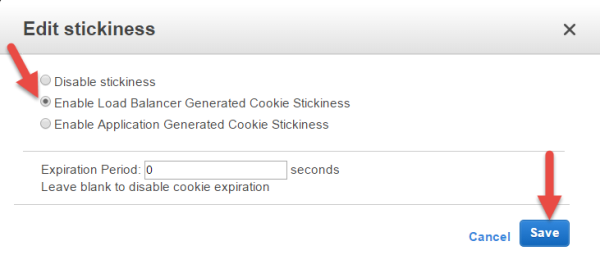
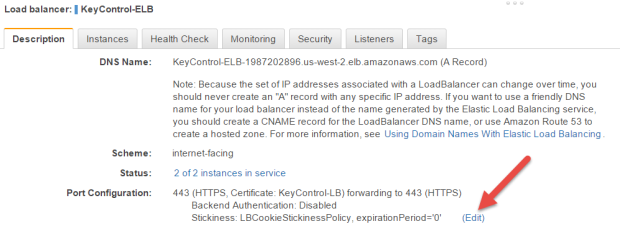
Enable Stickiness in your Load Balancer
On the Load Balancer page, select the newly created Load Balancer and then take the following steps:
- Click the Description tab in the Load Balancerdetails section of your ELB.
- In the Port Configuration section, next to Stickiness: Disabled, click the Edit link.
- Select Enable Load Balancer Cookie Stickiness.
- Leave Expiration Period blank.
- Click Save.
Run a Health Check on your new Load Balancer
Take the following steps:
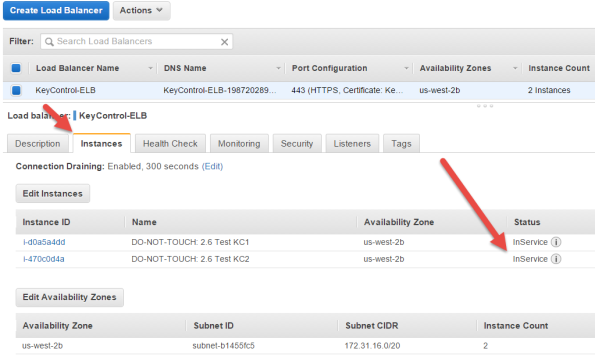
- Click the Instances tab in the Load Balancerdetails section of your ELB.
If any of the instance's status shows OutOfService, there could be up to a several minute delay before the load balancer marks the instances as being InService (Healthy). Once all of backend instances are marked InService, your load balancer is fully operational.
logging in to your KeyControl cluster through the Load Balancer
Take the following steps to see your Load Balancer in action:
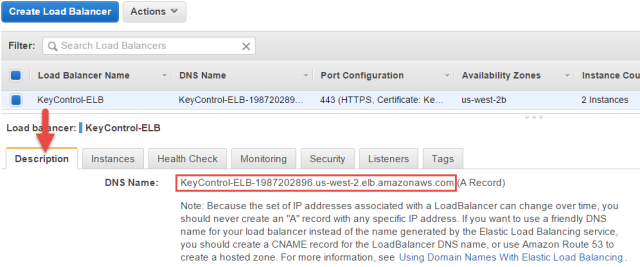
- Click the Description tab in the Load Balancerdetails section of your ELB.
- Copy the DNS name of the ELB, excluding (A Record).
- Open your browser, and in the navigation/address bar type https:// followed by ELB DNS name.
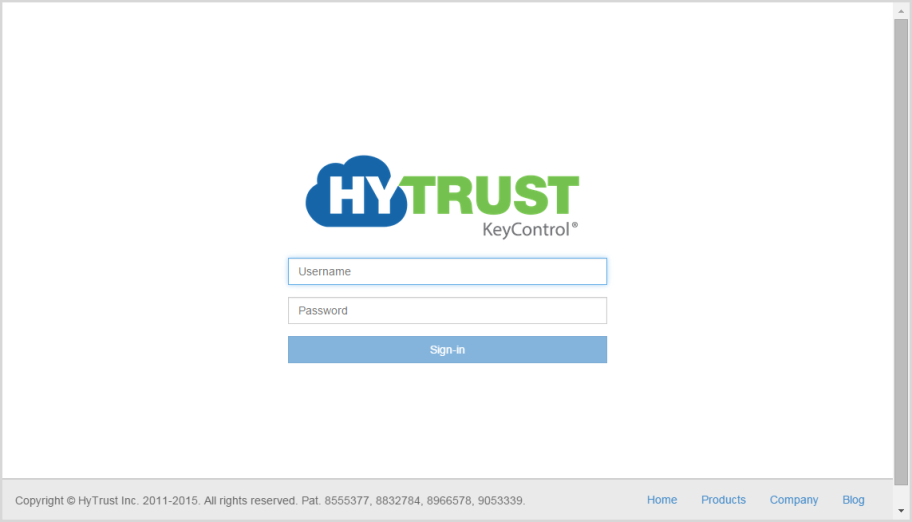
- Log on with your user name and password. If your login is successful, you have set up your Load Balancer successfully.

After a pause, you should see the login page of one of your KeyControl instances.
Adding a KeyControl node to a cluster in the same availability zone
The following components are required prior to adding a new KeyControl node to an existing KeyControl cluster.
- One or more running KeyControl nodes.
- ID of the VPC where the existing KeyControl node runs.
- ID of the Security Group of the existing KeyControl server.
- Key Pair of the existing KeyControl node/cluster.
- Internal IP address of a KeyControl server in the existing cluster.
Log on to Amazon Web Services with an existing account
To begin with, you need to have an existing account on Amazon Web Services. You will start by logging in to that account.
For details, see Log on to Amazon Web Services with an existing account
Select the region where your existing KeyControl node resides
- Log on to your EC2 account.
- Navigate to the EC2 Console Dashboard.
- At the top right of the EC2 Dashboard, click your deployment region from the drop-down list. In the example below, US West (Oregon) is chosen, but you should choose based on the location of your existing KeyControl Node.

Modify your Security Group
- In order to allow communication between KeyControl servers, certain rules must be added to the Security Group of the existing KeyControl cluster.
- From the VPC Dashboard, click Security Groups.
- From the list of Security Groups in the table, click the Security Group of the existing KeyControl server.
- Click the Inbound tab, and review the rules that exist. If they do not look like the following image, add more rules, as shown below.
- If there is no Custom ICMP rule with Echo Reply in the Port Range column in the rules table on the right, create one, as follows:
- Click Edit.
- Click Add Rule.
- Click Custom ICMP Rule from the drop down menu.
- Click Echo Reply as Port Range.
- Select a Source of Anywhere or enter an IP range that includes all members of the cluster.
- If there is no Custom ICMP rule with a Port Range of Echo Request in the rules table on the right, create one, as follows:
- Click Add Rule.
- Click Custom ICP Rule from the drop down menu.
- Click Echo Request as the Port Range.
- Select a Source of Anywhere or enter an IP range that includes all members of the cluster.
- If there is no Custom TCP rule with a Port Range of 2525 in the rules table on the right, create one, as follows:
- Click Add Rule.
- Click Custom TCP rule from the drop down menu.
- Click 2525 as the Port Range.
- Select a Source of Anywhere or enter an IP range that includes all members of the cluster.
- If there is no Custom TCP rule with a Port Range of 2526 in the rules table on the right, create one, as follows:
- Click Add Rule.
- Click Custom TCP rule from the drop down menu.
- Click 2526 as the Port Range.
- Select a Source of Anywhere or enter an IP range that includes all members of the cluster.
- If there is no Custom TCP rule with a Port Range of 6666 in the rules table on the right, create one, as follows.
- Click Add Rule.
- Click Custom TCP rule from the drop down menu.
- Click 6666 as the Port Range.
- Select a Source of Anywhere or enter an IP range that includes all members of the cluster.
- Click Save, and review your end result to ensure that it looks like this:


NOTE: The above is an example of inbound traffic rules for an AWS Security Group. These ports are open to the world, as indicated by their 0.0.0.0/0 CIDR notation, merely for demonstration purposes. Important: It is the responsibility of the administrator to open these ports only to the IP addresses that are absolutely necessary to connect to the KeyControl instance. When restricting inbound network traffic for security purposes and your KeyControl nodes do not reside in the same VPC (that is, if they reside in different availability zones, or different regions, or on a different VPC in the same availability zone) you must add rules to your Security Group so that each node allows inbound network traffic from the VPC subnet of other KeyControl nodes.
- For example if your KeyControl_Node1 resides in a VPC with subnet 172.31.68.0/24 and KeyControl_Node2 resides in another VPC with subnet 90.232.96.0/24, then the Security Group rule for KeyControl_Node1 must allow:
- Inbound network traffic from 90.232.96.0/24 (or a range containing KeyControl_Node2) for protocols/ports TCP/2525, TCP/2526, ICMP/Echo Request, and ICMP/Echo Reply.
- Similarly, KeyControl_Node2 must allow inbound network traffic from 172.31.68.0/24 (or a range containing KeyControl_Node1).
Create an EIP address
For step-by-step details, see Create an EIP address.
Launch an instance
- From the VPC Dashboard, click Launch EC2 Instances.
- Click HyTrust AMI from AWS Marketplace.
- The Choose an Instance Type dialog box appears.
- From the list of Instance Types, click m3.large or whatever best fits the bandwidth/latency requirements you desire.
- Click Next: Configure Instance Details.
- The Configure Instance Details dialog box appears.
- Click your VPC ID as the Network used for launch.
- Number of instances should be 1.
- Make sure Auto-assign Public IP is NOT set. Click Disable.
- Click Next: Add Storage.
- The Add Storage dialog box appears.
- Root device with all defaults works fine. There is no need to change anything.
- Click Next: Tag Instance.
- The Tag Instance dialog box appears.
- If you wish to add key-value tags to your instance, do so.
- Click Next: Configure Security Group.
- The Configure Security Group dialog box appears.
- In Assign a Security Group click Select an existing Security Group.
- Select the Security Group of the existing KeyControl node.
- Click Review and Launch.
- The Boot from General Purpose (SSD) dialog box appears.
- Click on your choice of boot volume for this instance, and then click Next.
- The Review and Launch dialog box appears.
- Review your settings, paying particular attention to the IP address ranges you have open to external browsers. Your current settings, set at
0.0.0.0/0, are "open to the world." - When you are satisfied with your settings, click Launch.
- The Select an existing key pair or create a new key pair dialog box appears:
- When asked to click a Key Pair, click Choose an existing Key Pair.
- Select the Key Pair used for the existing KeyControl node.
- Click the checkbox acknowledgment that you have access to this Key Pair.
- Click Launch instances.


Associate the EIP to the instance
- Once the newly launched instance is in initializing state, note its Instance ID.
- From the VPC Dashboard, in the center of the screen, click Elastic IPs.
- Click Associate Address.
- The Associate Address dialog box appears.
- In the instance drop-down box, click the instance ID of the new KeyControl node.
- Click Yes, Associate.
- Click Instances from the EC2 Dashboard.
- Click the Instance ID.
- When the Elastic IP of the instance appears, it indicates that the EIP is now associated with the instance. Note that the public IP has the same address, which you will use after completing the next steps in the KeyControl system menus.


Connect to the Instance console and install
Use ssh to log into the new KeyControl menu system. You will use the key pair associated with the VPC and the EIP associated with the instance. Use the login ID sysmenus. The initial password is sysmenus. Issue the following command from your UNIX shell:
ssh -i <my_key> -l sysmenus <my_EIP>- You will first be prompted to change the KeyControl menu system's password (you cannot continue to use the initial
sysmenus password):

- You will be required to enter the password twice. Passwords must be a minimum of eight characters. The
menus to which the root/password combination enables access are where diagnostics and settings can be manipulated for this system during its lifetime. Without the password, access to the system for these tasks is impossible. It is critical that the password be stored safely somewhere.
- Note that this is not a general login account. Since this is a secure node, you cannot get a shell prompt, and only have access to a basic menu system that allows for hardware change, network setup and general debugging capabilities. We cover these topics later.
- The last step in configuration is choosing whether
you are going to add this new KeyControl instance as a new node to an existing cluster:
- You do want to add this system as a new node in an existing cluster, so you should click Yes, and follow the directions here: Joining a KeyControl Cluster.


Connect to GUI of first KeyControl node and authenticate the new KeyControl node
At this point you need to log on to the webGUI of first KeyControl node/cluster with Domain Administration privileges. The new KeyControl node will automatically appear as an unauthenticated node in the KeyControl cluster, as shown below:

To authenticate this new node, click the Actions Button and then click Authenticate. This will take you to the authentication screen shown below. You are prompted to enter the Authentication Passphrase.

Once authentication completes, the KeyControl node is listed as Authenticated but Unreachable until cluster synchronization completes and the cluster is ready for use. This should not take more than a minute or two.
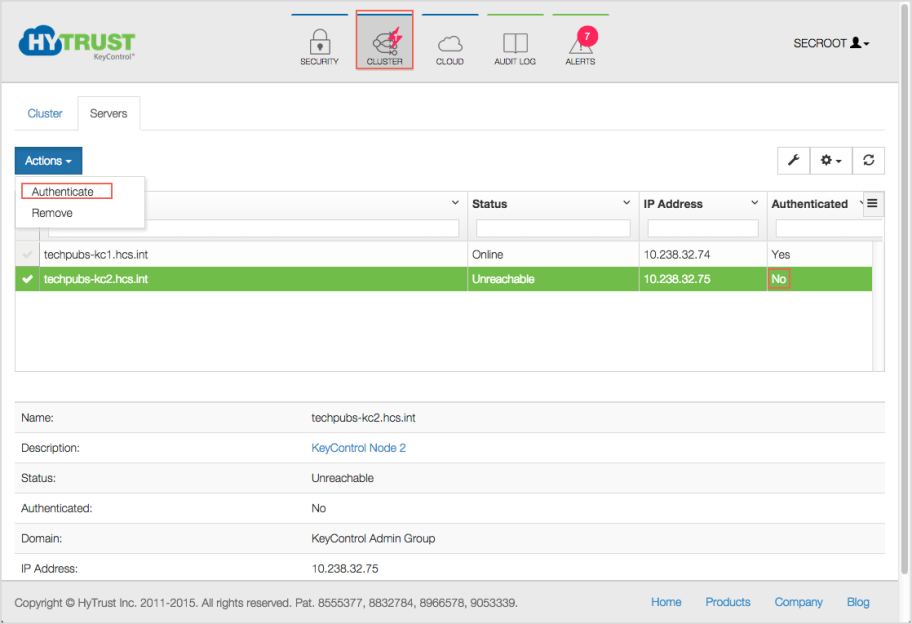
Once the KeyControl node is available, the status will automatically move to Online and the cluster status at the top right of the screen will change back to Healthy.
At this point, the new cluster/node is ready to use.
Adding a KeyControl node to a cluster in a different availability zone
The following components are required prior to adding a new KeyControl node to an existing KeyControl cluster in a different availability zone:
- One or more running KeyControl servers
- The CIDR block of the VPC or the VPC ID of a running KeyControl server
- The internal IP address of the running KeyControl server
Log on to Amazon Web Services with an existing account
To begin with, you need to have an existing account on Amazon Web Services. You will start by logging in to that account.
For details, see Log on to Amazon Web Services with an existing account
Connect to the same region as your existing KeyControl server
- Log on to your EC2 account.
- Navigate to the EC2 Console Dashboard.
- At the top right of the EC2 Dashboard, click your deployment region from the drop-down list. In the example below, US West (Oregon) is chosen, but you should choose based on the location of your existing KeyControl cluster.

Virtual Private Cloud (VPC)
- Navigate to Console Home (yellow cube) at top left of the Dashboard.
- Under Compute & Networking, click VPC (Isolated Cloud Resources).
- From the VPC Dashboard, click Start VPC Wizard.
- Click Select to set up VPC with a Single Public Subnet.
- By default, when a VPC is created, an Internet Gateway is automatically assigned to it. If the assigned gateway and/or IP block is insufficient, you can modify the IP block and subnet information according to your needs. You can also create a new Internet Gateway and assign it to your VPC. Note: In order for two VPCs to communicate, there should not be any overlapping IP addresses between the two VPCs. A good example is
50.0.0.0/16and100.0.0.0/16. - Give your VPC a name.
- Click Create VPC, and then click OK. Note the VPC ID.


Use VPC Peering to connect the two VPCs
- Navigate to Peering Connections in the VPC Dashboard in the target AWS account.
- If both VPCs belong to the same account, stay in the existing account.
- Click Create VPC Peering Connection. The Create VPC Peering Connection dialog box appears.
- Give your Peering Connection a name, and click Create.
- The Peering connection should indicate that it is pending acceptance.
- Click OK, and then click Accept request.
The state of the peering connection changes to Active.


Modify the routing tables of the VPCs
Modify the main routing table of both VPCs to route the network traffic to the peering connection ID.
- In the running KeyControl VPC (10.0.0.0/16), navigate to its routing table.
- Click the Route table entry.
- Click Edit. A line opens up in the entry.
- In the Destination field, enter the CIDR block of the new VPC (172.31.0.0/16).
- In the Target field, click the ID of the VPC peering connection.
- Click Save. Your first routing entry is complete.
- Next, in the newly created VPC (172.31.0.0/16), navigate to its route table.
- Click the Route table entry.
- Click Edit. A line opens up in the entry.
- In the Destination field enter the CIDR block of the running KeyControl VPC (10.0.0.0/16).
- In the Target field, click the ID of the VPC peering connection.
- Click Save. Your second routing entry is complete


Create a Key Pair, if one does not exist
For step-by-step details, see Create a Key Pair.
Create a Security Group, if one does not exist
As part of VPC creation a default Security Group is assigned to your VPC. For KeyControl communication, it is recommended to create a Security Group that only enables certain inbound services/ports.
For step-by-step details, see Create a Security Group.
Add rules to the Security Group, if rules are not present
In order to allow communication between KeyControl servers, certain rules must be added to the Security Group of the existing KeyControl cluster.
For step-by-step details, see Add rules to the Security Group.
Create an EIP address
For step-by-step details, see Create an EIP address.
Launch an instance
- From the VPC Dashboard, click Launch EC2 Instances.
- Click HyTrust AMI from AWS Marketplace.
- The Choose an Instance Type dialog box appears.
- From the list of Instance Types, click m3.large or whatever best fits the bandwidth/latency requirements you desire.
- Click Next: Configure Instance Details.
- The Configure Instance Details dialog box appears.
- Click your VPC ID as the Network used for launch.
- Number of instances should be 1.
- Make sure Auto-assign Public IP is NOT set. Click Disable.
- Click Next: Add Storage.
- The Add Storage dialog box appears.
- Root device with all defaults works fine. There is no need to change anything.
- Click Next: Tag Instance.
- The Tag Instance dialog box appears.
- If you wish to add key-value tags to your instance, do so.
- Click Next: Configure Security Group.
- The Configure Security Group dialog box appears.
- In Assign a Security Group click Select an existing Security Group.
- Select the Security Group of the existing KeyControl node.
- Click Review and Launch.
- The Boot from General Purpose (SSD) dialog box appears.
- Click on your choice of boot volume for this instance, and then click Next.
- The Review and Launch dialog box appears.
- Review your settings, paying particular attention to the IP address ranges you have open to external browsers. Your current settings, set at
0.0.0.0/0, are "open to the world." - When you are satisfied with your settings, click Launch.
- The Select an existing key pair or create a new key pair dialog box appears:
- When asked to click a Key Pair, click Choose an existing Key Pair.
- Select the Key Pair used for the existing KeyControl node.
- Click the checkbox acknowledgment that you have access to this Key Pair.
- Click Launch instances.


Associate the EIP to the instance
- Once the newly launched instance is in initializing state, note its Instance ID.
- From the VPC Dashboard, in the center of the screen, click Elastic IPs.
- Click Associate Address.
- The Associate Address dialog box appears.
- In the instance drop-down box, click the instance ID of the new KeyControl node.
- Click Yes, Associate.
- Click Instances from the EC2 Dashboard.
- Click the Instance ID.
- When the Elastic IP of the instance appears, it indicates that the EIP is now associated with the instance. Note that the public IP has the same address, which you will use after completing the next steps in the KeyControl system menus.


Connect to the Instance console and install
Use ssh to log into the new KeyControl menu system. You will use the key pair associated with the VPC and the EIP associated with the instance. Use the login ID sysmenus. The initial password is sysmenus. Issue the following command from your UNIX shell:
ssh -i <my_key> -l sysmenus <my_EIP>- You will first be prompted to change the KeyControl menu system's password (you cannot continue to use the initial
sysmenus password):

- You will be required to enter the password twice. Passwords must be a minimum of eight characters. The menus to which the root/password combination enables access are where diagnostics and settings can be manipulated for this system during its lifetime. Without the password, access to the system for these tasks is impossible. It is critical that the password be stored safely somewhere.
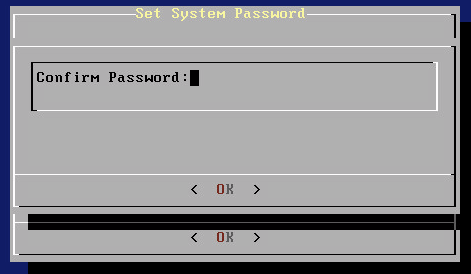
- Note that this is not a general login account. Since this is a secure node, you cannot get a shell prompt, and only have access to a basic menu system that allows for hardware change, network setup and general debugging capabilities. We cover these topics later.
- The last step in configuration is choosing whether
you are going to add this new KeyControl instance as a new node to an existing cluster:
- You do want to add this system as a new node in an existing cluster, so you should click Yes, and follow the directions here: Joining a KeyControl Cluster.

Connect to the GUI of the first KeyControl node and authenticate the new KeyControl node
At this point you need to log on to the webGUI of first KeyControl node/cluster with Domain Administration privileges. The new KeyControl node will automatically appear as an unauthenticated node in the KeyControl cluster, as shown below:

To authenticate this new node, click the Actions Button and then click Authenticate. This will take you to the authentication screen shown below. You are prompted to enter the Authentication Passphrase.

Once authentication completes, the KeyControl node is listed as Authenticated but Unreachable until cluster synchronization completes and the cluster is ready for use. This should not take more than a minute or two.

Once the KeyControl node is available, the status will automatically move to Online and the cluster status at the top right of the screen will change back to Healthy.
At this point, the new node is ready to use.
Adding a KeyControl node to a cluster in a different Region
The following components are required prior to adding a new KeyControl node to an existing KeyControl cluster in a different Region:
- One or more running KeyControl servers in a different region.
- A new region with at least two available Elastic IP addresses.
- Internal IP address of a KeyControl server in a different region.
Log on to Amazon Web Services with an existing account
To begin with, you need to have an existing account on Amazon Web Services. You will start by logging in to that account.
For details, see Log on to Amazon Web Services with an existing account
Connect to a different region from your existing KeyControl server
- Log on to your EC2 account.
- Navigate to the EC2 Console Dashboard.
- At the top right of the EC2 Dashboard, click your deployment region from the drop-down list. In the example below, US West (Oregon) is chosen, but you should choose based on the location of your existing server. You should choose a region in which your existing KeyControl server/cluster does NOT reside.
Note: Make sure that the newly selected region has at least two available Elastic IP addresses.

Create a Virtual Private Cloud (VPC)
- Navigate to Console Home (yellow cube) at top left of the Dashboard.
- Under Compute & Networking, click VPC (Isolated Cloud Resources).
- From the VPC Dashboard, click Start VPC Wizard.
- Click Select to set up VPC with a Single Public Subnet.
- By default, when a VPC is created, an Internet Gateway is automatically assigned to it. If the assigned gateway and/or IP block is insufficient, you can modify the IP block and subnet information according to your needs. You can also create a new Internet Gateway and assign it to your VPC. Note: In order for two VPCs to communicate, there should not be any overlapping IP addresses between the two VPCs. A good example is
50.0.0.0/16and100.0.0.0/16. - Give your VPC a name.
- Click Create VPC, and then click OK. Note the VPC ID.


Create two VPN instances in each VPC
In order for two VPCs in different regions to communicate, a VPN instance on each VPC must be deployed. Amazon provides documentation for creating and configuring VPN instances using SSL or IPS. Follow the steps indicated in these links:
http://media.amazonwebservices.com/AWS_Amazon_VPC_Connectivity_Options.pdfhttp://aws.amazon.com/articles/5472675506466066http://aws.amazon.com/articles/0639686206802544
After VPN instances in both regions are up and running, verify that the VPN instances can ping each other by their private IP address. The Security Group of the VPN instances in each region must allow all network traffic (protocols and ports) required by the KeyControl Security Group to go through.
Create a Key Pair, if one does not exist
For step-by-step details, see Create a Key Pair.
Create a Security Group
As part of VPC creation a default Security Group is assigned to your VPC. For KeyControl communication, it is recommended to create a Security Group that only enables certain inbound services/ports.
For step-by-step details, see: Creating a Security Group
Add rules to the Security Group, if the rules are not present
- In order to allow communication between KeyControl servers, certain rules must be added to the Security Group of the existing KeyControl cluster.
- From the VPC Dashboard, click Security Groups.
- From the list of Security Groups in the table, click the Security Group of the existing KeyControl server.
- Click the Inbound tab, and review the rules that exist. If they do not look like the following image, add more rules, as shown below.
- If there is no Custom ICMP rule with a Port Range of Echo Reply in the rules table on the right, create one, as follows:
- Click Add Rule.
- Click Custom ICP Rule from the drop down menu.
- Click Echo Reply as the Port Range.
- Select a Source of Anywhere or enter an IP range that includes all members of the cluster.
- If there is no Custom ICMP rule with a Port Range of Echo Request in the rules table on the right, create one, as follows:
- Click Add Rule.
- Click Custom ICP Rule from the drop down menu.
- Click Echo Request as the Port Range.
- Select a Source of Anywhere or enter an IP range that includes all members of the cluster.
- If there is no Custom TCP rule with a Port Range of 2525 in the rules table on the right, create one, as follows:
- Click Add Rule.
- Click Custom TCP rule from the drop down menu.
- Click 2525 as the Port Range.
- Select a Source of Anywhere or enter an IP range that includes all members of the cluster.
- If there is no Custom TCP rule with a Port Range of 2526 in the rules table on the right, create one, as follows:
- Click Add Rule.
- Click Custom TCP rule from the drop down menu.
- Click 2526 as the Port Range.
- Select a Source of Anywhere or enter an IP range that includes all members of the cluster.
- If there is no Custom TCP rule with a Port Range of 6666 in the rules table on the right, create one, as follows.
- Click Add Rule.
- Click Custom TCP rule from the drop down menu.
- Click 6666 as the Port Range.
- Select a Source of Anywhere or enter an IP range that includes all members of the cluster.
- Click Save, and review your end result to ensure that it looks like this:


NOTE: The above is an example of inbound traffic rules for an AWS Security Group. These ports are open to the world, as indicated by their 0.0.0.0/0 CIDR notation, merely for demonstration purposes. Important: It is the responsibility of the administrator to open these ports only to the IP addresses that are absolutely necessary to connect to the KeyControl instance. When restricting inbound network traffic for security purposes and your KeyControl nodes do not reside in the same VPC (that is, if they reside in different availability zones, or different regions, or on a different VPC in the same availability zone) you must add rules to your Security Group so that each node allows inbound network traffic from the VPC subnet of other KeyControl nodes.
- For example if your KeyControl_Node1 resides in a VPC with subnet 172.31.68.0/24 and KeyControl_Node2 resides in another VPC with subnet 90.232.96.0/24, then the Security Group rule for KeyControl_Node1 must allow:
- Inbound network traffic from 90.232.96.0/24 (or a range containing KeyControl_Node2) for protocols/ports TCP/2525, TCP/2526, ICMP/Echo Request, and ICMP/Echo Reply.
- Similarly, KeyControl_Node2 must allow inbound network traffic from 172.31.68.0/24 (or a range containing KeyControl_Node1).
Create an EIP address
For step-by-step details, see Create an EIP address.
Launch an instance
- From the VPC Dashboard, click Launch EC2 Instances.
- Click HyTrust AMI from AWS Marketplace.
- The Choose an Instance Type dialog box appears.
- From the list of Instance Types, click m3.large or whatever best fits the bandwidth/latency requirements you desire.
- Click Next: Configure Instance Details.
- The Configure Instance Details dialog box appears.
- Click your VPC ID as the Network used for launch.
- Number of instances should be 1.
- Make sure Auto-assign Public IP is NOT set. Click Disable.
- Click Next: Add Storage.
- The Add Storage dialog box appears.
- Root device with all defaults works fine. There is no need to change anything.
- Click Next: Tag Instance.
- The Tag Instance dialog box appears.
- If you wish to add key-value tags to your instance, do so.
- Click Next: Configure Security Group.
- The Configure Security Group dialog box appears.
- In Assign a Security Group click Select an existing Security Group.
- Select the Security Group of the existing KeyControl node.
- Click Review and Launch.
- The Boot from General Purpose (SSD) dialog box appears.
- Click on your choice of boot volume for this instance, and then click Next.
- The Review and Launch dialog box appears.
- Review your settings, paying particular attention to the IP address ranges you have open to external browsers. Your current settings, set at
0.0.0.0/0, are "open to the world." - When you are satisfied with your settings, click Launch.
- The Select an existing key pair or create a new key pair dialog box appears:
- When asked to click a Key Pair, click Choose an existing Key Pair.
- Select the Key Pair used for the existing KeyControl node.
- Click the checkbox acknowledgment that you have access to this Key Pair.
- Click Launch instances.


Connect to the Instance console and install
Use ssh to log into the new KeyControl menu system. You will use the key pair associated with the VPC and the EIP associated with the instance. Use the login ID sysmenus. The initial password is sysmenus. Issue the following command from your UNIX shell:
ssh -i <my_key> -l sysmenus <my_EIP>- You will first be prompted to change the KeyControl menu system's password (you cannot continue to use the initial
sysmenus password):

- You will be required to enter the password twice. Passwords must be a minimum of eight characters. The
menus to which the root/password combination enables access are where diagnostics and settings can be manipulated for this system during its lifetime. Without the password, access to the system for these tasks is impossible. It is critical that the password be stored safely somewhere.
- Note that this is not a general login account. Since this is a secure node, you cannot get a shell prompt, and only have access to a basic menu system that allows for hardware change, network setup and general debugging capabilities. We cover these topics later.
- The last step in configuration is choosing whether
you are going to add this new KeyControl instance as a new node to an existing cluster: Your answer should be Yes.
- Follow the instructions onscreen by providing the IP address of the existing KeyControl server and a passphrase. Click the following link: Joining a KeyControl Cluster.


Connect to the GUI of the first KeyControl node/cluster and authenticate the new KeyControl node
At this point you need to log on to the webGUI of the first KeyControl node with Domain Administration privileges. The new KeyControl node will automatically appear as an unauthenticated node in the KeyControl cluster, as shown below:

To authenticate this new node, click the Actions Button and then click Authenticate. This will take you to the authentication screen shown below. You are prompted to enter the Authentication Passphrase.

Once authentication completes, the KeyControl node is listed as Authenticated but Unreachable until cluster synchronization completes and the cluster is ready for use. This should not take more than a minute or two.

Once the KeyControl node is available, the status will automatically move to Online and the cluster status at the top right of the screen will change back to Healthy.
At this point, the new cluster/node is ready to use.