Requirements
A separate boot disk is required on which the HyTrust software will be installed. This allows the system to boot and communicate with HyTrust KeyControl and get the necessary encryption keys which are then used to boot and decrypt (on the fly) the Linux root disk / file system and encrypt / decrypt swap.
Make sure your version of Linux has a separate boot partition. If it does not you will need to create one.
If the Linux installation does not have separate boot partition, we recommend that you create a free partition on the existing device. The procedure to set up a separate boot partition is different for different Linux platforms. Here we present the procedure for two flavors of Linux, CentOS and Ubuntu.
Common Preparation on any Azure Linux VM
Note: This discussion assumes that Azure is accessed through https://portal.azure.com. In the material that follows, we have created the VM through the “Virtual Machines (classic)” interface using the “classic” method.
The first part of the process for preparation of a separate boot partition is the same for both Linux flavors on the Microsoft Azure platform. We shall discuss this here.
Setting Access Method
Ensure that the VM can be accessed using the “ssh public key” access method. It has been noticed that at times we lose VM access after the outlined process, and the only method that works for sure is the “ssh public key” access method. Though Azure allows you to change the access method at any time, it is best to set this before starting the process. See the screenshot below which shows how to set the “ssh public key” access (right hand panel).

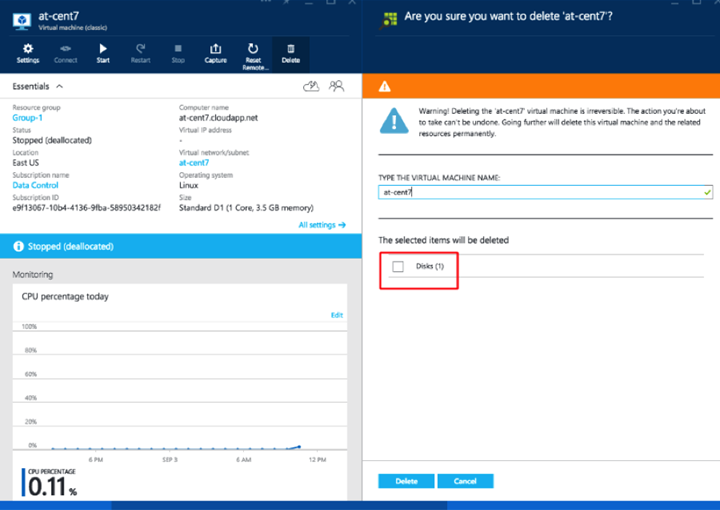
Release the OS disk for the VM
There is no direct method to release the “OS disk” on Azure while keeping the VM intact. The only way to release the OS disk is to delete the VM.
As we delete the VM, any Azure customizations that we did for it will be lost with it. For this reason, before deleting the VM, you should make note of all required customizations.
Note that while deleting the VM, we have to ensure that its disks are not deleted at the same time. There is a checkbox in the delete VM workflow (which should not be checked). See the screenshot below.
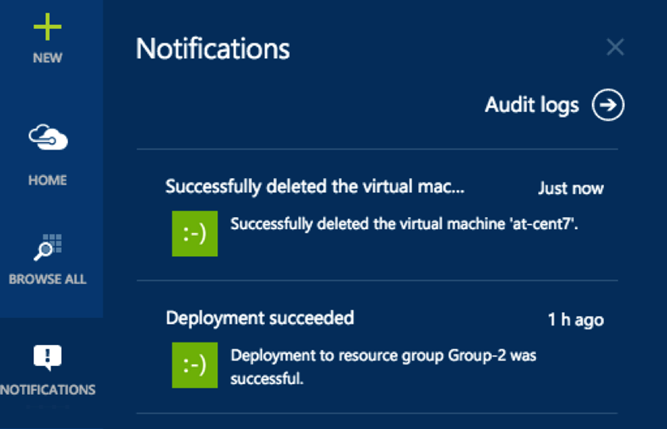
Wait for Azure to delete the VM, you can see the progress in the “Notifications” tab:
Resize the root partition
We need to create another VM in the same “Resource Group” in the same “Location.” Note that it is very important that the new VM be in the same resource group, otherwise it won’t be able to see the OS disk of the original VM. This second VM is used to modify the OS disk of the original VM. Linux does not support online resize of the mounted file system and that is the main reason for following this process.
Attach the OS disk of the original VM as data disk in the new VM.
The OS disk will show up on the new VM, you can use dmesg to find out the device name. In the case of the new Ubuntu 14.04 server, it shows as /dev/sdc. We need to resize the root file system on this device and create enough space for a separate boot partition.
Mount the root partition:
# mkdir /tmp/root# mount -o ro /dev/sdc1 /tmp/root
Find out the space required by the /boot subtree:
# du -sh /tmp/root/boot178M /tmp/root/boot# umount /tmp/root
The new boot partition should at least have two times this space. As a rule of thumb the space provided should be higher than twice the space used by /boot, plus 100MB.
The following three steps are required to shrink the original root file system and create a new boot partition
# e2fsck -f /dev/sdc1# resize2fs /dev/sdc1 <newsize># fdisk /dev/sdc
We will have to delete and recreate the root partition, ensure that the new root partition starts at exactly the same block, and that its size is equal or greater than the new size of root file system (after we have run resize2fs). As a rule of thumb, the size of the new root partition should be 100MB more than new size of the root file system. Remember to set the boot flag on the root partition.
The example below shows how this is achieved.
# e2fsck -f /dev/sdc1e2fsck 1.42.12 (29-Aug-2014)
Pass 1: Checking inodes, blocks, and sizes
Pass 2: Checking directory structure
Pass 3: Checking directory connectivity
Pass 4: Checking reference counts
Pass 5: Checking group summary information
/dev/sdc1: 11/128016 files (0.0% non-contiguous), 26666/510976 blocks
# resize2fs /dev/sdc1 400Mresize2fs 1.42.12 (29-Aug-2014)
Resizing the filesystem on /dev/sdc1 to 409600 (1k) blocks.
The filesystem on /dev/sdc1 is now 409600 (1k) blocks long.
# fdisk /dev/sdcWelcome to fdisk (util-linux 2.25.2).
Changes will remain in memory only, until you decide to write them.
Be careful before using the write command.
Command (m for help): p
Disk /dev/sdc: 1 GiB, 1073741824 bytes, 2097152 sectors
Units: sectors of 1 * 512 = 512 bytes
Sector size (logical/physical): 512 bytes / 512 bytes
I/O size (minimum/optimal): 512 bytes / 512 bytes
Disklabel type: dos
Disk identifier: 0xa265b300
Device Boot Start End Sectors Size Id Type
/dev/sdc1 2048 1024000 1021953 499M 83 Linux
/dev/sdc2 1026048 2097151 1071104 523M 82 Linux swap / Solaris
Command (m for help): d
Partition number (1,2, default 2): 1
Partition 1 has been deleted.
Command (m for help): n
Partition type
p primary (1 primary, 0 extended, 3 free)
e extended (container for logical partitions)
Select (default p):
Using default response p.
Partition number (1,3,4, default 1):
First sector (2048-2097151, default 2048):
Last sector, +sectors or +size{K,M,G,T,P} (2048-1026047, default 1026047): +400MCreated a new partition 1 of type 'Linux' and of size 400 MiB.
Command (m for help): p
Disk /dev/sdc: 1 GiB, 1073741824 bytes, 2097152 sectors
Units: sectors of 1 * 512 = 512 bytes
Sector size (logical/physical): 512 bytes / 512 bytes
I/O size (minimum/optimal): 512 bytes / 512 bytes
Disklabel type: dos
Disk identifier: 0xa265b300
Device Boot Start End Sectors Size Id Type
/dev/sdc1 2048 821247 819200 400M 83 Linux
/dev/sdc2 1026048 2097151 1071104 523M 82 Linux swap / Solaris
Command (m for help): n
Partition type
p primary (2 primary, 0 extended, 2 free)
e extended (container for logical partitions)
Select (default p):
Using default response p.
Partition number (3,4, default 3):
First sector (821248-2097151, default 821248):
Last sector, +sectors or +size{K,M,G,T,P} (821248-1026047, default 1026047):Created a new partition 3 of type 'Linux' and of size 100 MiB.
Command (m for help): a
Partition number (1-4): 1
Command (m for help): p
Disk /dev/sdc: 1 GiB, 1073741824 bytes, 2097152 sectors
Units: sectors of 1 * 512 = 512 bytes
Sector size (logical/physical): 512 bytes / 512 bytes
I/O size (minimum/optimal): 512 bytes / 512 bytes
Disklabel type: dos
Disk identifier: 0xa265b300
Device Boot Start End Sectors Size Id Type
/dev/sdc1 * 2048 821247 819200 400M 83 Linux
/dev/sdc2 1026048 2097151 1071104 523M 82 Linux swap / Solaris
/dev/sdc3 821248 1026047 204800 100M 83 Linux
Partition table entries are not in disk order.
Command (m for help): w
The partition table has been altered.
Calling ioctl() to re-read partition table.
Syncing disks.
/dev/sdc3 is the newly created partition.
Recreate the Original VM
After this step we need to detach the disk from the new VM, where we re-partitioned it to create the additional boot partition.
The disk (whose name is derived from the VM) can be found in the OS disks tab in the Azure portal, under Browse All.

Once the original VM is re-created, we can boot it and access it using ssh public key access that we had set up in the first step.
After this initial preparation, the next stage depends on the flavor of Linux being used. Here we describe two versions as examples. See Encrypting Linux Root and Swap Drives for additional detail.
On the new VM switch the boot flag on the OS disk to the new partition:
#fdisk /dev/sda
Command (m for help): a
Partition number (1-3, default 3): 3
Command (m for help): a
Partition number (1-3, default 3): 1
Command (m for help): p
Disk /dev/sda: 1 GiB, 1073741824 bytes, 2097152 sectors
Units: sectors of 1 * 512 = 512 bytes
Sector size (logical/physical): 512 bytes / 512 bytes
I/O size (minimum/optimal): 512 bytes / 512 bytes
Disklabel type: dos
Disk identifier: 0xa265b300
Device Boot Start End Sectors Size Id Type
/dev/sda1 2048 821247 819200 400M 83 Linux
/dev/sda2 1026048 2097151 1071104 523M 82 Linux swap / Solaris
/dev/sda3 * 821248 1026047 204800 100M 83 Linux
Command (m for help): w
The partition table has been altered!
Calling ioctl() to re-read partition table.
Preparation of /boot on Ubuntu
From the new VM, format the new partition with ext4 (ext3 is also fine), like this
#mkfs.ext4 /dev/sda3
The files from the /boot directory should be copied to the new boot partition:
# mkdir -p /tmp/sda3# mount /dev/sda3 /tmp/sda3# cp -a /boot/* /tmp/sda3
Find the UUID of the new boot partition:
# blkid -o list /dev/sda3device fs_type label mount point UUID---------------------------------------------------------------------------------------------------------/dev/sda3 ext4 (not mounted) b425c93b-533d-4e73-8c2b-dbca05b9a8f1# umount /tmp/sda3
Add an entry to /etc/fstab to mount the new boot partition, like this:
UUID=b425c93b-533d-4e73-8c2b-dbca05b9a8f1 /boot ext4 rw 0 0
Mount the /boot partition. This is important; do not forget this step:
# mount /boot
Re-install grub on current boot device (GRUB files need to be copied to /boot, which was mounted in the step shown above), like this:
# grub-install /dev/sda
Note that GRUB is being installed on /dev/sda but the boot directory comes from /dev/sda3. Update your GRUB configuration to take this change into account:
# grub-mkconfig -o /boot/grub/grub.cfg
Your system is ready now, so reboot and ensure that all is well.
Preparation of /boot on CentOS 7
Format the new partition with ext4 (ext3 is also fine), like this
# mkfs.ext4 /dev/sda3
The files from directory /boot should be copied to the new boot partition:
# mkdir -p /tmp/sda3# mount /dev/sda3 /tmp/sda3# cp -a /boot/* /tmp/sda3
Find the UUID of the new boot partition:
# blkid /dev/sda3# umount /tmp/sda3
Add an entry to /etc/fstab to mount the new boot partition, like this:
UUID=<uuid> /boot ext4 rw 0 0
Mount the /boot partition. This is important; do not forget this step:
# mount /boot
Re-install GRUB on the current boot device (GRUB files need to be copied to /boot, which was mounted in the previous step), like this:
# grub2-install /dev/sda
Note that GRUB is being installed on /dev/sda but the boot directory comes from /dev/sda3. Update your GRUB configuration to take this change into account:
# grub2-mkconfig -o /boot/grub2/grub.cfg
Your system is ready now, so reboot and ensure that all is well.
Encrypting the root and swap disks
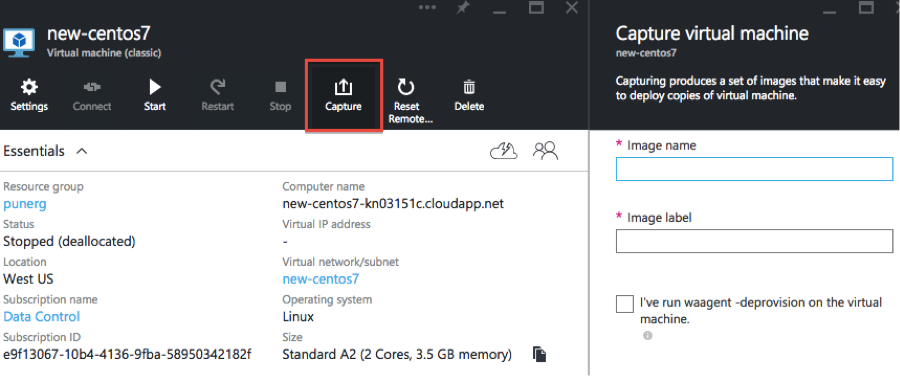
At this point you are now ready to encrypt your root and swap partitions. First of all though, to avoid having to repeat the process shown above, we recommend that you create a template from this VM. All subsequent VMs are then able to start with an already correctly partitioned system. See the following screenshot to understand how to create a template in Azure:
When you’re ready to encrypt your root and swap drives, please refer to Encrypting Linux Root and Swap Drives.