Encryption with Windows Virtual Machines
Introduction
This chapter describes installation and management of the HyTrust DataControl Policy Agent (the Policy Agent) on Windows platforms. We assume that you have read the introductory chapter on Virtual Machine Encryption,which covers the architectural aspects as well as operations that are common to both Windows and Linux.
First you need to install one or more KeyControl nodes. You can find details here
There are three methods of registration and administration after Policy Agent installation:
- Through a Windows GUI application.
- Through the command line, interactively.
- The third method involves adding the username and password on the
hclcommand line.
The command line method is the same in Windows and Linux and may be preferable for UNIX-based administrators. Windows administrators may prefer to use the GUI. We do recommend in both cases that registration and authentication be performed using the GUI to avoid having to create and copy certificates between the KeyControl and the VMs.
If you are using the command line, you will need to generate a certificate for each VM on which you're installing the Policy Agent. Note that a certificate ties a VM to a Cloud VM Set. You then register the VM.
Platforms supported
We currently support the following Windows platforms:
- Windows 2012 Server
- Windows 2012 Server R2
- Windows 2008 Server R2 64-bit, with service pack 1 and patch KB3033929 (KB3033929 is required by Microsoft as of Jan 1, 2016 in order to support signed drivers)
- Windows 7 64-bit, with service pack 1 and patch KB3033929
- Windows 8 and 8.1
- Windows 10
If you are intending to use the HyTrust GUI, you need to install version 4 of the Microsoft .NET framework for Windows 2008R2 and Windows 7. Windows 2012 already supports the .NET framework. You can find details here:
http://www.microsoft.com/en-us/download/details.aspx?id=17851
If you are only going to use the command-line-based tools, you can skip installation of the .NET framework. Whether using the GUI or not, you can still install the HyTrust software without having .NET installed.
A Note on Administrator Privileges
Administrator privileges are required to install, upgrade or uninstall the software. If you attempt one of these operations as a regular user, you will be prompted to enter the administrator password before continuing. If User Account Control (UAC) is turned off, then install/upgrade/uninstall will prevent a non-administrator from completing the task.
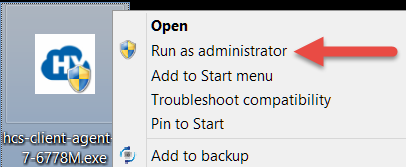
All of the hcl operations must be run as an administrator. Any attempts to run any hcl commands without administrator privilege will terminate with the message:
hcl must be run as Administrator
To run a program/command as the Administrator, simply locate it, right click on it and then select Run as administrator as shown below with the icon on a Windows 7 computer’s desktop:
Setting Up A Device For Encryption
Before we describe the installation process, we want to say a few words about mapping drive letters to drives. HyTrust does not require that drives are formatted but we do require that each drive have an associated drive letter.
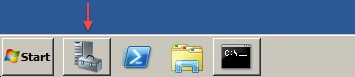
The Windows disk manager should be used to add drive letters. To start the disk manager, either run diskmgmt.msc from the command shell or locate and start the Server Manager as shown below:
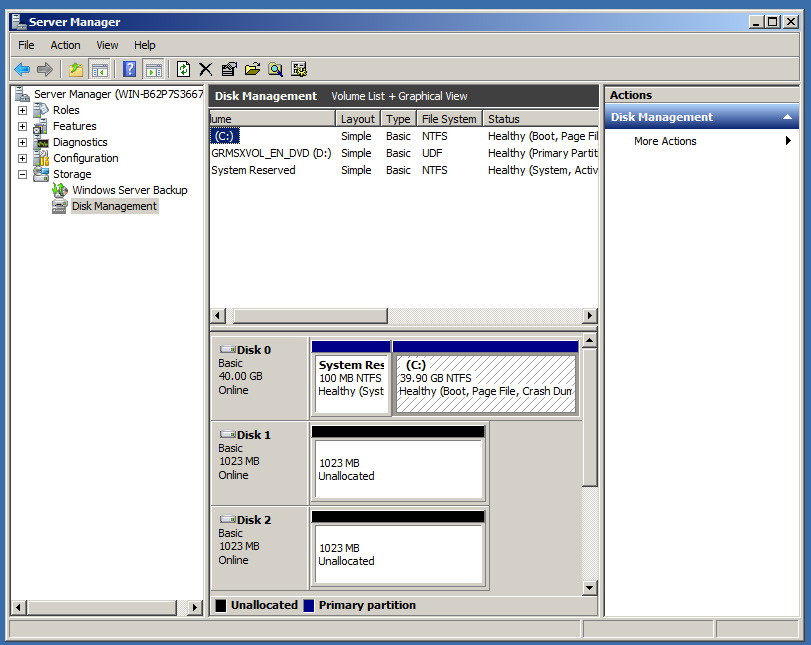
Once loaded, you will see the following screen. Select Storage, on the left side, and then select Disk Management(Local). Note that VHD drives are not supported in those cases where they are stored on an NTFS filesystem as files.

In this example we have two new disks, referenced on the screen as shown below. Note that in subsequent usage (after formatting) you may just see the disks as online and available.

Select MBR for partitioning. Note that GPT is supported for drives beyond the boot C: drive, but the C: drive must be an MBR disk. After pressing OK, the two disks will be displayed as follows (Disk 1 and Disk 2):
You can now create volumes of the appropriate type and format as necessary. If you're adding a new disk you don't need to format it. HyTrust will format the disk for you.
NOTE on GPT support: we only support a single partition per disk. Attempts to encrypt GPT disks containing multiple partitions will be rejected.
The Windows Disk Manager is a little harder to locate on Windows 7. Click on the Start button and then choose Control Panel. Click on the System and Security link. In the System and Security window, click on the Administrative Tools heading located near the bottom of the window. And from the Administrative Tools window, double-click the Computer Management icon. When Computer Management opens, click on Disk Management on the left side of the window, located under Storage.
An easier alternative is to click Start, type run and then type diskmgmt.msc, and then click OK.
Windows 2012 is a special case. The Windows 2012 Server Manager does not allow you to initialize new disks using the MBR partition style. However, there are 2 alternate mechanisms that can be used.
- From Powershell, run the Initialize-Disk cmdlet. This command allows you to specify the style. For instance:
Initialize-Disk 1 -PartitionStyle MBRThis command will initial Disk 1 as MBR. The disk will now be available for encryption.
- From the Server Manager GUI, select Computer Management from the Tools drop-down menu. This will allow you to select the Disk Management tool on the left hand tree view under Storage. When you select Disk Management, you will be presented with the tool that was available in previous windows releases. This tool will allow you to select the MBR partitioning style.
Installation
The following sections describe how to install, upgrade and uninstall the Policy Agent on Windows.
Installation Prerequisites
As described above, if you are intending to use the HyTrust GUI, you need to install version 4 of the Microsoft .NET framework. Note that this is not required if you are running Window 2012, which has the .NET framework built in. You can find details here:
http://www.microsoft.com/en-us/download/details.aspx?id=17851
If you are only going to use the command-line-based tools, you can skip installation of the .NET framework. Whether using the GUI or not, you can still install the HyTrust software without having .NET installed.
Downloading and Installing the Policy Agent on Windows
Click the Cloud icon and then click the Actions button. Click Download Policy Agent. Note: On Windows, the Policy Agent can only be installed on a system drive, not a data drive.
When you download the Policy Agent, a Zip file containing the client software downloads to the host computer you are using. (For Linux, see Downloading and Installing the Policy Agent on Linux)

Make sure that the Disk Defragmenter service on each client computer is enabled before installing the Policy Agent software. This is needed for compatibility with boot drive encryption. The user account used for installing the software should have the SeRestorePrivilege and the SeTakeOwnershipPrivilege for the Bootloader installation to succeed. Additionally, the SeSecurityPrivilege is required for successful installation on Windows 2008R2. For details on boot drive encryption, see: Encrypting Windows Boot Drives
The next step is to locate the HyTrust package (usually in your default downloads folder) and double click the filename to start the install process. This will unzip the file, and give you access the Windows package. Alternatively, you can run an unzip program to extract the files. Note that this process can also be scripted as a silent installation, as described in Silent Installation on Windows

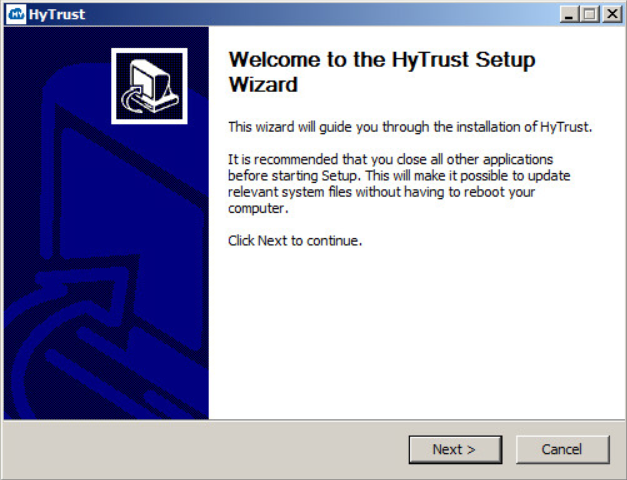
The first screen that appears is a simple "Welcome" screen, as follows:
First, you choose a destination for the software:

Next, you need to agree to the license terms:
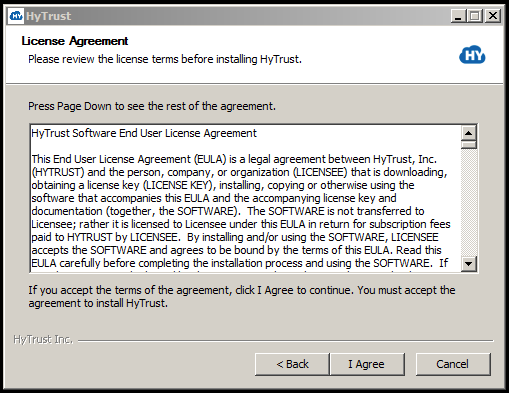
Next, you verify the components to be installed and the space required. Note that if you are installing the HyTrust Bootloader, you must check its box, shown below, to enable it. If you do not anticipate ever encrypting your boot drive, be sure that you uncheck the box, as shown below. Note that the default state is to have this box checked, opting to install the Bootloader.
If you do want to install the Bootloader, follow the instructions here: Encrypting Windows Boot Drives
If you choose to install without the Bootloader, and have unchecked the box, then click Install to proceed with the installation.

It will only take a few seconds after which you are prompted to reboot. Click Reboot now, and then click Finish.

Once the reboot is complete, the Policy Agent is ready to use. You can now continue on to configure encrypted devices.
Uninstalling the Policy Agent on Windows
To uninstall the HyTrust software, select Uninstall from the HyTrust menu (from Start > All Programs > HyTrust). Note that on some operating systems, you should navigate to Program Files\hcs\bin\uninstall.exe. If you wish to preserve data you should run hcl decrypt on your volumes or use the GUI, located at Start > All Programs > HyTrust). Note that on some operating systems, you should navigate to Program Files\hcs\bin\hclgui.exe.

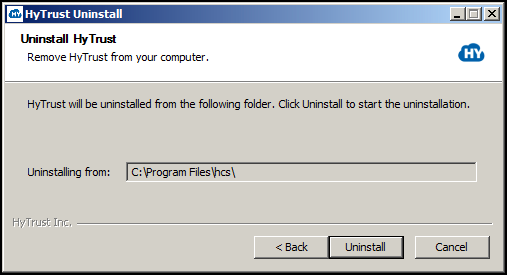
First of all, a short welcome screen is presented:
After selecting Next, click Uninstall to start the process of removing the software.
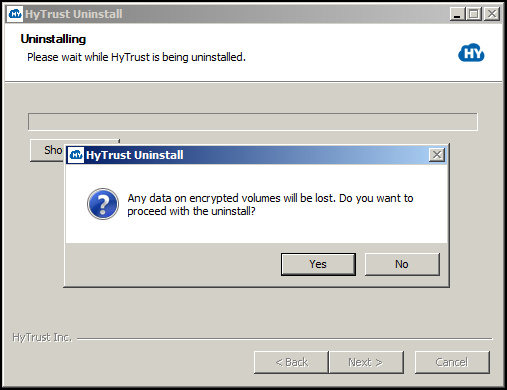
The following screen will be displayed. You need to confirm that if you continue with the uninstall, all data on all volumes will be lost. Click Yes to continue.
Once the software has been uninstalled, you will see the following message. After the uninstall you should reboot Windows to clean up any driver state.

Note that any errors encountered during the install/uninstall process will be logged to C:\hcs-install.log. If errors are encountered, a popup will highlight that fact and mention the path to the logfile.
NOTE: You should now reboot Windows to complete the uninstall.
Upgrading the Policy Agent on Windows
Upgrading the HyTrust software is very similar to the process of installing the software for the first time. First of all, you can check the current version of the software by looking at the top of the GUI as follows:

or via the command line as follows:
C:\>hcl version
3.2.1 (b9355)
The next step is to run the installation package. After the first few screens, which are similar to first install, you will see the following screen appear to inform you that an upgrade will take place. Note that any outstanding encryption or decryption operations must complete before you run the upgrade. Once they are completed, close the applications and then run the upgrade.
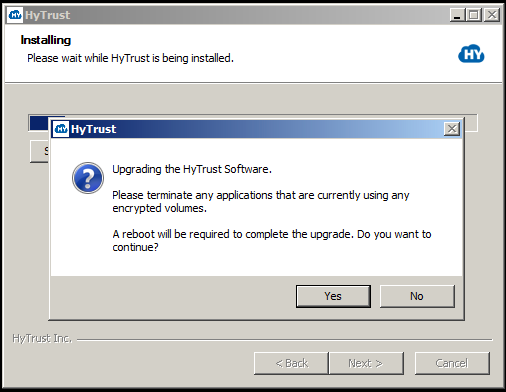
At this point, click Yes and the upgrade will continue. Once complete, you should reboot Windows. Once reboot is complete, your drives will be back online.
Agent Version Should Not be Higher Than KeyControl Version
Be sure that your Agent version is not higher than your KeyControl node. Upgrading an Agent to a version higher than your KeyControl is not supported. A best practice is to upgrade your Agents along with your KeyControl.
GUI-based VM Management
Most operations can be performed through the HyTrust GUI. This can be found from Start > All Programs > HyTrust). Note that on some operating systems, you should navigate to Program Files\hcs\bin\hclgui.exe.
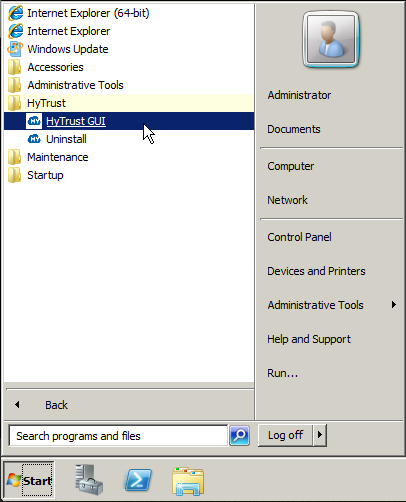
When the GUI starts for the first time, you will see a screen similar to the following screen shot:
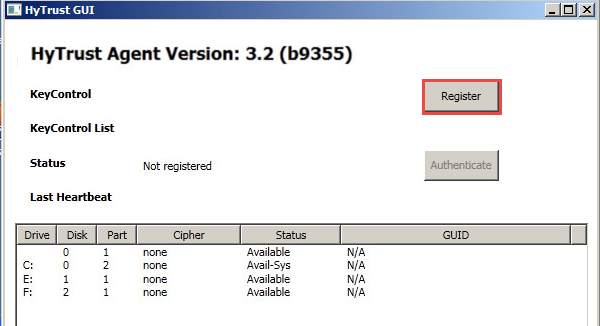
Which drives show depends upon on your configuration.
Registration with the KeyControl Cluster
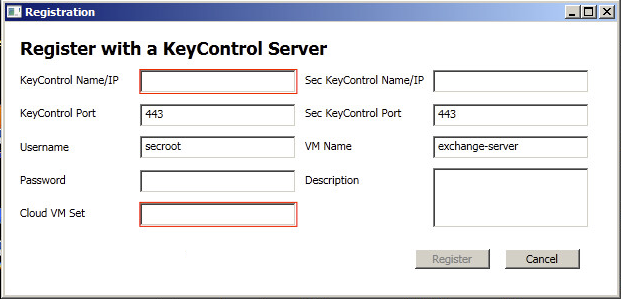
When starting the GUI for the first time, you will see a screenshot similar to the one shown above. To register with the KeyControl cluster, click the Register button. This will bring up the following screen:
Before describing the fields to fill in, let's look at the list of Cloud VM Sets that we have:

We are going to register with this KeyControl and we want to place the VM in the "Headquarters" Cloud VM Set. The parameters that need to be entered in the GUI are:
- KeyControl Name/IP - the hostname or IP address one of the KeyControl nodes.
- Sec KeyControl Name/IP - if you have a second node in a KeyControl cluster, enter the hostname or IP address here. You can leave this blank if you only have one KeyControl.
- Username - this is the Cloud Admin username under which you are registering the VM.
- Password - the password for the Cloud Admin (that you would normally enter to log in to the KeyControl GUI).
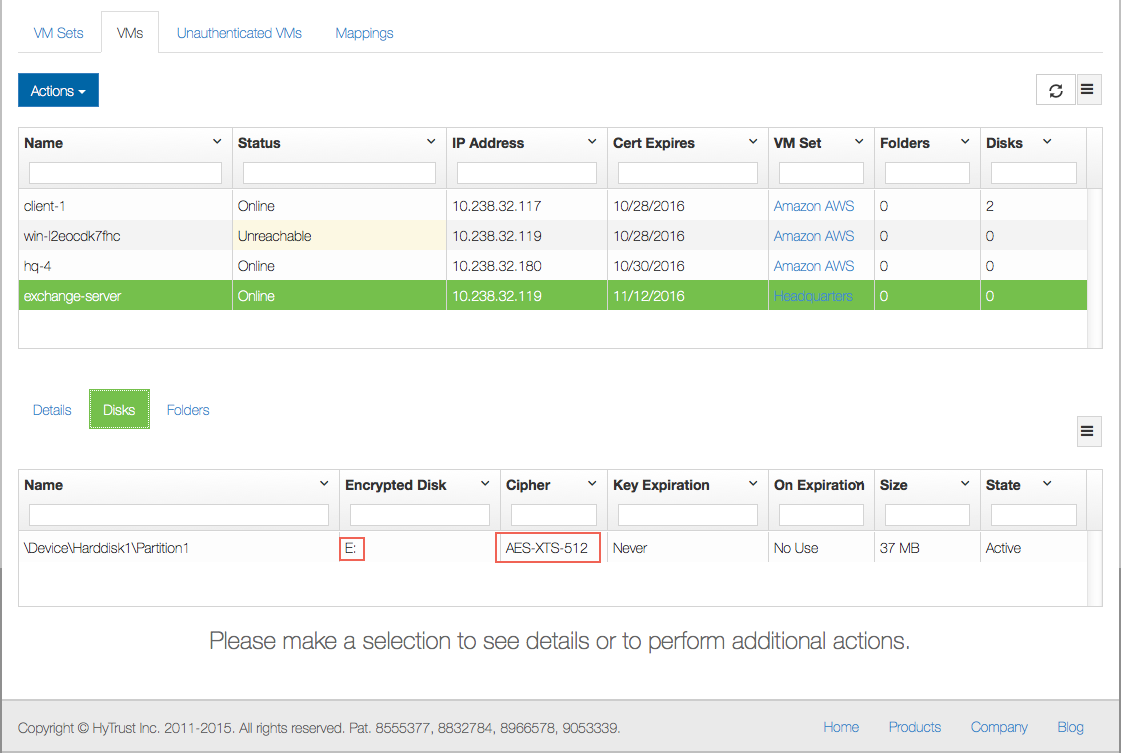
- VM Name - the symbolic name of the VM. This will appear in the KeyControl GUI. For example, see the screenshot below. Here we have a Windows VM with a VM Name of exchange-server. The default name, if none is selected, is the hostname of the VM, as it is here.
- Description - an optional description which will be shown in the KeyControl GUI when displaying more information about the VM.
- Cloud VM Set - the Cloud VM Set into which we will place this VM. As noted above, we are going to
place it in the Headquarters Cloud VM Set.
Click Register and we will go through the process of generating a certificate, downloading the certificate and registering the VM. You do not need to go to the GUI to authenticate the VM since you have already supplied your credentials. Once complete you will see the following which shows that the VM is now connected to the KeyControl cluster:

And if you look at the KeyControl GUI, you will see the VM in the Headquarters Cloud VM Set. Note that the VM named exchange-server appears in the Headquarters VM Set.

Encrypting New and Existing Devices
Before adding a device, we recommend that you re-read this section, earlier in tjhis topic, which covers device management in Windows. Before HyTrust can encrypt drives or encapsulate drives containing an NTFS filesystem, we must first have a drive letter that we can reference.
NOTE: If Windows disks are sparse, we will only encrypt allocated blocks ensuring that only the allocated blocks are encrypted and the spareness remains. This is not currently available for Windows C: drives.
Once drive letters are assigned, right click on one of the displayed devices and you will see two options:
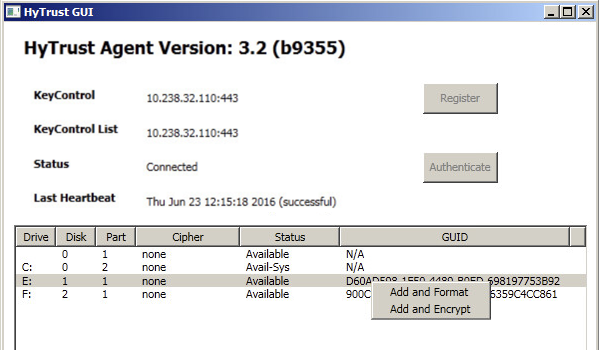
If you select Add and Format, you will need to acknowledge that all data will be overwritten:
Once you select Yes we will add the device (equivalent of hcl add on the command line) and format the encrypted device with NTFS. You will now see the following change in the GUI:

and the device will now be visible on the KeyControl GUI. There is “1” disk now formatted. If you then choose to encrypt, you will see the results for Drive E:, in the Encrypted Disk, column, below, along with the encryption cipher used.
Noting that the F: drive is listed in the GUI, let's assume that we already have a NTFS filesystem on it and that we wish to encapsulate the drive (keep the NTFS filesystem / files and encrypt it). In this case, we need to select Add and Encrypt the device as shown below:

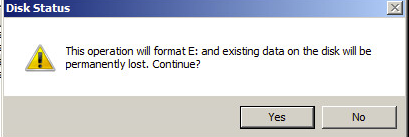
You will see the following warning:

After selecting Yes, the drive will then be encrypted. This could take a long time depending on the size of the drive and the performance of the CPU/storage subsystem. However, the operation will be performed in the background so you can still use the drive. Once you confirm that you wish to encrypt you will see the following:

The popup window informs you that the process of encrypting the disk has started. In the main window you can see that the encryption process is 50.10% complete.

We will cover encryption and how you control it in this section: Encrypting An Existing Device
Removing a Device from HyTrust Control
To remove a disk from HyTrust control, right click on the device and you will see the following three options:

If you select Remove, we will remove the disk and you will no longer be able to access the data, so be warned. If you wish to continue accessing data after removal, select Decrypt and Remove. Note that you will see the following warning. As with Add and Encrypt you can continue to access the disk while it is being decrypted.

Command-Line-Based VM Management
In the following sections, we describe the operations that can be performed on the VM including registration, authentication, encrypting devices and obtaining and understanding status messages.
Creation of Certificates
Once you have created a Cloud VM Set and wish to add a VM, you first need to create a certificate. To do this, point your browser at the KeyControl, log on, select the Cloud tab and then select the Cloud VM Set. For example, in the screenshot below, we have selected the Headquarters Cloud VM Set.
From here, we click the Actions button, and then click Create new certificate, as shown below:

You will then see the Create New Certificate dialog box:
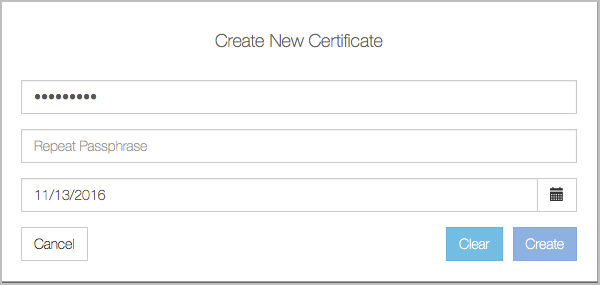
Type in the (optional) password for the certificate. You will be prompted to re-type this password when you register the VM. You can also specify the length of time for which the certificate is valid. By default this is 365 days. At this point you need to click the Create button. The certificate will then be downloaded and should be copied to the VM. Note that you can generate multiple certificates from this screen before returning, by repeated clicks of the Actions button and Create new certificate. Be aware that certificates can only be used once.
Registration Of The VM
Besides the registration that you do on installation, you have access the command-line interface for registration and VM encryption services. The hcl command is your gateway to VM encryption services. To register a VM select Start and then type command and Enter as shown below:
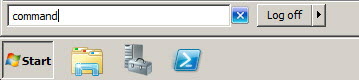
On Windows 7, if you are not logged on as an Administrator, you can run the command shell as Administrator by right-clicking on the command icon as shown below. Note that Windows 8, 8.1 and 10 give direct access to the command-line window.

To display the list of options available, simply type hcl and press enter. A full manual page is available here
Run the following command to register the VM with the KeyControl. Note that you must first copy the certificate to the VM from which you will register, and make sure that you switch to the directory where you placed the certificate. Note that Windows also supports command line completion so you can enter the first character of the certificate and hit <Tab> to complete the filename.
C:>hcl register -h hq-4 -d "Windows 2008" 192.168.140.130 ad85837b-9862-11e1-afd5-000c29de5d41_120507163538.bin
Enter Import Password: Enter certificate passphrase

Enter passphrase (min 16 characters): OneTimePass16chrs
Registered as hq-4 with KeyControl 192.168.140.130

Please login to the KeyControl to complete the authentication of this node
-h and -d arguments are optional. The name of the VM (the -h argument) is user chosen and can be anything. In this case, we just chose the name hq-4. It will appear in the webGUI next to this VM. If the argument is omitted, the hostname will be used by default. The IP address references the KeyControl and the certificate filename is the last parameter. The -d argument is optional but will be displayed in the webGUI and is useful to further identify your VM.
In the above, ad85....bin file was the certificate file that we got from the Create New Certificate step.
The Import Password is the password used to encrypt the certificate while generating it.
The Passphrase is the one-time password used to authenticate the VM with the KeyControl. This must be a minimum of 16 characters.
Once you have issued the hcl register command go back to the KeyControl and you should see an entry for the VM_name of hq-4 in the Unauthenticated VMs list under the Cloud Icon.
Simplified Registration
A simpler form of registration is available by which you do not need to manually create a certificate and copy it to the VM. You can quickly register and authenticate a VM by providing your KeyControl credentials and selecting the Cloud VM Set. For example, in this case pass the -a option to hcl:
# hcl register -a -h "Ubuntu-15.04" -d "My Ubuntu test VM" 192.168.140.151
Please provide the KeyControl login details
username: spate
password: ********

Available Cloud VM Sets
---------------------------------------------------
Microsoft_Azure
Amazon_AWS
ENKI
---------------------------------------------------

Please specify Cloud VM Set to which this VM should be added: ENKI

Certificate passphrase might be required
Certificate successfully unpacked
Registered as Ubuntu-15.04 with KeyControl node(s) 192.168.140.151

Completing authentication for Ubuntu-15.04 on KeyControl node(s) 192.168.140.151
Authentication complete, machine ready to use
Here, we invoke hcl register as before, but pass the -a option. First, hcl prompts for your username and password. It authenticates against KeyControl and then lists the available Cloud VM Sets. All you need to do now is to select the Cloud VM Set in which to place the VM. A certificate is created, copied to the VM and registration/authentication takes place.
In the example here, we are registering with a cluster of three KeyControl nodes.
Certificates are valid for 365 days by default but the actual expiration date can be specified when certificates are created. We discuss certificate handling further in the section Certificate Handling
Return to the webGUI on the KeyControl cluster, navigate to the node, click the Actions button, and then click Authenticate. Enter your one-time password in the VM Authentication dialog box, click Authenticate, and the VM is authenticated. Below is the prompt in the webGUI:

Click on the VM and you will see the VM details (such as OS, IP address) as shown below. You can edit the Description, Heartbeat, Grace Period, Reauthenticate on..., and Rekey Interval parameters.

Description of the fields shown for each VM:
- Description - The is a user-defined description of the VM. It can be set by editing the VM properties.
- IP Address - The VM's IP address as seen by the KeyControl cluster. If some VMs are behind a NAT gateway, then they will all show the same IP address: that of the gateway.
- Cloud VM Set - The Cloud VM Set to which this VM belongs.
- Heartbeat - The interval (in seconds) at which the VM pings a KeyControl node. Any actions such as device revocation or revocation of the VM itself will be performed the next time that the VM heartbeats into the KeyControl cluster.
- Grace Period - If the KeyControl cluster does not hear from the VM within the grace period (in seconds), the VM is forced to go through authentication once more. Access to all encrypted devices will be revoked at this point, so be sure to set the grace period to a value that is acceptable. To avoid simple problems such as networking disconnects which could easily be hit for several heartbeat attempts, the Grace Period should be at least 10 times the Heartbeat value.
- Status - this will be Online if the VM can be reached and Unreachable if the VM is not accessible. This could occur if the VM is not reachable due to network errors or if the VM is shut down.
- OS - Operating system level information about the VM.
- HyTrust Agent Version - The HyTrust software version that the client is running.
- Reauthenticate on IP Change: The default is No. If you change this option to Yes, when the IP address is changed, re-authentication is needed.
- Reauthenticate on Change of H/W signature: Currently, we use the MAC address of the first Ethernet card as the hardware signature. If this value changes, re-authentication is needed. Typically, when a VM is copied, the hypervisor changes the MAC address of the new copy so be warned.
- Reauthenticate on Reboot: The default is No. However, one could force re-authentication every time the VM boots. This is similar to having a boot-time password to enable the VM to come up completely.
- Rekey Interval: The number of days that the Policy Agent will go between rekeying the encrypted disks.
- Mapping GUID: If mapping has been implemented, this field shows the connection between the mapped drive and this one.
If a VM is already registered and you attempt to register again, you will see the following warning:
C:\>hcl register -p rootroot -o HyTrust -h win-2008 -d "My Windows VM" 192.168.140.151 *bin
Already registered
Use -c to register as clone (clone certificate will be required)
If you wish to start afresh by destroying all existing configuration
information and data on encrypted volumes, run 'hcl destroy' and remove
this VM from the KeyControl
You will only likely see this if you forget the passphrase and the VM is still sitting on the Unauthenticated VMs list. Remove the VM and repeat the registration phase once more.
Automated Registration of New Agents
You can also use the hcl register -a command with variables that enable automation of the registration process. Details of the hcl register -a parameters are below:
The command:
register -a [-c] [-h myname] [-d description]
	[-n KC_Mapping] [-u KC_user [-s KC_password]] [-z cvmset]
	KC_hostname[:port],KC_hostname2[:port2],...
where:
-u—usernamefor KeyControl-s—passwordfor KeyControl-z—cvmsetto add VM to-n—nameof cluster mapping
Each option overrides the input. For example, if username is specified, but password is not, then it prompts for password. This permits interactivity where you choose to have it.
Here is a fully automated example, showing a password of "Hytrust123!":
# hcl register -a -h Ubuntu-15.04 -u secroot -s 'Hytrust123!' -z headquarters -n hqmap 192.168.154.156

Certificate passphrase might be required
Certificate successfully unpacked
Registered as Ubuntu-15.04 with KeyControl node(s) 192.168.154.156

Completing authentication for Ubuntu-15.04 on KeyControl node(s) 192.168.154.156

Authentication complete, machine ready to use
Getting KeyControl Mapping information

KeyControl Mapping
server description hqmap, ip 192.168.154.156, port 443
Updated KeyControl list with KeyControl nodes 192.168.154.156:443
Here is an example with an interactive password:
#hcl register -a -h Ubuntu-15.04 -u secroot -z headquarters -n hqmap 192.168.154.156password:<user enters password>Certificate passphrase might be required Certificate successfully unpacked Registered as Ubuntu-15.04 with KeyControl node(s) 192.168.154.156 Completing authentication for Ubuntu-15.04 on KeyControl node(s) 192.168.154.156 Authentication complete, machine ready to use Getting KeyControl Mapping information KeyControl Mapping server description hqmap, ip 192.168.154.156, port 443 Updated KeyControl list with KeyControl nodes 192.168.154.156:443S
Checking The VM Post Registration
The status of the VM can be checked at any time using the hcl status command. For example, following a successful registration, run the command as follows:
C:\> hcl status

Summary
---------------------------------------------------
KeyControl: 192.168.140.151:443
KeyControl list: 192.168.140.151:443
Status: Connected
Last heartbeat: Sat Sep 07 14:18:21 2014 (successful)

Device details
---------------------------------------------------
Drive Disk  Part  Cipher     Status       GUID
---------------------------------------------------
E:    1     1     none       Available    N/A
F:    2     1     none       Available    N/A
The status is shown as Connected. The list of devices detected that are available for use is also shown.
Encrypting a New Disk
Empty drives must be given drive letters prior to being managed by HyTrust. For example, consider the following system for which two drives are available:
Device details
---------------------------------------------------
Drive Disk  Part  Cipher     Status       GUID
---------------------------------------------------
E:    1     1     none       Available    N/A
F:    2     1     none       Available    N/A
The Windows disk manager should be used to add drive letters. If no drive letters are associated with the drives, HyTrust cannot use them. Please refer to this section, earlier in this topic, for information on using the Disk Manager to add drive letters. Please note that for new drives, you do not need to format them. We just require that you have the right volume type that meets your storage needs and that you have a drive letter attached.
After you have added drive letters and run hcl status, you will see the associated drive letters:
Summary
---------------------------------------------------
KeyControl: 192.168.140.152:443
KeyControl list: 192.168.140.152:443
Status: Connected
Last heartbeat: Sat Jan 26 16:00:36 2014 (successful)

Device details
---------------------------------------------------
Drive   Disk    Part    Cipher          Status         Handlers
---------------------------------------------------
E:      1       1       none            Available      DEFAULT,DEFAULT
F:      2       1       none            Available      DEFAULT,DEFAULT
We can now add/attach the drives as follows. Please note that this operation is destructive. It will add the drive and format it. If you wish to encrypt an existing filesystem/disk, please click hereE: disk will use the default cipher of AES-XTS-512 and the F: disk will also use AES-XTS-512. For details on the encryption ciphers, see Key Management Capabilities. Note that root drive encryption on Windows uses AES-XTS-512 by default. For details on encrypting root drives on Windows, see: Encrypting the Windows Boot Drive
C:\> hcl add e:
Added device \Device\Harddisk2\Partition1
partition is already raw, just unmounting E
formatting...
The type of the file system is RAW.
The new file system is NTFS.
QuickFormatting 5118M
Creating file system structures.
Format complete.
       5.0 GB total disk space.
       5.0 GB are available.
Encrypted device E: has been added.

C:\> hcl add -c AES-XTS-512 f:
Added device \Device\Harddisk2\Partition1
partition is already raw, just unmounting G
formatting...
The type of the file system is RAW.
The new file system is NTFS.
QuickFormatting 2046M
Creating file system structures.
Format complete.
       2.0 GB total disk space.
       2.0 GB are available.
Encrypted device F: has been added.
You can now view the attached disks as follows:
C:\> hcl status

Summary
---------------------------------------------------
KeyControl: 192.168.140.152:443
KeyControl list: 192.168.140.152:443
Status: Connected
Last heartbeat: Sat Jan 26 16:02:57 2014 (successful)

Device details
---------------------------------------------------
Drive Disk  Part  Cipher         Status       GUID
---------------------------------------------------
E:    1     1     AES-XTS-512    Attached     BA7883AE-3562-44F1-9D86-87D80323CC01
F:    2     1     AES-XTS-512    Attached     N/A
At this point the encrypted disks are formatted and ready to use.
If you add a device that already contains an NTFS filesystem, we will detect that and print the following message:
C:\>hcl add f:
The partition you've selected to add already contains an NTFS file system.
This operation will destroy the contents of the disk.
If you wish to preserve them, run hcl encrypt F instead.
Do you want to proceed (y/n)
If you do not wish to overwrite and have the contents of the disk encrypted, you should not use hcl add and use hcl encrypt instead.
Once added, you can now use your disks as normal. For example, in the screenshot below, both E: and F: have been formatted and files copied into E: - note that by default, Explorer won't show the string "Encrypted." That is the label we chose when adding a drive letter, and is not generated by HyTrust. Also note that the drive's contents do not show, because the drive is encrypted.

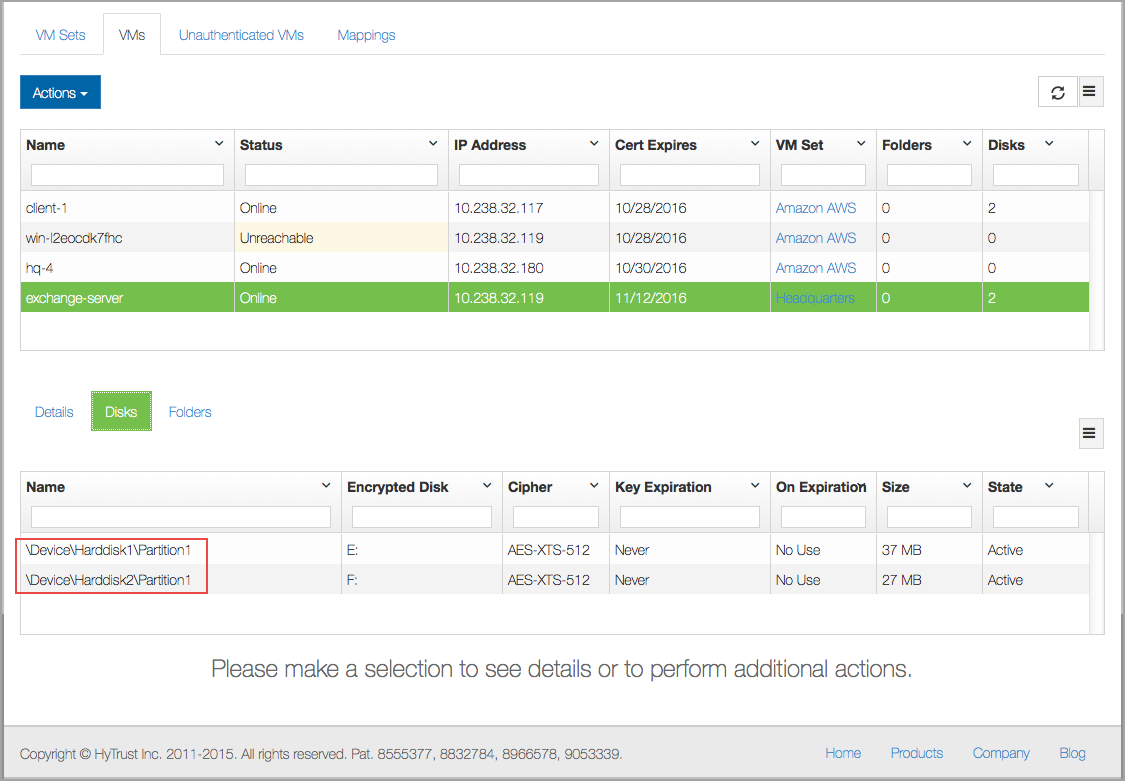
You can view the HyTrust-managed devices in the webGUI by selecting the Windows VM and selecting Disks in the file browser. For the two disks under management above, here is the view in the webGUI:
Encrypting An Existing Device
The windows client also supports attach and detach handler scripts. These run at the same times as the Linux client scripts. The attach handlers will be called immediately after a successful attach. Detach handling scripts will be called immediately before detaching disks.
You can create a handler script for each disk that is encrypted. The format of the name will be
DRIVE_LETTER.attach.cmd and DRIVE_LETTER.detach.cmd
Individual disk handler scripts are not required. If not specified, then the default script will be called instead. Those are named default.attach.cmd and default.detach.cmd.
Each script invocation will be passed 4 parameters:
- The drive letter of the disk being attached or detached
- The device name of the volume that is being attached or detached
- The index into the list of disks that are available
- The total number of disks that are available.
Therefore, if there are 4 disks in the system, the script can determine when all of the disks have been attached or detached by checking these 2 parameters. If parameter 3 (plus 1 since it is offset from 0) is equal to parameter 4, then the script can assume that all of the disks in the system have been handled.
If the total number of disks passed in is 0, then it indicates that an hcl attach or detach has been run from the command line and only a single disk is being operated on at that time. The same is true of calls from the revoke/restore operation in the KeyControl GUI.
If you have a disk that already contains data that you want to be encrypted, you can run the hcl encrypt command. All encryption, whether encrypting a new disk or removing and decrypting an existing disk, makes use of dynamic rekey. In the case of encrypting a disk, we do the conversion in the background allowing you access the disk while the encryption process is taking place. This allows you to have no downtime for your applications and data.
NOTE: If Windows disks are sparse, we will only encrypt allocated blocks ensuring that only the allocated blocks are encrypted and the spareness remains. This is not currently available for Windows C: drives.
To demonstrate how rekey works, let's first look at the contents of the unencrypted G::
C:\>dir g:
 Volume in drive G is New Volume
 Volume Serial Number is 44A1-E6A7

 Directory of G:\

10/25/2012  01:48 PM           346,454 HCS_BreachWhitepaper_v1.5.pdf
10/25/2012  01:48 PM           303,179 HCS_CSP_Whitepaper.pdf
10/25/2012  01:48 PM         2,278,559 HCS_Encryption_Use_Cases.pdf
10/25/2012  01:48 PM           883,773 HCS_HIPAA_Compliance.pdf
10/25/2012  01:48 PM         1,006,858 HCS_PCI_Compliance.pdf
10/25/2012  01:48 PM           310,103 HCS_Shack-P1.pdf
10/25/2012  01:48 PM           495,492 HCS_Shack-P2.pdf
               7 File(s)      5,624,418 bytes
               0 Dir(s)   2,098,798,592 bytes free
and now let's start the encryption process:
C:\>hcl encrypt g:
All the data on G: will be encrypted. This operation may take a long time.
Do you want to proceed? (y/n) y

registering drive G:, guid FF2A17F2-D7DE-404B-B977-018ADC611BCC

Encrypted device G: has been added.
.....
You can view the progress of the rekey operation by running hcl rekey as follows:
C:>\ hcl rekey status g:
device: \Device\Harddisk3\Partition1
drive: G
state: in progress
begin: 65536
end: 2144403456
current: 725794816
sector offset (from 0): 1417568
total sectors: 4188160
total size: 2144337920
pct done: 33.85%
elapsed time (seconds): 27
...and even though the drive is only partially encrypted, we can still view the contents:
C:\>dir g:
 Volume in drive G is New Volume
  Serial Number is 44A1-E6A7

 Directory of G:\

10/25/2012  01:48 PM           346,454 HCS_BreachWhitepaper_v1.5.pdf
10/25/2012  01:48 PM           303,179 HCS_CSP_Whitepaper.pdf
10/25/2012  01:48 PM         2,278,559 HCS_Encryption_Use_Cases.pdf
10/25/2012  01:48 PM           883,773 HCS_HIPAA_Compliance.pdf
10/25/2012  01:48 PM         1,006,858 HCS_PCI_Compliance.pdf
10/25/2012  01:48 PM           310,103 HCS_Shack-P1.pdf
10/25/2012  01:48 PM           495,492 HCS_Shack-P2.pdf
               7 File(s)      5,624,418 bytes
               0 Dir(s)   2,098,798,592 bytes free
Changing the Drive Letter of an Encrypted Volume
The drive letters of encrypted volumes must not be changed without informing the KeyControl server of the modified configuration. hcl mv can be used to change the letter associated with the drive while the encrypted drive is attached, as shown below:
c:\>hcl mv source: destination:
For example, to remap the currently attached drive E: to drive F: the command hcl mv E: F: can be used. The drive will be temporarily unmapped, causing it to disappear in Windows Explorer. Then the configuration will be modified and sent to the KeyControl, where it will display the new drive letter. Finally, the drive will be reattached with the new drive letter, making the storage once again available.
NOTE: This command will not operate on the Windows boot partition. The source drive must be a currently attached encrypted drive. The destination drive must not be in use for this command to succeed.
Removing and Decrypting Devices
Disks can be detached (taken offline) or removed from HyTrust control. To take a disk offline simply do the following:
C:\>hcl detach E:
Encrypted drive  E: detached; decrypted contents no longer visible
This will remove access to the clear text data. You can bring the disk back online by running:
C:\>hcl attach E:
Encrypted device \Device\Harddisk1\Partition1 attached; decrypted contents visible at E:
To remove a disk completely from HyTrust control, simple issue the following command:
C:\>hcl rm E:
WARNING: Removal of devices will cause any data stored on them to be permanently lost.
Do you want to proceed? (y/n)? y

Removed device \Device\Harddisk2\Partition1
If you wish to remove a device but decrypt the contents first so the filesystem/files will still be accessible after HyTrust relinquishes access, you should simply run the following:
C:\>hcl decrypt E:
All the data on E: will be decrypted. This operation may take a long time.
Do you want to proceed (y/n)
As with add/encrypting a disk, decryption involves a rekey from cipher text to clear text and is performed in the background. You can view the decryption progress as follows:
C:\>hcl rekey status E:
device: \Device\Harddisk3\Partition1
drive: E
state: in progress
begin: 65536
end: 2144403456
current: 535085056
sector offset (from 0): 1045088
total sectors: 4188160
total size: 2144337920
pct done: 24.95%
elapsed time (seconds): 15
And of course, you can still access the files while the decryption is in progress.
Once completed, you will see that the drive moves back to being Available.
Device details
---------------------------------------------------
Drive Disk  Part  Cipher	 Status	   GUID
---------------------------------------------------
C:    0     2     none       Avail-Sys    N/A
E:    1     1     AES-256    Attached     A8E25AE9-7A75-471A-A1AA-7CAE1550B35C
F:    2     1     none       Available    583EB883-52D3-4B05-A482-FF113B5359DD
G:    3     1     none       Available    FF2A17F2-D7DE-404B-B977-018ADC611BCC
You can also confirm this by checking for rekey status. Once complete you will see the following message:
C:\>hcl rekey status G:
Could not find g: in hcl config
Device g: does not exist
Expanding An Encrypted Device
When a filesystem becomes close to full, to add more space, the device needs to be first extended which is easily done in a virtual machine. You then need to expand the NTFS filesystem within that device. Thus MUST be performed through HyTrust interfaces. Consider the following filesystem:
C:\>dir f:

 Volume in drive F is Encrypted F:
 Volume Serial Number is C2E3-6984

 Directory of F:\

10/25/2012  01:48 PM           346,454 HCS_BreachWhitepaper_v1.5.pdf
10/25/2012  01:48 PM           303,179 HCS_CSP_Whitepaper.pdf
10/25/2012  01:48 PM         2,278,559 HCS_Encryption_Use_Cases.pdf
10/25/2012  01:48 PM           580,043 HCS_Evaluating-HCS-VM-Encryption.pages
10/25/2012  01:48 PM           310,203 HCS_Evaluating-HCS-VM-Encryption.pdf
10/25/2012  01:48 PM         1,479,834 HCS_Evaluating-HyTrust.pages
10/25/2012  01:48 PM           979,387 HCS_Evaluating-HyTrust.pdf
10/25/2012  01:48 PM           975,640 HCS_Evaluation.pages
10/25/2012  01:48 PM           883,773 HCS_HIPAA_Compliance.pdf
10/25/2012  01:48 PM         1,006,858 HCS_PCI_Compliance.pdf
10/25/2012  01:48 PM           310,103 HCS_Shack-P1.pdf
10/25/2012  01:48 PM           495,492 HCS_Shack-P2.pdf
10/25/2012  01:48 PM           129,289 HyTrust-PCI-DSS-mapping.pdf
10/25/2012  01:48 PM           670,050 HyTrustSecurity_DataSheet_1.8.pdf
10/25/2012  01:48 PM           673,911 HyTrustSecurity_DataSheet_2.0.pdf
              15 File(s)     11,422,775 bytes
               0 Dir(s)   1,567,735,808 bytes free
There is approximately 1.5GB of space in this device. We are going to expand it to 2GB. Shut down the VM and expand the disk. Once the system is up and running again, you can simply call hcl extend as follows:
C:\>hcl extend f:
extending partition for f:
extending filesystem for f:the new filesystem is 2146369536 bytes long
And now the extra space is available and any data written beyond the end of the original device will be encrypted.
C:\>dir f:
 Volume in drive F is Encrypted F:
 Volume Serial Number is C869-A617

 Directory of F:\

10/25/2012  01:48 PM           346,454 HCS_BreachWhitepaper_v1.5.pdf
10/25/2012  01:48 PM           303,179 HCS_CSP_Whitepaper.pdf
10/25/2012  01:48 PM         2,278,559 HCS_Encryption_Use_Cases.pdf
10/25/2012  01:48 PM           580,043 HCS_Evaluating-HCS-VM-Encryption.pages
10/25/2012  01:48 PM           310,203 HCS_Evaluating-HCS-VM-Encryption.pdf
10/25/2012  01:48 PM         1,479,834 HCS_Evaluating-HyTrust.pages
10/25/2012  01:48 PM           979,387 HCS_Evaluating-HyTrust.pdf
10/25/2012  01:48 PM           975,640 HCS_Evaluation.pages
10/25/2012  01:48 PM           883,773 HCS_HIPAA_Compliance.pdf
10/25/2012  01:48 PM         1,006,858 HCS_PCI_Compliance.pdf
10/25/2012  01:48 PM           310,103 HCS_Shack-P1.pdf
10/25/2012  01:48 PM           495,492 HCS_Shack-P2.pdf
10/25/2012  01:48 PM           129,289 HyTrust-PCI-DSS-mapping.pdf
10/25/2012  01:48 PM           670,050 HyTrustSecurity_DataSheet_1.8.pdf
10/25/2012  01:48 PM           673,911 HyTrustSecurity_DataSheet_2.0.pdf
              15 File(s)     11,422,775 bytes
               0 Dir(s)   2,104,590,336 bytes free
Notice the difference in device size between the two runs of dir.
Dynamic Rekey Management
We have discussed how dynamic rekey is used to both encrypt and decrypt disks without taking applications or data offline. While this is used for adding/removing encrypted disks, dynamic rekey can also be performed on existing disks. For example, consider the following:
Device details
---------------------------------------------------
Drive Disk  Part  Cipher	 Status	   GUID
---------------------------------------------------
C:    0     2     none       Avail-Sys    N/A
E:    1     1     none       Available    365DED95-9354-4D6F-A3BD-0319432FD723
G:    2     1     AES-256    Attached     EDCDD166-B740-4296-8218-26BDE0ED1BFB
F:    3     1     AES-256    Attached     8DFA86D3-32F9-4B8C-9D81-0888A7DBF87C
The F: drive is already attached and encrypted. If you wish to rotate encryption keys, for example decrypt the disk with the current key and encrypt with a newly allocated key, we can do so using dynamic rekey. In the current release, this is only available through the command line.
To start a rekey, simply run the hcl command as follows:
C:\>hcl rekey f:
You can check the status as follows:
C:\>hcl rekey status f:
device: \Device\Harddisk3\Partition1
drive: F
state: in progress
begin: 65536
end: 3218145280
current: 2793684992
sector offset (from 0): 5456416
total sectors: 6285312
total sizhe: 3218079744
pct done: 86.81%
elapsed time (seconds): 90
The percentage of the rekey operation being performed will also be shown in the GUI as follows:
This screen shot shows 50.10% complete in the Status column. Upon completion, the GUI will display the disk as attached. If you run hcl rekey status you will see that rekey is 100.00% done.
Operations During Rekey
Rekey operations can be paused. You may wish to pause a rekey if you get a spike in I/O activity. Although rekey will be throttled in the event of higher I/O activity, it may still cause a performance bottleneck. Simply call hcl rekey pause f: to pause the rekey and hcl rekey resume f: to start it again. If paused, you will see the following in the GUI:

Note the PS under Status. You can also pause, resume, and abort ongoing rekey operations by right-clicking the disk being rekeyed and making a choice from the drop-down menu:
- Pause: Causes the operation to temporarily halt. It’s status mnemonic will change to “PS” to indicated that it is paused.
Pausing the rekey operation means that no additional portions of the disk will be rekeyed. This will allow system I/O on the partition to occur without any potential contention from the encryption or decryption process. When the operation is in this state, the only reasonable action therefore is to resume it. The popup context menu while in this state provides that option. - Resume: Continues the rekey operation. The mnemonic goes back to RK, showing an in-process rekey operation.
- Abort: This is a destructive operation and should only be taken if you are certain that you can recover the data already in the partition. That is because the data is in a half-encrypted state, showing a mnemonic of AB. Abort is not reversible.
However, the data itself is still temporarily accessible. The explorer window indicates access to the partition while at the same time, the status has changed to AB. The data will only remain accessible until either the partition is removed or the virtual machine is rebooted. After that, the data is inaccessible. - Remove: When the operation has been aborted, the only possible operation is to remove the partition from the HyTrust system. The right-click context menu provides for that operation.
Revoking VM Permissions
To revoke access to a VM, click the Cloud navigation icon, then select the VM that you want to change. If you want to revoke the entire VM, click the Actions button and then click Revoke VM Authentication. You are asked confirm your choice before the VM’s authentication is revoked. The particular VM will immediately be moved to the 'Unauthenticated' list.
On the VM, hcl status still shows that everything is fine (Connected).
C:\> hcl status

Summary
---------------------------------------------------
KeyControl: 192.168.140.152:443
KeyControl list: 192.168.140.152:443
Status: Connected
Last heartbeat: Sat Jan 26 16:02:57 2014 (successful)
However, after the next heartbeat (5 minutes), the status changes as follows:
C:\> hcl status

Summary
---------------------------------------------------
KeyControl: 192.168.140.152:443
KeyControl list: 192.168.140.152:443
Status: Reauth needed (Virtual Machine not authenticated)
Last heartbeat: Sat Jan 26 16:02:57 2014 (successful)

Device details
---------------------------------------------------
Drive Disk  Part  Cipher     Status       GUID
---------------------------------------------------
E:    1     1     AES-256    Detached     BA7883AE-3562-44F1-9D86-87D80323CC01
F:    2     1     AES-256    Detached     N/A
Filesystems on E: and F: have been force-unmounted and the devices have been detached. The VM needs to be re-authenticated again before the encrypted devices can be accessed. This is achieved as follows through the GUI:

Just click Authenticate and enter your password.
Or you can re-authenticate through the command line as follows:
C:\> hcl auth

Enter passphrase (min 16 characters): onetimepassword16chrs
Sent an authentication request to KeyControl 192.168.140.128

Please log on to the KeyControl to complete the authentication of this node
Return to the webGUI on the KeyControl cluster, navigate to the node, click the Actions button, and then click Reauth VM. Enter your one-time password in the VM Authentication dialog box, click Authenticate, and the VM is reauthorized. Below is the prompt in the webGUI:
After the VM has been moved to the Unauthenticated VMs list, if you now delete the node it will be permanently deleted from the KeyControl. No re-authentication is possible, all keys are destroyed, and thus all storage using those keys is effectively useless.