Encryption Within Virtual Machines, Using the DataControl Policy Agent
Introduction
This chapter describes support for encryption within individual Virtual Machines (VMs) or physical servers wherever they reside (data center, private, public or hybrid clouds). For virtual machines, HyTrust's encryption works independently of the type of the hypervisor platform (Type 1, Type 2, etc.) as well as the hypervisor vendor (VMware, Microsoft, Citrix, Red Hat, etc.) and Cloud environment (vmWare vCloud Air, Amazon AWS, ENKI, Rackspace, Microsoft Azure and iLand, and so on) or cloud frameworks such as OpenStack. Throughout the chapter, we will refer to the virtualized case and reference the agent being managed by the KeyControl cluster as a "VM."
AES-NI Support under AWS
All current-generation EC2 instances support this processor feature.
Overview of Cloud Operations and VM Sets
To understand the major components of the system consider the following figure:

A "Cloud Administrator" controls one or more "Cloud VM Sets" through the KeyControl cluster. Each Cloud VM Set can be considered a logical grouping of related VMs, for example "Amazon EC2 VMs," "vCloud Air VMs," "Legal Dept VMs," and so on. In addition to this logical grouping, authentication between the VMs and the KeyControl cluster requires the use of a per-VM certificate which is used during registration of the VM with the KeyControl cluster. This process ties the VM to a specific administration group and Cloud VM Set. Certificates can be revoked post-install which de-authenticates the VM that is tied to the certificate.
Cloud Administration is performed by an administrator with Cloud admin privileges. As with other administration roles, Security Administrators need to establish the Cloud Admin users and the Cloud Admin groups to which the user should be a member. For further information on User and Group management, refer to the chapter on Security Administration As a summary the following figure also shows the relationship between Cloud Admin groups and Cloud VM Sets:
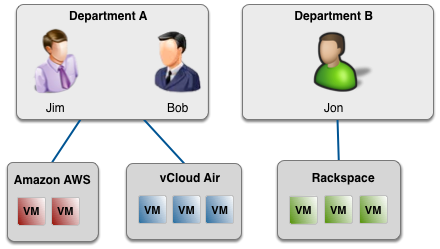
Cloud Admins are placed in Cloud Admin groups. Recall that all objects in the DataControl universe are owned by groups and not by individual administrators. On the left of the figure, Jim and Bob are members of the "Department A" Cloud Admin group. Between them, they have created two Cloud VM Sets, namely "Amazon AWS" and "vCloud Air." Jon is a member of the "Department B" Cloud Admin group and has created one Cloud VM Set called "Rackspace." It is not possible for Jim and Bob to see Jon or his Cloud VM Sets. It is also not possible for Jon to see Jim or Bob or their Cloud VM Sets.
Creating VM Sets
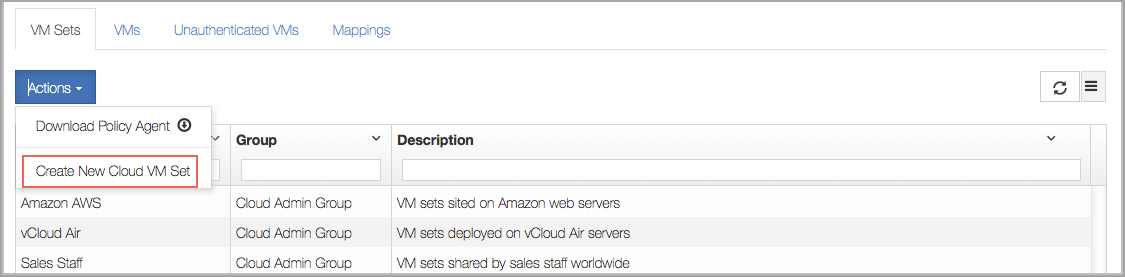
Before you can start adding VMs, you must first create a Cloud VM Set. To do this, click the Cloud Icon and select the VM Sets tab. Click the Actions Button and then click Create New Cloud VM Set:
Click the Actions button and then select Create Cloud VM Set:
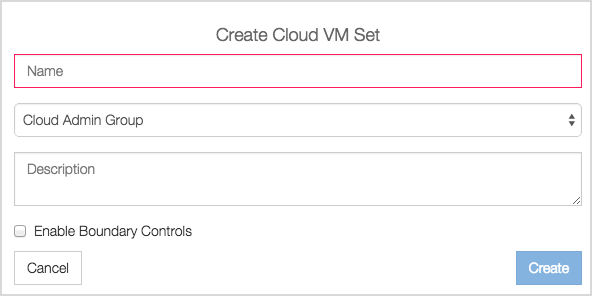
Fill in the Name and Description, and decide whether this VM Set will enable Boundary Controls. For details on Boundary Controls, see Boundary Control Settings
Installation of the HyTrust DataControl Policy Agent
Although operation of the installed Policy Agent is similar across Windows and Linux, installation and adding devices to be encrypted is different. You can find out the details of how to install the Linux Policy Agent here and the Windows Policy Agent here
The overall steps to be followed to install and get going are shown in the following figure:
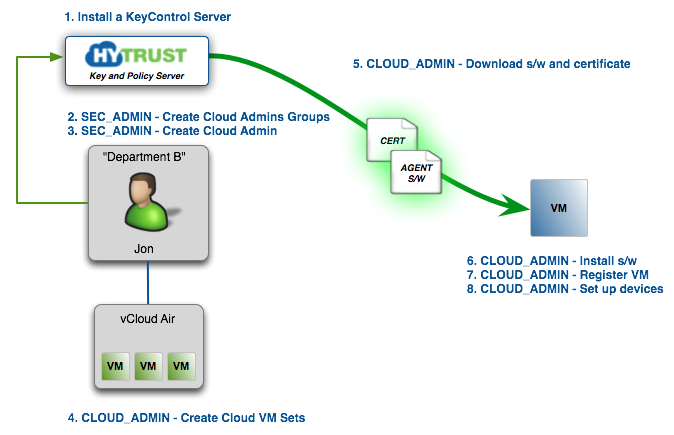
The following sections discuss installation of the Policy Agent software and how to set up and initialize devices to encrypt. Let's assume that you wish to set up a Cloud Admin user who will manage sets of VMs. To quickly summarize what is shown in the figure:
- Install the KeyControl server.
- As a Security Admin, create a user with only Cloud Admin privileges.
- As a Security Admin, place this user in a the default Cloud Admin Group or create a separate Cloud Admin group. In the figure we have created a Cloud Admin called "Jon", a Cloud Admin Group called "Department B" and added Jon to the "Department B" group. Note that you should ideally create the Cloud Admin groups first.
- Jon then logs in and creates a Cloud VM Set called "Rackspace".
- Jon creates a certificate that is associated with the "Rackspace" group. He then downloads the certificate and the Policy Agent software and copies them to the VM. Please note that a certificate is needed for each VM and that each certificate is single-use only.
- Jon ensures that the Disk Defragmenter service on each client computer is enabled before installing the Policy Agent software on Windows machines.
- Jon then installs the software and registers the VM with the KeyControl cluster. At this point he can now start adding devices to encrypt.
Once you have installed the agent and set up devices to be encrypted, please return to this chapter and review the following sections. Alternatively, read through the remainder of this chapter to get an understanding of features that apply to both Linux and Windows.
Managing the KeyControl list
Each VM needs to know the list of KeyControl nodes in the cluster in order to locate a running KeyControl node in the event that one node in the cluster fails. It is not always possible for the KeyControl cluster to be able to update each VM with the list of available nodes. For example, consider the following figure:
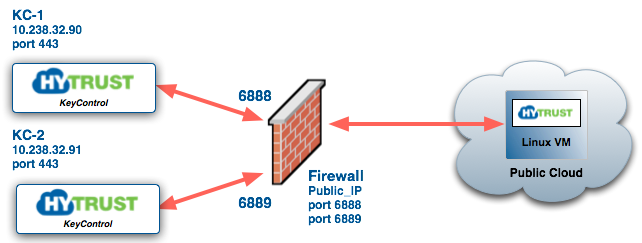
In this case, the KeyControl cluster is sitting behind a corporate firewall. According to each node in the cluster, the IP addresses are 10.238.32.90 and 10.238.32.91. However, the IP addresses used by each VM are referenced by Public_IP/port number, information that is invisible to the KeyControl nodes.
Each VM must be able to heartbeat a node in the cluster using the list of KeyControl nodes available. There are three options for managing the list, either:
- DNS is used to map a single KeyControl name to multiple IP addresses. Any time a node is added or removed from the cluster, the DNS entry must be updated.
- The
hclcommand can be invoked to keep the list up to date. - You maintain the list of available KeyControl mappings with KeyControl itself. The list of KeyControl nodes is then pulled from KeyControl by the VM during the heartbeat cycle.
Maintaining KeyControl Mappings within KeyControl
You can maintain a list of KeyControl mappings from within KeyControl itself. Each mapping is a list of KeyControl IP, port number pairs. You can have multiple lists, and each Cloud VM Set can have its own mapping. For example, if you have a KeyControl cluster in the data center, you may have direct access from your VMs within the data center.
The KeyControl mappings can be seen from within the Cloud tab. Here is the tab without any mappings:
![]()
Currently there are no mappings available. Click the Actions button to create one. We have a sample below.
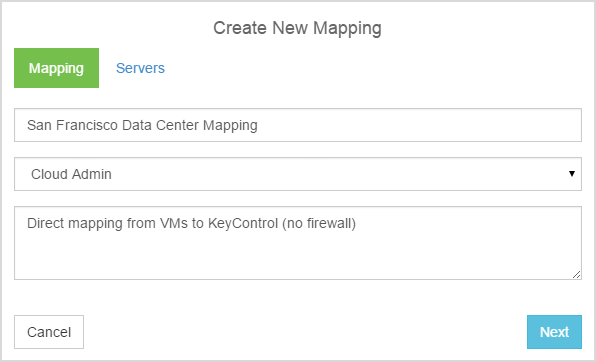
Give the mapping a Name and Description and then click Next. This brings up the Servers tab, which has another sample entry:
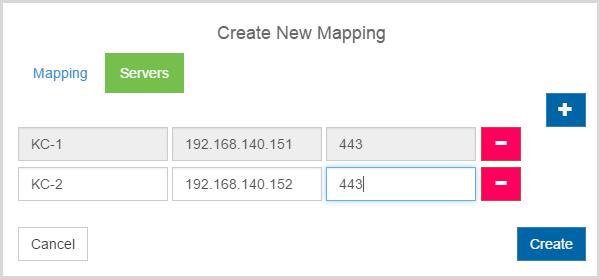
Note that you click the plus button to add new servers, and the minus button to remove them. When you are done, click Create. Your mapping appears in the user interface:
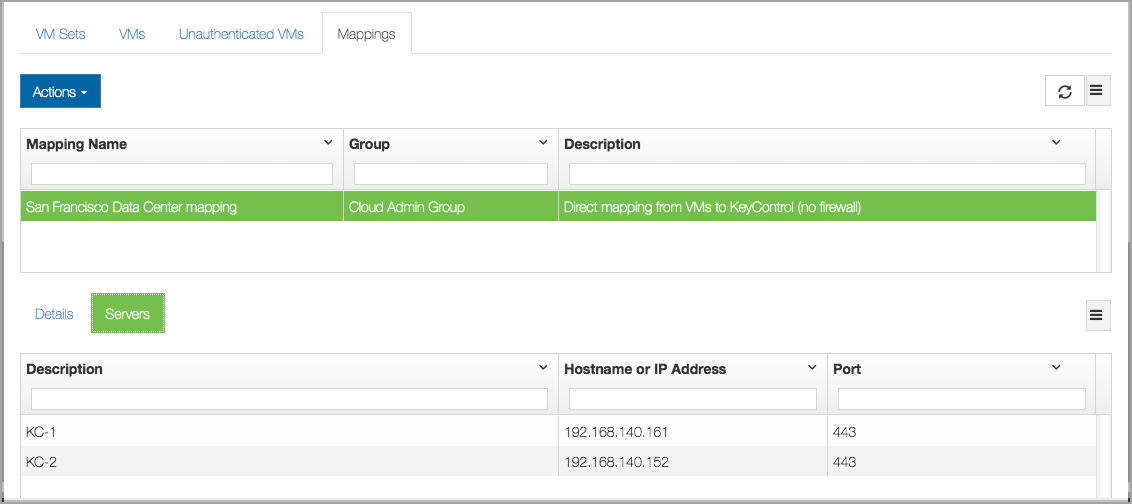
Select the mapping to make any changes. You can delete it, you can add or remove servers, or you can change the name and/or description:
When you register a VM, you will now be prompted for the KeyControl mapping to be used. Here is an example of registration:
# hcl register -a 192.168.140.151Please provide the KeyControl login details
username: secroot
password: ********
Available Cloud VM Sets
---------------------------------------------------
SecrootCVMSet.cn-1
SecrootCVMSet.cn-2
---------------------------------------------------
Please specify Cloud VM Set to which this VM should be added: SecrootCVMSet.cn-1
Certificate passphrase might be required
Certificate successfully unpacked
Registered as cn-1 with KeyControl node(s) 192.168.140.151
Completing authentication for cn-1 on KeyControl node(s) 192.168.140.151
Authentication complete, machine ready to use
Getting KeyControl Mapping information
This VM can be added to one of the following KeyControl Mappings
---------------------------------------------------
1 : San Francisco Datacenter
---------------------------------------------------
Please select KeyControl Mapping (0 to skip): 1
KeyControl Mapping
server description KC-1, ip 192.168.140.151, port 443
server description KC-2, ip 192.168.140.152, port 443
Updated KeyControl list with KeyControl nodes 192.168.140.151:443,192.168.140.152:443
Note that the list of mappings is displayed. In this case we entered “1” to select our "San Francisco Datacenter” mapping.
The mapping used can be updated as follows:
# hcl updatekc -a
Getting KeyControl Mapping information
Please provide the KeyControl login details
username: secroot
password: ********
This VM can be added to one of the following KeyControl Mappings
---------------------------------------------------
1 : San Francisco Datacenter
2 : AWS VMs
---------------------------------------------------
Please select KeyControl Mapping (0 to skip):
Maintaining KeyControl Mappings By Hand
In the second option, consider the case where we have a single KeyControl node and a VM connected to it, hcl status shows the following:
#hcl statusSummary --------------------------------------------------- KeyControl: kc-1:443 KeyControl list: kc-1:443 Status: Connected
We have a single KeyControl node "kc-1". If we add a new node to the cluster, we should update the KeyControl list as follows:
# hcl updatekc kc-1,kc-2
Updated KeyControl list with KeyControl nodes kc-1,kc-2
# hcl status

Summary
---------------------------------------------------
KeyControl: kc-1:443
KeyControl list: kc-1:443,kc-2:443
Status: Connected
Now we have two KeyControl nodes.
Note that on Windows you must add quotes around the KeyControl list so the above call will be:
C:\> hcl updatekc "kc-1,kc-2"
Updated KeyControl list with KeyControl nodes kc-1,kc-2
Similarly, if we remove a node from the cluster, we should issue the call again to update the list. For example, to remove the second KeyControl:
# hcl updatekc kc-1
Updated KeyControl list with KeyControl nodes kc-1
It is extremely important that you keep the KeyControl list up to date to prevent device access from being revoked, and to prevent failure to get keys on a reboot.
Managing Devices From the KeyControl Cluster
Once devices have been added and attached, they are under KeyControl cluster management, and they can be viewed from within the webGUI. Click the Cloud Icon , then click the VMs tab, and click to select the VM you want to examine, as shown below:
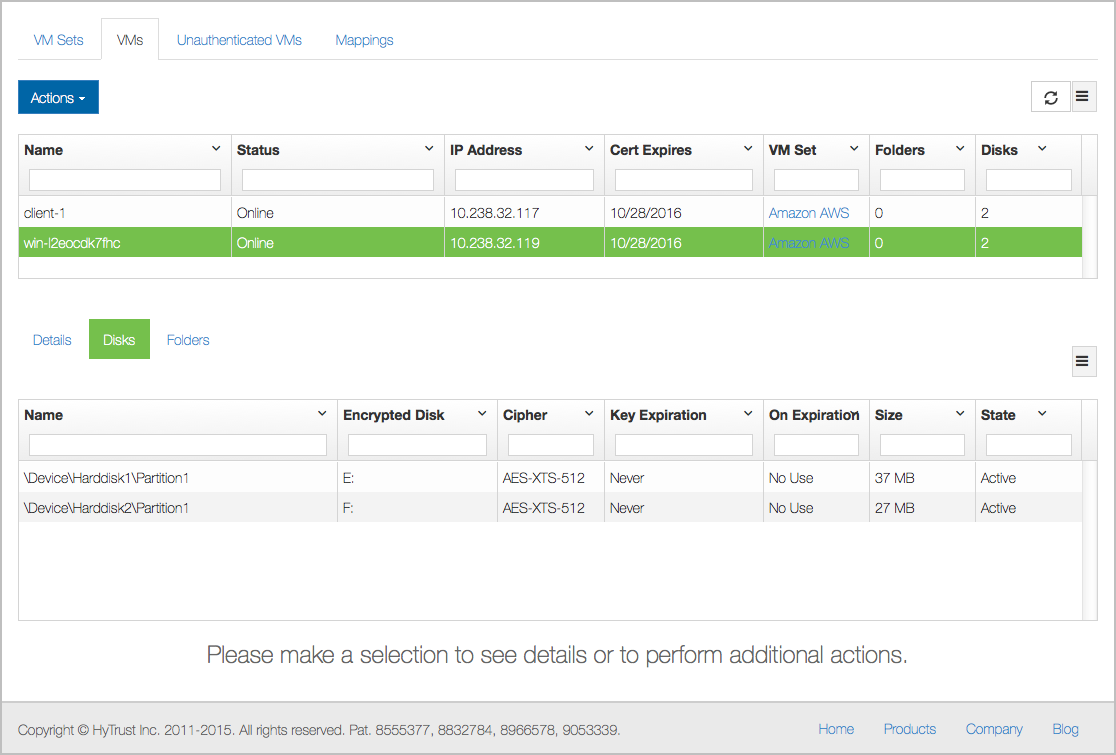
Click the Disks tab, and the details of the disks display, as shown in the image above:
As an example, for Linux the screen will look similar to Windows, with the only difference being in device naming.
There are two operations that can be performed on disks.
First, you can change the expiration date of a disk. From the screen shown above, click on one of the disks to open the details dialog box. Click on the down-arrow next to Expiry Date, and choose a date for expiration. This is shown on the screen below:
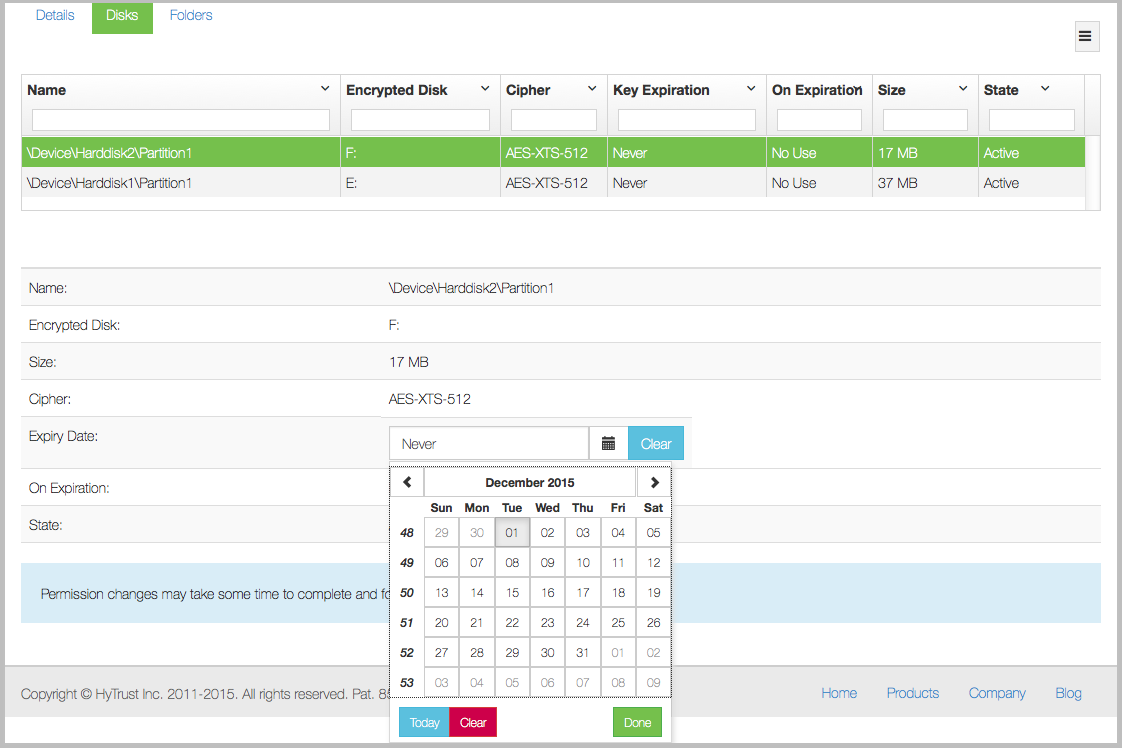
Once a key expires, what happens to the key depends on the key expiration option chosen. The default is No Use which means that the key life can be extended by modifying the expiration time to some date in the future. If you have chosen Shred, then when the key expires it is made unusable". Also note that when the disk is removed, the key is expired at that time.
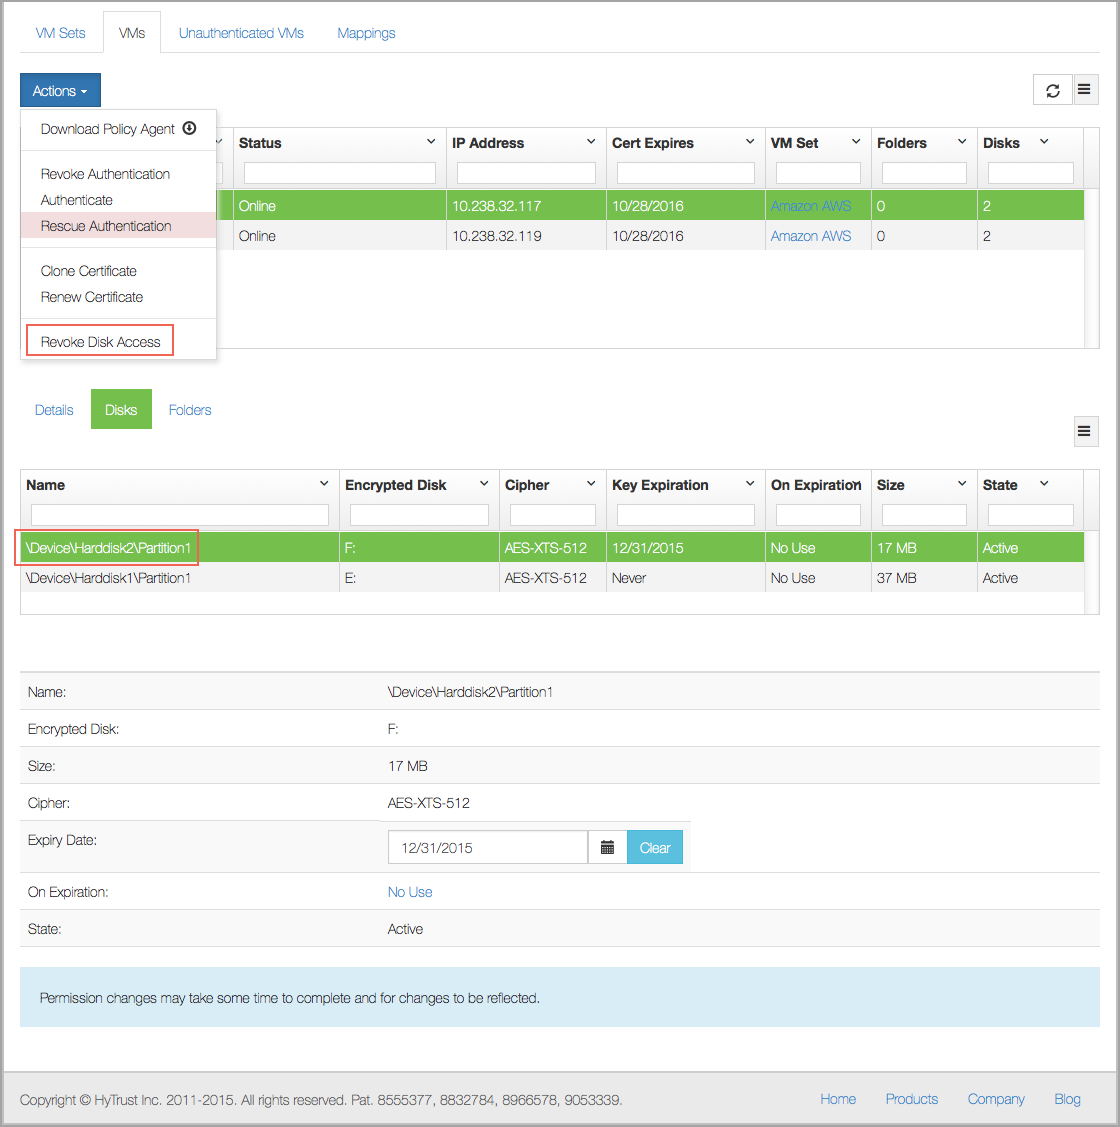
The second option is to revoke access to a device.
To revoke access to a disk, click the Cloud navigation icon, then select the VM with the disk authorization that you want to change. Click the Actions button and then click the Disks tab in the details pane. Select the disk you want to revoke, then click the Actions button and then click Revoke Disk Access. You will be asked to confirm your choice.
Once a device is revoked, if the filesystem on the device is mounted, it will be force unmounted on the next heartbeat and the device will be detached, On Linux, when running hcl status, if the device has been revoked we will now see that the device is no longer attached:
sdb2              /dev/mapper/clear_sdb2            AES-256           Not attached
 '--> Handlers: attach = DEFAULT, detach = DEFAULT
An attempt to attach the device will now fail:
# hcl attach sdb2
Error on device getkey sdb1: Disk not ACTIVE
Could not get encryption key for device sdb2
Failed to attach sdb2
On Windows the encrypted drives will simply disappear from view in Explorer and other applications. An attempt to attach the disk using hcl add will get the following:
C:\> hcl attach e:
Error on device getkey \Device\Harddisk1\Partition1: Disk not ACTIVE
Could not get encryption key for device e:
Failed to attach e:
To restore access to the device to be attached again, you must enable it through the webGUI. When a VM's disks are displayed, the disk that was revoked appears, but its status shows as Revoked, as shown below:
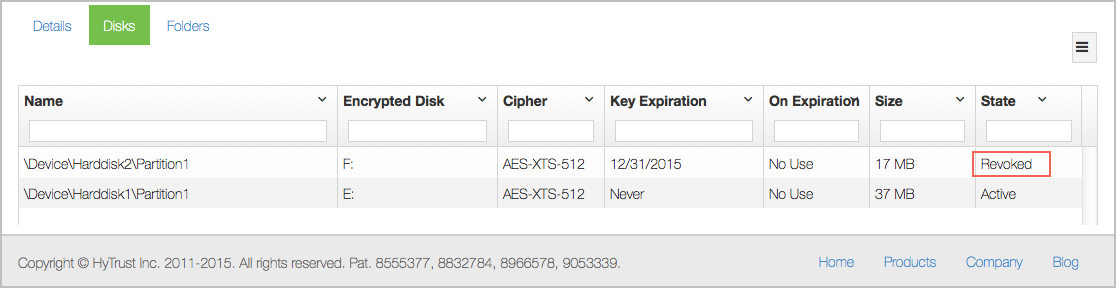
Click on the line showing the disk, confirm and the hcl attach will now complete successfully. Click Actions, and then click Grant Disk Access. The drive will automatically be visible in Explorer. On Linux, you will need to remount the filesystem.
Revoking VM Permissions
To revoke access to a VM, click the Cloud navigation icon, then select the VM that you want to change. If you want to revoke the entire VM, click the Actions button and then click Revoke Authentication, as shown below:
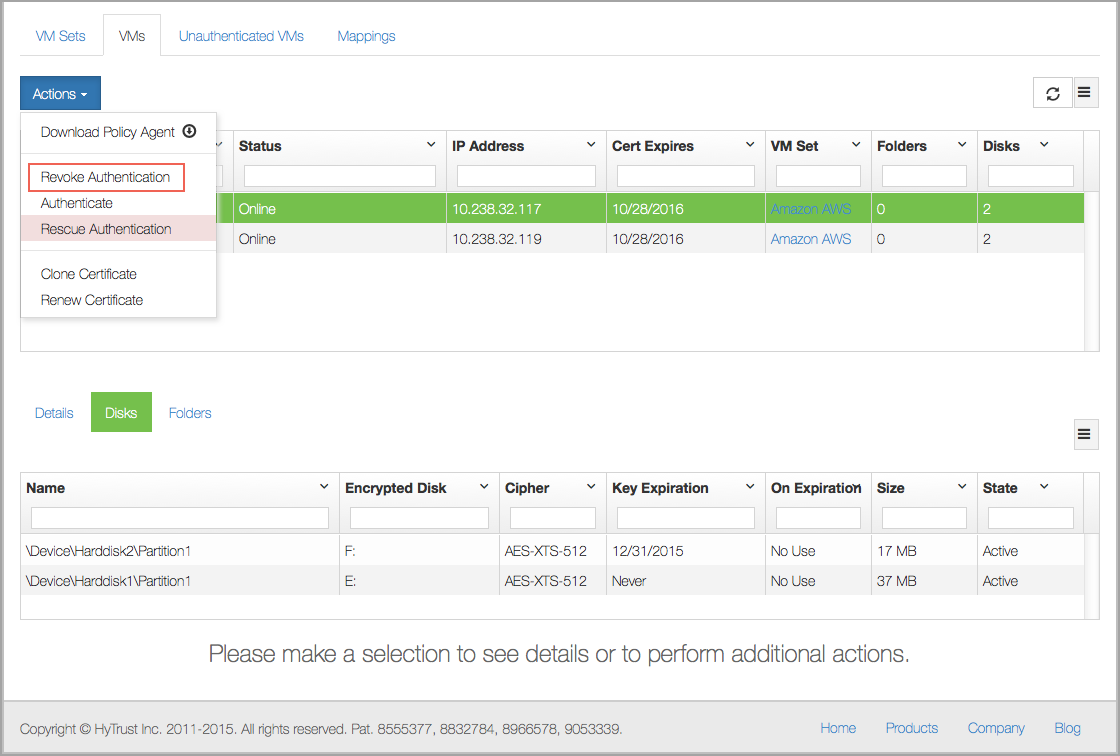
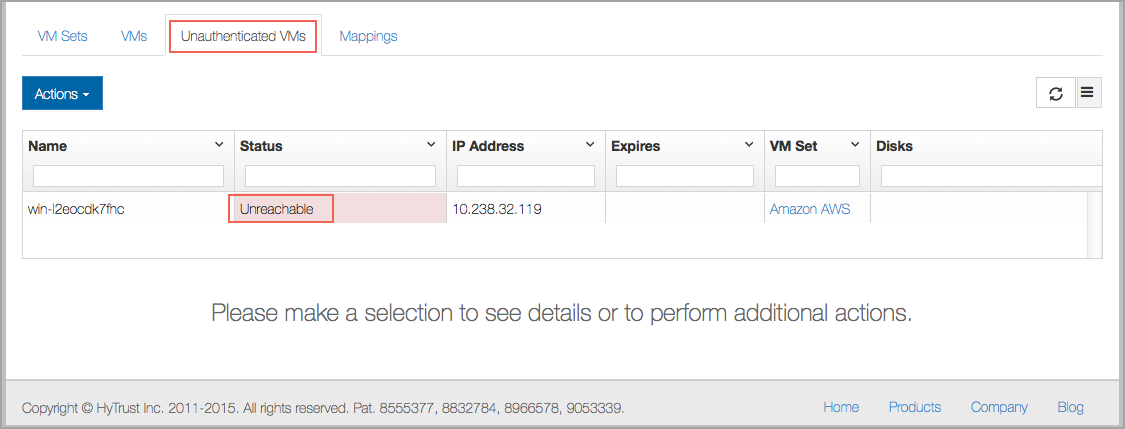
You are asked confirm your choice before the VM’s authentication is revoked.The particular VM will immediately be moved to the 'Unauthenticated' list.
On the VM, the status shows:
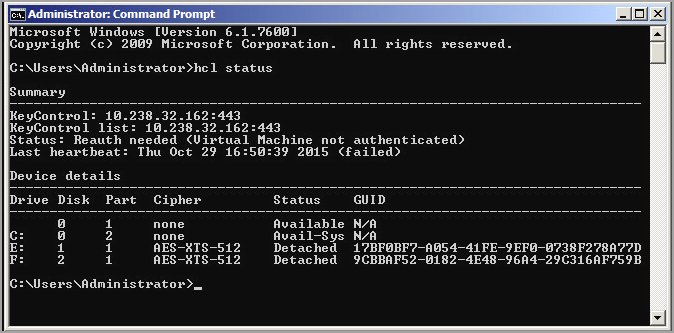
Filesystems on drives E: and F: have been force-unmounted and the devices have been detached. The VM needs to be re-authenticated again before the encrypted devices can be accessed. This is achieved as follows in the Agent GUI:
On the VM, you see Reauth needed (Virtual Machine not authenticated) Click the Authenticate button:
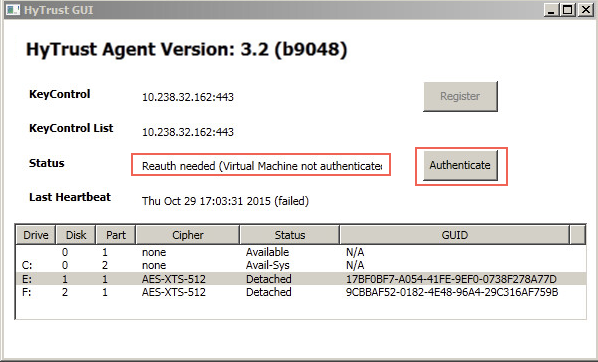
You will get a shortened form of your original registration. Enter the requested information, and the VM will be reauthenticated:
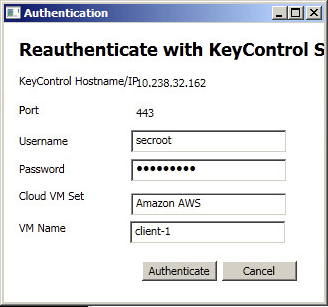
Using the command line, you begin on the VM and finish on the KeyControl. Enter as shown below:
# hcl auth

Enter passphrase (min 16 characters): onetimepassword16chrs
Sent an authentication request to KeyControl node 10.238.32.162

Please log on to the KeyControl node to complete the authentication of this node
Return to the webGUI on the KeyControl cluster, navigate to the node, click the Actions button, and then click Authenticate. Enter your one-time password in the VM Authentication dialog box, click Authenticate, and the VM is reauthorized. Below is the prompt in the webGUI:

On the VM, one can now do an hcl attach -a to access encrypted devices again.
If you do not reauthenticate, and the VM has been moved to the Unauthenticated VMs list, if you now delete the node, it will be permanently deleted from the KeyControl cluster. No re-authentication is possible, all keys are destroyed, and thus all storage using those keys is effectively useless.
Client-side Key Caching
Keys are delivered to the VM when it first boots and authenticates itself with the KeyControl cluster or when a new device is added, in which case the device is registered with the KeyControl cluster and a new key created. If the VM cannot access the KeyControl cluster for a time exceeding the Grace Period, access to the clear text devices will be revoked. Also, if the VM is not able to contact the KeyControl cluster on boot, keys will not be accessible. Note that key caching does not work for root-encrypted VMs.
HyTrust DataControl supports an off-line cached key mode whereby keys can be cached on the VM, wrapped with a password, for a specified period of time. In this mode, if the VM boots and is not able to access the KeyControl cluster, the keys can still be accessed by typing the passphrase.
Walking through an example, consider the following two devices:
Registered Devices
---------------------------------------------------
Disk Name         Clear                             Cipher      Status
---------------------------------------------------
sdb2              /dev/mapper/clear_sdb2            AES-256     Attached
 '--> auto_attach=ENABLED, attach_handler=DEFAULT, detach_handler=DEFAULT
sdb1              /dev/mapper/clear_sdb1            AES-256     Attached
 '--> auto_attach=ENABLED, attach_handler=DEFAULT, detach_handler=DEFAULT
Now let's cache the key for sdb1. We'll cache for a single day. "HyTrust" is the passphrase that we will use to encrypt the keys in this example.
#  date
Tue Jan 14 13:47:12 PST 2016
# hcl cache -n 1 sdb1
Enter passphrase (min 4 characters): ********
Re-enter passphrase: ********
Cached keys for device sdb1

or
# hcl cache -p HyTrust -n 1 sdb1 Cached keys for device sdb1 # hcl cache -l Cached keys for Devices --------------------------------------------------- Disk Name Valid till --------------------------------------------------- sdb1 01/30/16
Note that by running hcl cache -l you can see which devices have keys cached and for how long.
To demonstrate how caching works, let's shut down the KeyControl cluster and reboot the VM. Once the VM has rebooted, the clear text devices are not accessible since the KeyControl cluster is not reachable:
sdb2              /dev/mapper/clear_sdb2            AES-256     Detached
 '--> auto_attach=ENABLED, attach_handler=DEFAULT, detach_handler=DEFAULT
sdb1              /dev/mapper/clear_sdb1            AES-256     Detached
 '--> auto_attach=ENABLED, attach_handler=DEFAULT, detach_handler=DEFAULT
Let's now get access to cached keys by typing in the passphrase (as entered earlier, the passphrase is "HyTrust"):
# hcl attach -l -a
passphrase: ********
Encrypted device sdb1 (/dev/sdb1) attached; decrypted contents visible at /dev/mapper/clear_sdb1
Could not get encryption key for device sdb2
Failed to attach sdb2

or
# hcl attach -l -p HyTrust -a Encrypted device sdb1 (/dev/sdb1) attached; decrypted contents visible at /dev/mapper/clear_sdb1 Could not get encryption key for device sdb2 Failed to attach sdb2
We attempt to get keys for all devices but note that we only cached keys for sdb1.
Note that if you have different passwords for different devices, running a command such as the following will be limited:
# hcl attach -l -p HyTrust -a
Encrypted device sdb1 (/dev/sdb1) attached; decrypted contents visible at /dev/mapper/clear_sdb1
Could not get encryption key for device sdb2
This command will only retrieve the keys for the devices for which the password is correct.
Once a user presents a password to unlock the keys, access to the filesystems will remain until either an explicit hcl detach or until the cache time expires. This presents a window when users cache keys but forget that they are still cached and active. We suggest that you review your procedures for caching carefully.
If you no longer wish a key to be cached, call the following with the -r option:
# hcl cache -a -r
The -a option in combination with the -r option will remove the cached keys for all devices. Alternatively, you can specify a single disk in place of -a.
Managing Backups, Clones and Snapshots
The HyTrust Policy Agent identifies the VM on which it is running and uses this information and the certificate supplied during registration in order to authenticate with the KeyControl cluster to fetch the necessary encryption keys. Any attempt to spin up a VM that looks identical (for example a VM snapshot) will fail to have keys delivered. This is obviously necessary from a security perspective, but presents challenges when dealing with VM snapshots, backups and clones. If one needs to go to a backup, it may be necessary to spin up a snapshot of the VM temporarily while data is being recovered.
HyTrust provides support for cloned VM images. For example, assume that we bring up a VM that has previously been backed up. When it starts up, the Policy Agent will attempt to communicate with the KeyControl cluster but will fail authentication if the original VM is up and running. This is what hcl status will report:
# hcl status

Summary
---------------------------------------------------
KeyControl: 192.168.140.151:443
KeyControl list: 192.168.140.151:443
Status: Reauth needed (Hardware signature verification failed)
Here is a list of the errors you may see and what they mean, although they are usually obvious. The errors are based on four checks that KeyControl runs, in this sequence. Any failure produces the corresponding error message:
- VM certificate:
"Certificate not valid" - Hardware signature:
"Hardware signature verification failed"- This means the MAC address changed. - IP address match:
"IP address changed from <nnn.nnn.nnn.nn> to <nnn.nnn.nnn.mm>" - Cookie for Grace period:
"Grace period expired"
Be aware that the KeyControl does not know which VM is the original and which is the clone, and the one that matches the four checks above is considered the legitimate VM to receive the keys. The clone VM will usually have the same certificate, because the VM is copied, but the other three checks will likely fail. However if you run hcl auth on the clone and complete the authentication, then the clone VM will become the original VM and the previous original will go to the unauthenticated state.
You can clone the information associated with the original VM allowing the cloned VM to gain access to the encryption keys.
To create a clone of an existing certificate, click the Cloud Icon, then select the VM whose certificate you want to clone. Then click the Actions Button and click Clone Certificate, as shown below:
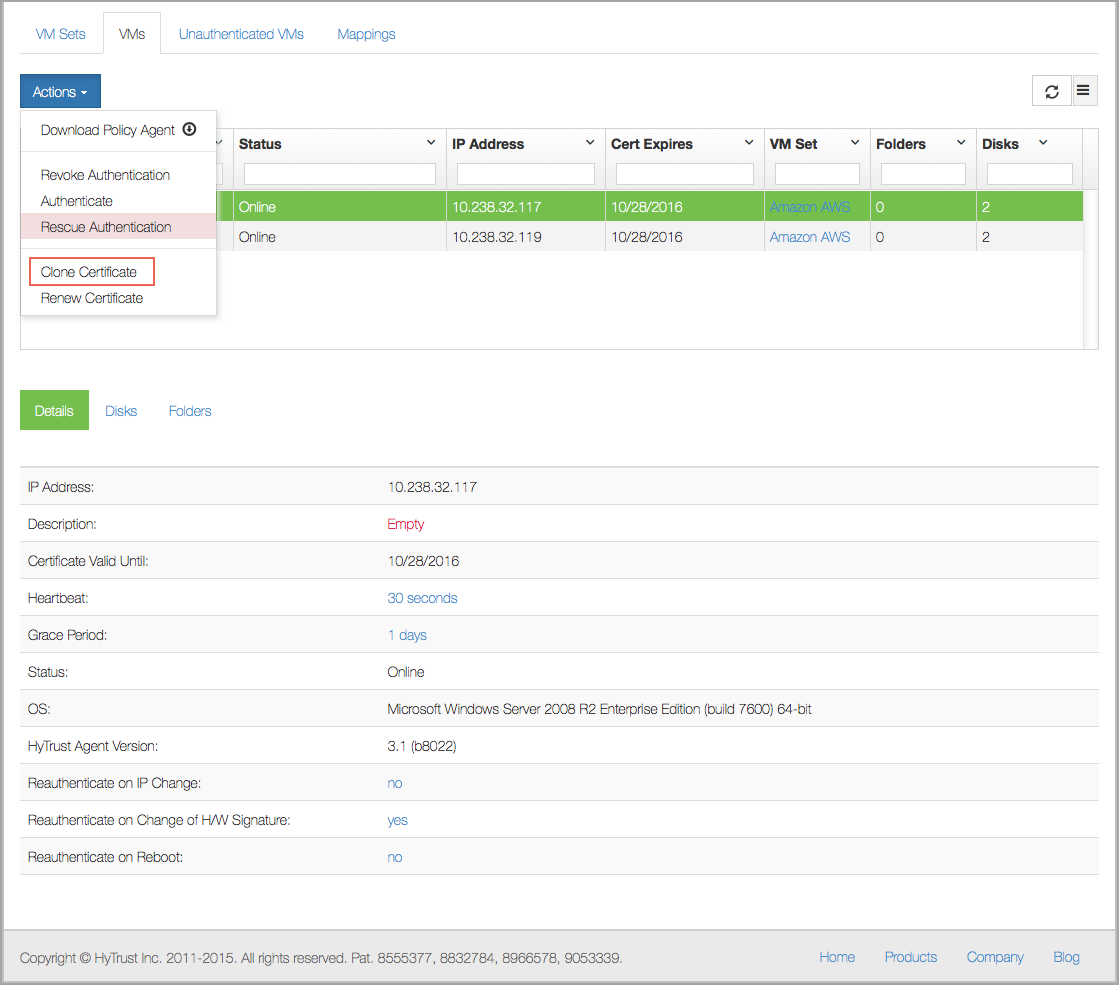
You will be prompted for a passphrase to use. Enter the passphrase, confirm it, and then click Clone. The certificate is generated and appears in your list of unused certificates immediately.
You should then copy the certificate to the clone VM and register once again with the KeyControl cluster. For example:
# hcl register -c -h "ubuntu-12.10" -d "My 12.10 VM" 192.168.140.15\
     bbd7d0c7-*_130415215216.bin

Certificate passphrase might be required
Certificate successfully unpacked

You need to specify a passphrase which will be used for authentication with KeyControl
Enter passphrase (min 16 characters): onetimepassword16chrs

Registered as ubuntu-12.10 with KeyControl(s) 192.168.140.15
Please log on to any KeyControl to complete the authentication of this node
Note that the only difference between this call and registration of any new VM is use of the -c option. Once you have typed the passphrase, you will be requested to authenticate the VM within the KeyControl webGUI. After VM authentication, the keys will be delivered and access to your encrypted devices will be granted.
See also: Encrypting VMware vSphere VDI VMs
Moving Disks Between VMs
There are many examples of where it is necessary to move disks between one VM and another. Legal data can move between lawyers working on the same case, disks need to "migrate" between active/passive Windows cluster nodes, or per-patient healthcare information may be stored on separate databases on their own devices. There are certainly other ways in which similar workflows can be achieved, but migrating virtual disks is a very easy operation and has become increasingly popular.
HyTrust supports the migration of disks between Linux VMs or between Windows VMs. All VMs to which the disk will be moved must be in the same Cloud VM Set. We must therefore ensure that disks are self identifying by having a GUID stamped on the disk.
Regardless of the disk partitioning used (MBR or GPT), HyTrust will attempt to place a private region on the disk if space is available. This region is used to store partition GUIDs and other information that allow us to associate disks/partitions with their encryption keys and key versions. We cannot store a GUID on the disk if you have not partitioned it.
To make a disk portable, you don't need to do anything. We will add a private region when you run hcl add or hcl encrypt. If we are unable to add a region because there is no space to do so, we will issue a warning for EFI/GPT (since the disk is already portable) or give an error for MBR.
NOTE: Of the two options hcl add is faster and more efficient than hcl encrypt, because an add encrypts data as it is written to disk, and there is no pre-existing data to encrypt.
To take advantage of this efficiency, do an hcl add of a new disk and copy the data over from your old disk.
You can also run backup and restore if you don't have sufficient storage. In that case, you would back up your existing disk using your favorite backup utility, and then do an hcl add of a new disk. Then restore the data from the backup.
To decrypt, just run hcl rm on the device and then restore.
Disk portability is allowed between any VMs in a Cloud VM Set. Simply move the disk or copy it to a new VM and do hcl add <disk>. We will recognize the GUID, attach the device and obtain access to the keys.
Let's take a look at a Linux system by running hcl status:
Available Devices
---------------------------------------------------
Disk Name           Device Node        Size (in MB)
---------------------------------------------------
sdb1                /dev/sdb1             2047
sdc                 /dev/sdc                10
We have two disks available. We can look to see if they have private regions as follows:
# hcl status -g

Device Discovery (Registered and Available)
---------------------------------------------------
Disk Name             PartLayout        GUID
---------------------------------------------------
sdb1                   MBR              N/A
sdc                    MBR              N/A
Both are MBR-formatted disks and currently have no associated GUID. Now let's add both disks and check again:
# hcl add sdb1
# hcl add sdc1
...
# hcl status -g

Device Discovery (Registered and Available)
---------------------------------------------------
Disk Name     PartLayout       GUID
---------------------------------------------------
sdb1          MBR              8AF3AF24-351A-2FD4-C1AE-44094D259B3F
sdb1          MBR              7AFFA524-459F-4F56-AC1E-5459E0259E3F
We can now see the associated GUIDs. At this point you are now able to copy this disk to another VM in the same Cloud VM Set.
On Windows, the GUIDs are displayed in the GUI and also by running hcl status, for example:
Device details
---------------------------------------------------
Drive Disk  Part  Cipher	 Status	   GUID
---------------------------------------------------
C:    0     2     none       Avail-Sys    N/A
E:    1     1     none       Available    A8E25AE9-7A75-471A-A1AA-7CAE1550B35C
F:    2     1     none       Available    583EB883-52D3-4B05-A482-FF113B5359DD
G:    3     1     none       Available    FF2A17F2-D7DE-404B-B977-018ADC611BCC
Note that all disks are available. In this case, we have used E:, F: and G: previously and they still retain their GUIDs.
An example of disk migration
To demonstrate how simple disk migration is, let's add a file to one of our Linux disks:
# mount /dev/mapper/clear_sdc1 /mnt
# echo "hello world" > /mnt/myfile
# umount /mnt
Here is its GUID:
sdc1 MBR 8182285F-1C43-400E-8E72-3105AE0D93A9
Next, we move the disk (using whatever tools your hypervisor platform provides) to another Linux VM. Let's see what disks are available:
# hcl status -g

Device Discovery (Registered and Available)
---------------------------------------------------
Disk Name     PartLayout   GUID
---------------------------------------------------
sdc1          MBR          8182285F-1C43-400E-8E72-3105AE0D93A9
sdb1          MBR          N/A
Notice that the GUID matches. Now let's add the device and see if our file is there:
# hcl add sdc1
Encrypted device sdc1 (/dev/sdc1) attached; decrypted contents visible at /dev/mapper/clear_sdc1
# mount /dev/mapper/clear_sdc1 /mnt
# cat /mnt/myfile
hello world
As a final word, the procedure is the same in Windows, when done from the command line.
Rekeying Disks
Rekey can be done from the WebGUI or from the command line. In the WebGUI, click the Cloud Icon, and then navigate to the VM with the disk that you want to rekey. Select the individual disk, and then click Rekey Disk from the Actions Button.
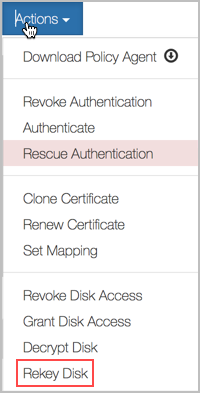
Follow the prompts from there. It is also possible to perform a rekey entirely from the command line, as follows.
Let’s assume that a disk is encrypted with key A. To rekey a disk first involves creation of a new key, let’s say key B. The rekey process involves decrypting each disk block with key A and encrypting it with key B.
Off-line rekey is supported on Linux, while online rekey is available on Windows. For further information on Windows rekey, please refer to this section
On Linux, off-line rekey is a very straightforward operation and does not need any interaction through the webGUI. The following session shows a filesystem that is mounted with several files at the top directory. We then unmount the filesystem, issue the rekey command, remount it and show that the files are still accessible.
# mount /dev/mapper/clear_sdc1 /mnt
# ls /mnt
file1  file2  file3  files.tgz	lost+found/
# umount /mnt
# hcl rekey sdc1
All the data on /dev/sdc1 will be rekeyed
The clear text data will be available on /dev/mapper/clear_sdc1
This operation may take long time

Do you want to proceed? (y/n) y
Starting rekey of sdc1
In case of failure run 'hcl rekey [-u] sdc1'
total device size 10206 KB

Processing: 100% 	Time left: 00:00:00
Completed rekey of sdc1 successfully
# mount /dev/mapper/clear_sdc1 /mnt
# ls /mntfile1  file2  file3  files.tgz	lost+found/
If you have rekeyed previously, you will see the following additional prompt:
# hcl rekey sdc1
WARNING: rekey operation was successfully performed for device sdc1
Run rekey again
Do you want to proceed? (y/n) y
All the data on /dev/sdc1 will be rekeyed
The clear text data will be available on /dev/mapper/clear_sdc1
This operation may take long time

Do you want to proceed? (y/n) y
Starting rekey of sdc1
In case of failure run 'hcl rekey [-u] sdc1'
total device size 10206 KB

Processing: 100% 	Time left: 00:00:00
Completed rekey of sdc1 successfully
You will also see a similar prompt if you have already encrypted or decrypted a disk.
If the operation fails for any reason, for example a system crash, by running the rekey operation again, you will see the following:
# hcl rekey sdb1
WARNING: Incomplete rekey operation detected for device sdb1
Continue rekey
Do you want to proceed? (y/n)
and if you wish to reverse a rekey that only partially completed:
# hcl rekey -u sdb1
Starting undo of rekey operation on sdb1;
In case of failure run 'hcl rekey -u sdb1' again
Processing: 100% 	Time left: 00:00:00
Completed undo for sdb1 successfully
Certificate Handling
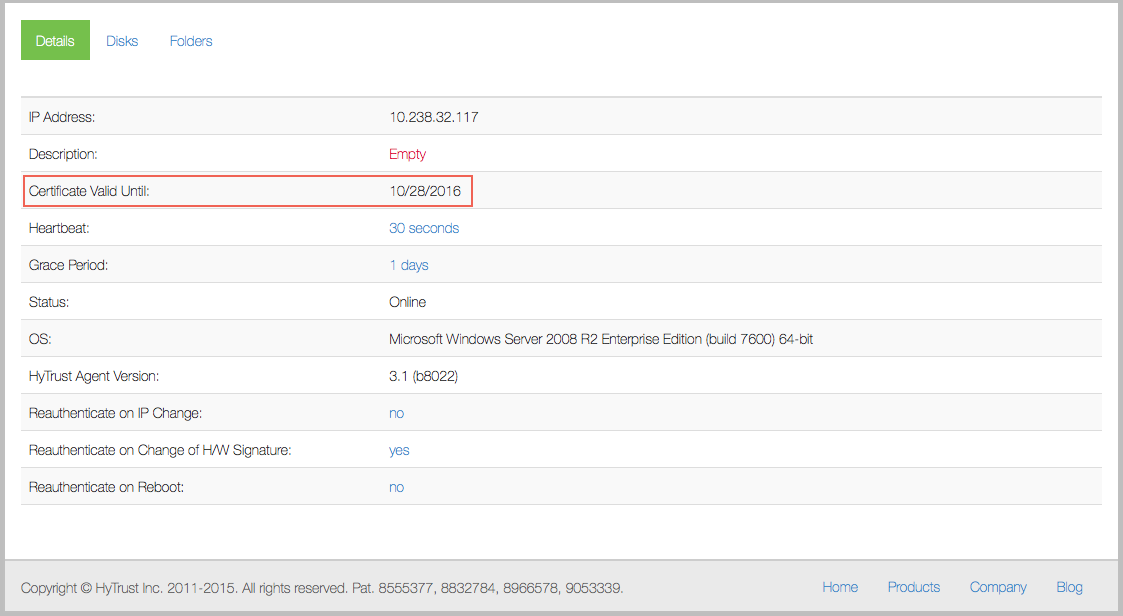
When certificates are generated, they are valid for 365 days by default, but you can specify the amount of time for which they are valid. At the time of expiration, the VM will be forced to re-authenticate, and with a new certificate. It is vital that if you wish to continue running without interruption, you generate a renewal certificate and apply it before the current certificate expires.
To examine a certificate's expiration date, click the Cloud Icon, then select the VM that you want to check. The certificate expiration date appears in the Cert Expires column.
In the period prior to certificate expiration, you will receive several Alerts that inform you that expiration is pending. See the section on Managing Alerts for further information.
Before a certificate expires, you will need to generate a renewal certificate.
Generating a Renewal Certificate
To generate a renewal certificate, you can either use the command-line interface, or the webGUI.
Generating a Renewal Certificate Through the WebGUI
To generate a renewal certificate through the WebGUI, take the following steps, as shown below:
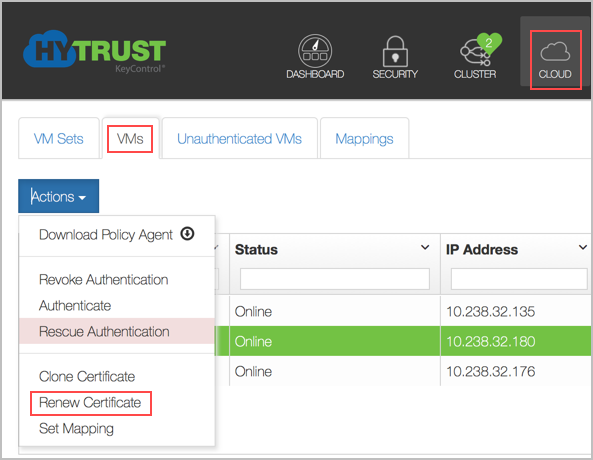
- Click the Cloud Icon.
- Select the VM for which you want to renew the certificate.
- Click the Actions button.
- Click Renew Certificate.
- In the Renew Certificate dialog box that appears, enter a passphrase, and repeat it. This is optional but recommended.
- By default, an expiration date one year from the current date is filled in. You can accept this date, type a new one in the form
MM/DD/YYYY, or pick a date using the onscreen calendar. - Click Renew. A certificate is generated with the file extension
.bin, and downloaded to the computer on which your browser is running.
Copy this certificate to the VM, log on and update the certificate as follows:
# hcl updatecert [-p certificate_password] /path/to/cert.bin
If you do not use the -p option, you will be prompted for the password, if you entered a password when the certificate was created. The devices will stay attached through this process.
Certificates are valid for one year by default, unless you changed the expiration date when the certificate
was created. To keep access to data you should create a new certificate prior to expiration and call the updatecert command to add the new certificate. If the certificate was passphrase protected you can supply the
passphrase using the -p option; otherwise, you will be prompted to enter it on the command line.
Generating a Renewal Certificate Through the Command-Line Interface
From the VM, you can update the VM certificate by providing your KeyControl credentials.
# hcl updatecert -a [-u username -p password] [-e certificate expiration]
You can also provide the KeyControl credentials as command line parameters.
The certificate expiration date can be specified with the -e option. The date should be specified in MM/DD/YYYY
format, for example 12/25/2016. If an expiration date is not specified, then the certificate is
valid for one year from the date of creation, by default.
Creating a New Certificate for a VM Set
To create a new certificate for a VM Set, you follow a similar process:
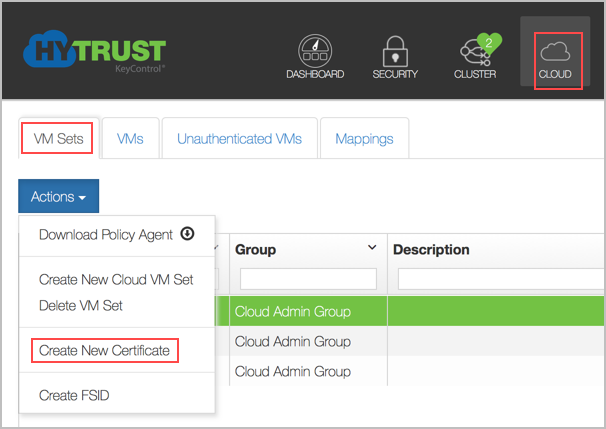
- Click the Cloud Icon.
- Select the VM Set for which you want to create a new certificate.
- Click the Actions button.
- Click Create New Certificate.
The rest of the process is similar. However, note that the new certificate is for a VM Set, not for an individual VM. For details on VM Sets, see: "Creating VM Sets".
Displaying Unused Certificates
Unused certificates belonging to each Cloud VM Set are displayed in the Cloud VM Set detail page, on the Unused Certificates tab, as shown below:
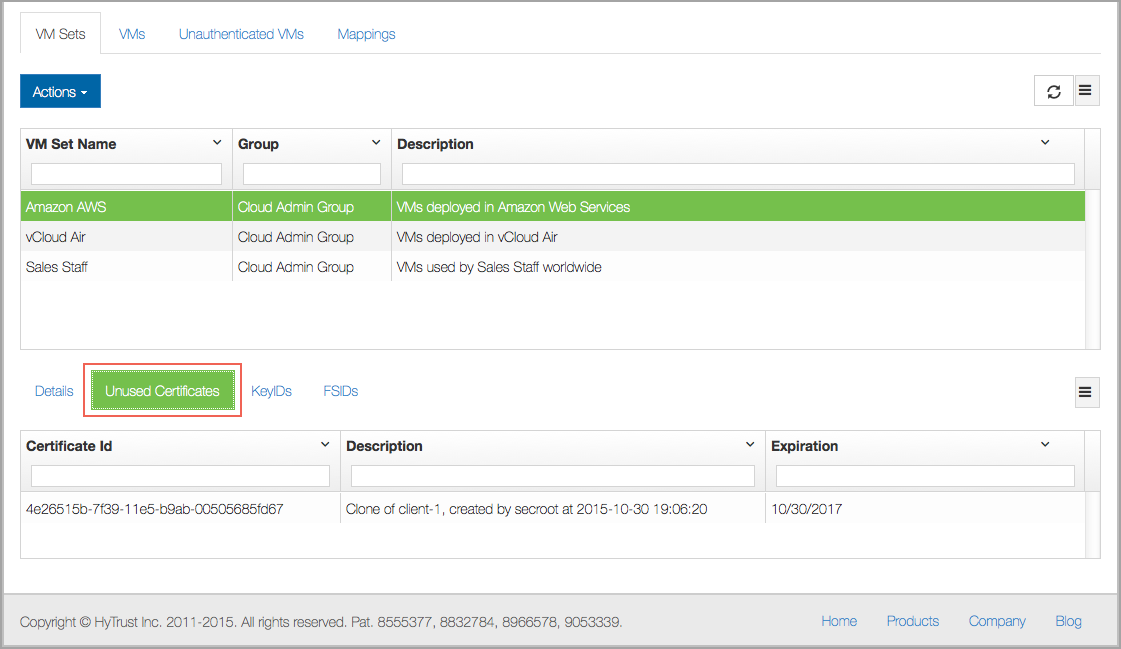
These certificates can be deleted. A "Certificate deletion" Alert is generated on deletion. A default description is created for every certificate. In case of fresh certificates, it is a message of the form:
"Created by <username> at <datetime>"
In case of clone certificates, it is of the form:
"Clone of <VM-name>, created by <username> at <datetime>"
This description is inherited by the VMs created using these certificates, and can be changed at the time of registration or later. The certificate expiration date is also shown. The certificate expiration date is shown for all VMs in a sortable column. When a new certificate is applied to an existing VM (using hcl updatecert), the new expiration date is automatically updated on the KeyControl cluster.
Timeouts (Heartbeat and Grace Period)
If connectivity between the VM and the KeyControl cluster is lost after Heartbeat seconds (300 seconds, or 5 minutes, by default), the VM will continue running but hcl status will show the disks as Could not connect. Any changes made in KeyControl will only be picked up at the next heartbeat.
If the VM fails to heartbeat to reach the KeyControl cluster, you get the following message:
# hcl statusSummary ---------------------------------------------------
KeyControl: 10.238.32.74:443 KeyControl list: 10.238.32.74:443 Status: Could not connect Last heartbeat: Wed Jun 10 12:32:00 2015 (failed)
Device details
---------------------------------------------------
Drive Disk  Part  Cipher	 Status	   GUID
---------------------------------------------------
C:    0     2     none       Avail-Sys    N/A
E:    1     1     none       Attached  A8E25AE9-7A75-471A-A1AA-7CAE1550B35C
F:    2     1     none       Attached  583EB883-52D3-4B05-A482-FF113B5359DD
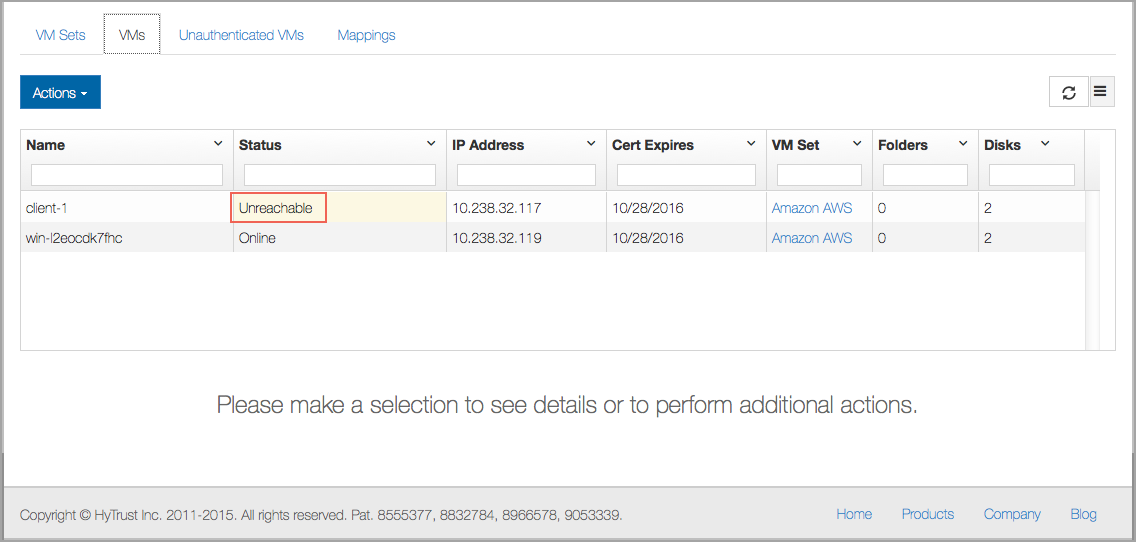
Once the KeyControl cluster becomes reachable again, the status will switch to Connected. Similarly, from the view of the KeyControl cluster, if the VM is down or unreachable, the VM's status will be viewable in the webGUI as follows. Here we have one VM and one that is not reachable:
The value set for the Grace Period is important. The default is 1 day. If the VM is not able to heartbeat within the Grace Period, all permissions will be revoked, access to the unencrypted data will not be available and the VM must be re-authenticated before access is granted again. If the time for the heartbeat is H seconds/minutes/days, then revocation will take place some time between hitting the Grace Period and H seconds afterwards.
The values of the Heartbeat and Grace Period can be altered from within the webGUI by editing the VM Set information or the individual VM information. There is no limit to the values that the Heartbeat and Grace Period can be set to. See Changing VM Defaults, below, for further details.
Changing VM Defaults
You can change the default Heartbeat and Grace Period values for any VM Sets you subsequently create by clicking the Settings Icon and then clicking Cloud Settings. You then see the following screen:
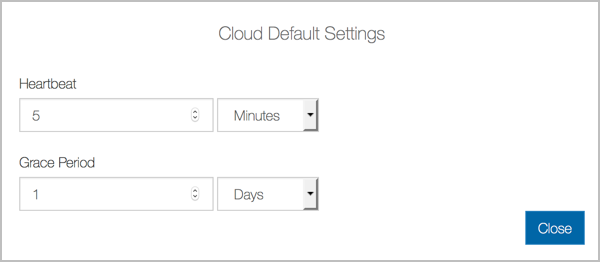
Note that by default, the Grace Period is set to one day and the Heartbeat is set to 5 minutes. We recommend that you alter the Grace Period value to suit your needs. Be careful about changing the Heartbeat. Each operation you invoke on the VM (such as altering these values, revoking device access etc) will only take place on heartbeat intervals. This means that changes you make in the GUI will go out five minutes later.
When creating or editing a Cloud VM Set, you can alter the values for both Heartbeat and Grace Period in the dialog box shown above.
Note however, that these are the defaults for each new VM that will be added to the Cloud VM Set. If you wish to change these defaults on a VM-by-VM basis, you need to select the VM and change its values.
By selecting a single VM, there are several parameters that can be changed. All of these parameters were described above in the previous section. Notice that the Heartbeat value is specified in seconds/days/minutes, and the Grace Period value is specified in days. You select a VM Set, and make your edits in the details screen. The VM Set edit screen is shown below:
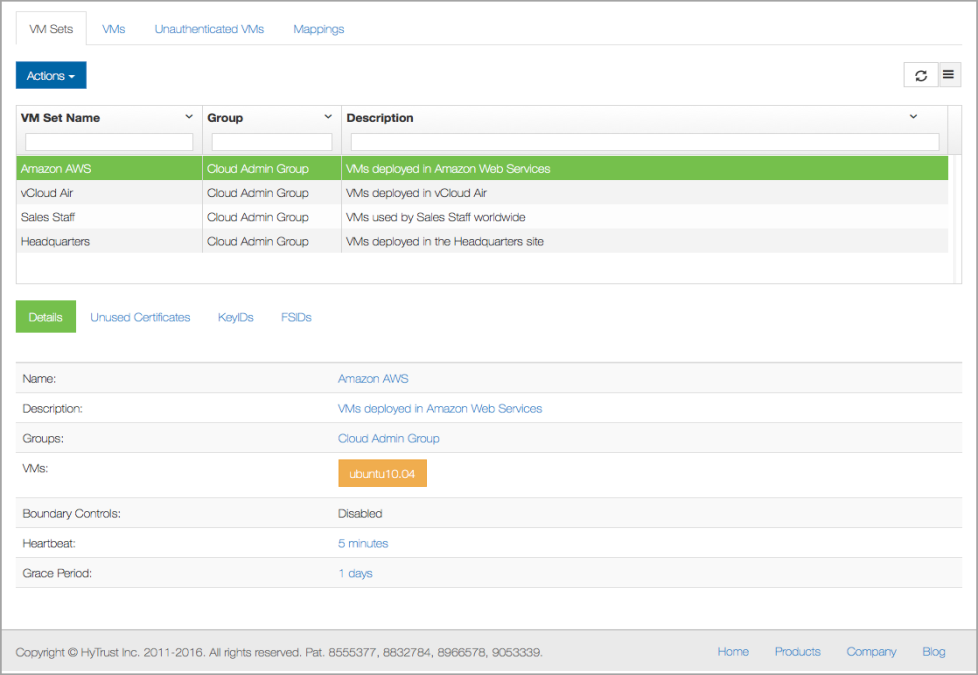
The values that can be changed for this VM Set are shown below:
- Name - the short name of this VM Set
- Description - a description of this VM Set
- Groups - the Admin Groups that administer this VM Set
- VMs - the names of other VMs in this VM Set (not changeable)
- Boundary Controls - whether Boundary Controls are enabled or disabled (not changeable)
- Heartbeat interval - the interval at which the VM Set "checks in" with the KeyControl
- Grace Period - the amount of time, in second, minutes, hours, or days that can pass without a successful heartbeat. After that period, all permissions will be revoked for the VMs in the VM Set , access to the unencrypted data will not be available and the VM Set must be re-authenticated before access is granted again.
Note that you see the default Cloud VM Set settings. You then have the ability to change all of the values shown above for this VM Set. You can also drill down to an individual VM and set the same values for the VM, separately from the other VMs in this VM Set.
Managing Alerts
There are various events which occur that will result in Alerts being generated. Your Security Administrator should have configured mail settings such that Alerts will be sent by email, or will be visible from within the webGUI on the KeyControl cluster. For example, here are a few Alerts as seen from within the webGUI:
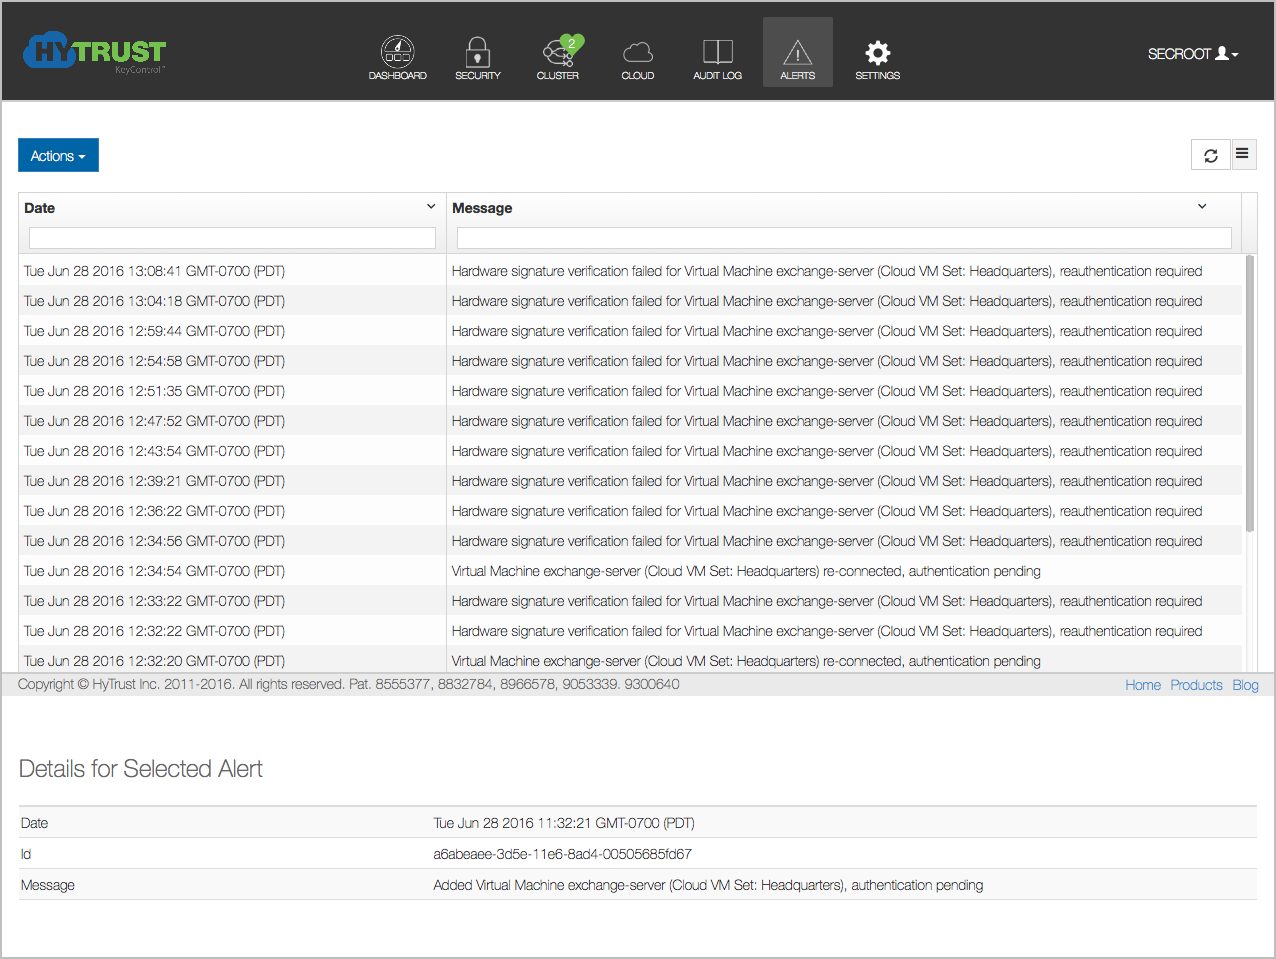
Make sure that you can see events both in the webGUI and through email so that you are aware of any actions that need to take place.
For certificate expiration, Alerts will be generated as follows:
- An Alert is generated once a day if the key/cert expiration date is nearer than a week.
- An Alert is generated once a week if the key/cert expiration date is nearer than a month.
- An Alert is generated once a month (30 days) if the key/cert expiration date is nearer than three months.
- No Alerts are generated up to three months prior to the expiration date.
- No additional Alerts are generated after three months from the expiration date.
Summary of VM Status Reporting
In this section, we list the various states that are reported by running the hcl status command:
- Not registered - The Policy Agent software is installed but the VM has not yet been registered.
- Connected - Everything is in great shape - the VM can communicate with the KeyControl cluster.
- Could not connect - The KeyControl cluster is not reachable.
- Need to update certificate - The certificate for the is VM is no longer valid and should be updated.
- Reauth needed - The VM needs to be re-authenticated.
- Virtual Machine not authenticated - displayed when VM permissions have been revoked from the KeyControl cluster.
- Identity verification failed - displayed when permissions are not available because the VM heartbeat times out, or its IP address or hardware signature changed (for example a copied VM run with new IP address).
- Unknown error from KeyControl cluster - an unknown error has occurred. Please contact HyTrust support if you see this message.