Introduction
This chapter shows how to deploy a KeyControl node from the HyTrust OVA.
For deployment in a vSphere environment (with use of vCenter), HyTrust provides a single virtual node in OVA format. With a few simple clicks and minimum configuration, you will have a KeyControl node up and running within minutes. The same OVA is used for any KeyControl deployment, whether this is your first KeyControl node or you are adding a node to an existing KeyControl cluster.
NOTE - if you are running directly on ESX and do not operate through vCenter, you will need to download the ISO and install from the ISO image. For details, see KeyControl Installation from an ISO Image.
System Requirements
OVA installations have the same minimum requirements as ISO "System requirements". Specifically:
- Disk space: 20 GB (60 GB recommended for large installations)
- RAM: 1GB (8 GB recommended)
See the ISO "System requirements" for details, specifically about increasing the size of the root drive.
Installing a Virtual KeyControl Node
To deploy a KeyControl node from the OVA through vCenter you will be doing initial work in the vCenter menus, then, when the new KeyControl VM is up and running, you will finish a few configuration tasks from the KeyControl system menus on the console.
vCenter Menu Tasks
To install, open your vSphere Windows Client, and then right-click on your vCenter Server. From the drop-down menu, click Deploy OVF Template ("OVF" in vCenter terms means "OVA" as used in this documentation).
Once the OVA package has been selected and opened by the vSphere client you will see a series of welcome screens, beginning with a confirmation of the OVA package that you are installing:

Click next and you will then be prompted for several pieces of information over the next few screens. You are provided with three pre-configured tiers for the installation, although you can modify this later on. The initial tiers:
- Recommended - 2 CPU, 8 GB of RAM
- Demo / Proof Of Concept - 2 CPU, 1 GB of RAM
- Large - 4 CPU, 16 GB of RAM

Next, you specify the location for where the node will be stored and how it will be provisioned. Then you set up your networks.
Last is the final configuration screen where you customize your OVA template. You need to specify a static IP address. Note that if you have an internal IP address that differs from your external IP address, what you put here is the internal IP address. Make sure that you fill in all fields until the red outlining goes away.

At this point you will see a screen showing all the options that you've selected. This allows you to confirm your choices and install. You can decide whether to just install or power on the KeyControl node after installation.

You will be notified when the installation is complete. The VM will then spend a few minutes configuring itself.
At this point you should switch to the KeyControl system menus on the console. There are a couple of tasks to perform on the system menus to complete the KeyControl configuration.
KeyControl System Menu Tasks
First, you will be prompted to change the console menu system's password. You will be required to enter the password twice. Passwords must be a minimum of eight characters.
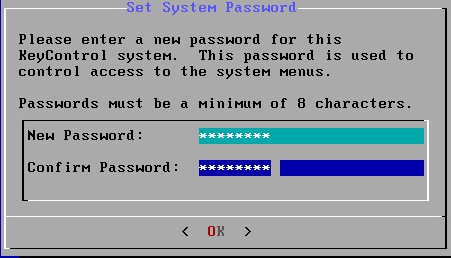
The console menu to which the root/password combination enables access is where diagnostics and settings can be manipulated for this system during its lifetime. Without the password, access to the system for these tasks is impossible. It is critical that the password be stored safely somewhere.
The last step in configuration is choosing whether
you are going to add this new KeyControl system as a new node to an existing cluster:
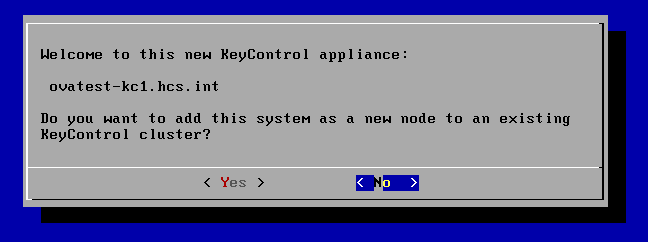
If you choose to add this new KeyControl system as a new node in an existing cluster, follow the directions
here: Installing Additional KeyControl Nodes
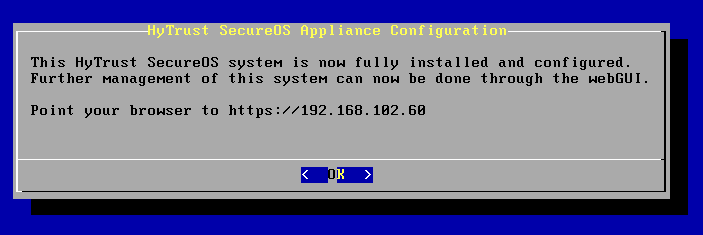
If this is your first KeyControl system and you respond No to this prompt, your system is fully configured and you will
see the last of these post-install menus pointing you to the webGUI interface:
After this, you are brought to the main menu for the system. At this point you can choose to log out. Remember that further access to the system menus requires the password that you just set up.