Introduction
HyTrust KeyControl is delivered in multiple formats. Click on the link to refer to the installation instructions that are specific for the media type you are using.
- OVA - to install KeyControl in VMware vSphere environments.
- ISO - to install KeyControl as a virtual machine (with most hypervisors) or on physical hardware.
- AMI - to install KeyControl on Amazon Web Services (see KeyControl Installation on Amazon Web Services.
The first step is to install an initial KeyControl node. Once a node is installed and set up, most administrative tasks are performed using the webGUI.
The steps needed for setting up HyTrust DataControl are as follows.
- Install the first KeyControl node.
- Log on to the webGUI, accept the EULA, and add user accounts.
- Add new KeyControl nodes to the cluster.
- Add Policy Agents in Windows and Linux VMs.
NOTE - A 30-day license key is shipped with the product and will be activated when you install and configure the first KeyControl node. This allows you to protect up to 5 virtual machines and use all product features. For further details, see the section on License Management
System requirements
Installation of HyTrust KeyControl requires the following configuration parameters:
| Parameter | Minimum | Recommended | Large Installations |
|---|---|---|---|
| CPUs | 2 | 4 | 4 |
| Disk | 20 GB | 20 GB | 60 GB |
| RAM | 1 GB | 8 GB | 16 GB |
Increasing KeyControl Storage
The KeyControl appliance detects when there is less than 2 GB of free space, and sends an alert.
If you want to increase the size of your drive, use your hypervisor commands to resize the underlying disk.
Next, reboot the KeyControl node. You can do this using the WebGUI, or by using the console.
Upon reboot, view the Audit log messages. It should report the new size upon success or provide information if the resize failed.
KeyControl ports that need to be open
Please note that KeyControl nodes communicate amongst themselves over TCP ports 2525, 2526, and 8443. If you have a firewall between one or more KeyControl nodes in your cluster, you need to make sure that these ports are open.
KeyControl Network Connectivity Requirements
The following list summarizes the networking settings for a HyTrust KeyControl node:
KeyControl to KeyControl:
- Internal protocol – TCP/8443,2525,2526 among the servers in the group
- HTKC webGUI – Inbound TCP/443 to administrator systems from any HTKC server in the cluster
- HTKC support-level access – Inbound TCP/22 (for full support) and TCP/6666 (for limited support) from administrator systems to any HTKC server in the cluster
DataControl Agent to KeyControl:
- HTKC/HTDC communication – Inbound TCP/443 from anywhere there is or will be an HTDC/encrypted client from any HTKC server in the cluster
KeyControl to Infrastructure Services:
- DNS - Outbound UDP/53
- SMTP – Outbound mail server, typically TCP/25
- SYSLOG – Outbound UCP/514 to the remote syslog server
- Backups via NFS – Inbound TCP and UDP/111, 2049
- NTP – Outbound UDP/123 or TCP/123 to NTP servers
NOTE: Network ports indicated for SMTP, syslog and NTP are the typical ports for these services, and are configurable. Please consult with the administrators of these services.
Having the KeyControl cluster behind a firewall
To operate a KeyControl cluster in your data center / private cloud, VMs that operate in the public Cloud using the Policy Agent must be able to see each KeyControl node. Consider the following figure:
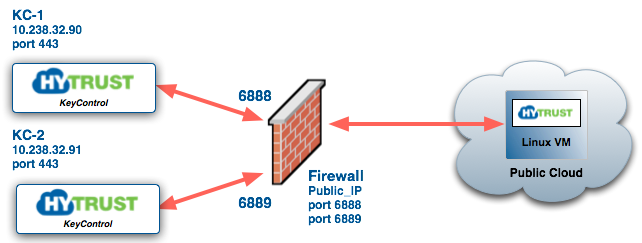
There are two KeyControl nodes in the cluster with IP address 10.238.32.90 and 10.238.32.91. The VM communicates with them through port 443 (HTTPS). There are multiple ways to achieve this communication, but the simplest way is to map a port in your firewall to each KeyControl node in the cluster and use the firewall IP address / port number when registering the VMs.
You can also consider having a load balancer behind the firewall that exports a single IP address to the firewall (and therefore the VMs) and your KeyControl nodes.
Using the system console menus
Regardless of the media used for installation, you will need to use the system console menus. These are text-based and involve use of the cursor keys, the <tab>key and the <enter / return> key.
- For selection menus, use <up / down> arrows to highlight your choice, <enter / return> to make a selection.
- For confirmation, if you are presented a <yes>, <no> or <cancel> choice, press <tab> to change the choice, <enter / return> to make the selection.
Login on the System Console Menus
The login on the system console menus is always "root" - you will change the password as you log in for the first time, but the login will not change. Note that this is only for the System Console Menu. The WebGUI requires a separate login.