KeyControl Configuration
Introduction
This section covers the various KeyControl configuration parameters that can be changed on the KeyControl cluster.
Changing Hardware on a KeyControl Node
We recommend the following procedure be taken when upgrading hardware. Let's assume that you have two nodes, KeyControl-1 and KeyControl-2 and wish to change hardware in KeyControl-1:
- Remove KeyControl-1 from the cluster (while logged into KeyControl-2)
- Bring down KeyControl-1 and change the hardware
- Reinstall KeyControl-1 and add it back to the cluster
Reinstalling KeyControl-1 and adding it back to the cluster is a simple operation that should take no longer than a few minutes. Once KeyControl-1 has been authenticated, replication of the object store onto KeyControl-1 is a quick and simple operation performed automatically without administrator intervention.
If you have a two-node cluster, you have a window where only one KeyControl node is available (while upgrading hardware in the other). We recommend that you bring a new node into the cluster temporarily, say KeyControl-3, to avoid any downtime.
See also MasterKey recovery, discussed in the "Master Key Protection"
Static Routes
KeyControl uses a single Network Interface Controller (NIC) for communication over networks. In some network environments, it may be necessary to add static routes to KeyControl. Since KeyControl is a locked-down system, there is a menu option to manage static routes.
To set up static routes in KeyControl, go to the console's main menu and select Manage Network Settings and then select Manage Static Routes:
Here, you can view the list of already configured static routes, and add or delete static routes. To add static routes, select Add Static Route.
Enter the Network Address and Gateway and press Enter.
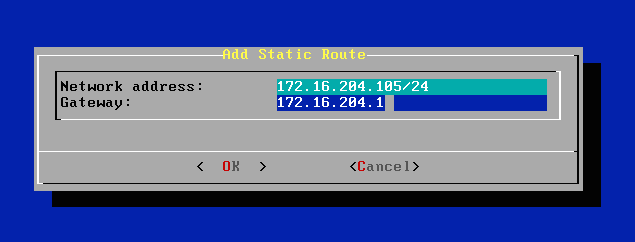
Check the information entered and if you want to force-add that route, select Yes. If you do not want to force-add that route, select No. KeyControl takes you back to the Static Routes menu. Select Add Static Route again and enter the corrected network address and gateway.
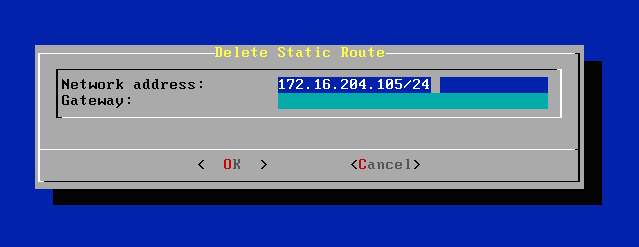
To delete static routes, select Delete Static Route on the Static Routes menu. Enter the network address or gateway, and select OK. KeyControl deletes all the static routes that match.
Adding Multiple DNS Servers
You can link to more than one DNS server. From the Console menu, click Manage Network Settings, and then click Change Current Network Configuration. You are presented with a warning that can safely click OK to.
In the HyTrust SecureOS Network Configuration dialog box, click Custom Configuration. Then, in the Network Configuration dialog box, click at the end of the DNS Hosts line, add a comma, and up to two more IP addresses for additional DNS Hosts.
Click OK to save your changes.
Environments with No Email Support
Just after your first login, you either enter an email address and email server settings for the secroot user, or you check the Disable e-mail notifications checkbox. The latter should only be used for environments where there is no email access.
Without email access, you will need to monitor syslog for Alerts or log on and check by clicking the Alerts button at the top right of the GUI page.
If you disable email support, the most important point to remember is that Admin Key parts are posted as Alerts and should be copied from the Alert screen to a safe place, after which you should delete the Alert.
If you believe that there is a likelihood that you will want to switch back to using email at some point in the future, you should always add email addresses to any account created to avoid having to do so in future. Of course, the choice is yours.
Let's consider a system where we have the following two users:
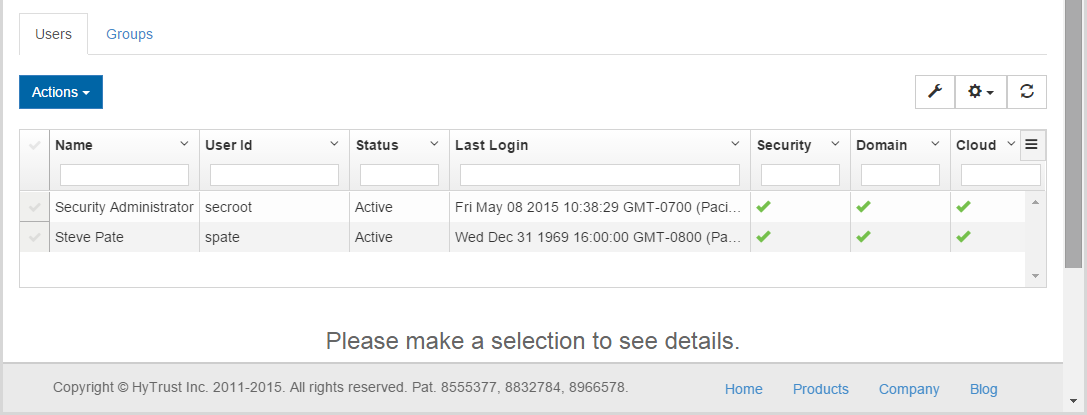
We have the initial secroot user and one more Security Administrator. We will have generated Alerts to post Admin Keys twice:
- On first install a single key part will be delivered to secroot.
- When adding spate, we will post key part Alerts to both secroot and spate.
If you are secroot, make sure you only retain/use the second key part, unless you want to restore from a backup image taken prior to the creation of spate, because the key part generated on first install will no longer work if you try to restore from a backup taken after spate was created. For details on timing of Admin Key generation and recovery, see Understanding the Admin Key
Adding Email Support Back
If you wish to add email support, select the Settings Icon and then click Mail Server.
Simply click to clear the Disable E-mail Notifications checkbox, fill in the email settings, and notifications are enabled.
You can click the Send Test button to send a test email which will look similar to the following:

If you get the email, you're good to go! Since email alerts were previously deleted, be sure that Security Admins copy their key part from their Alerts and make sure that the key part is securely stored.
Be aware that you can also download the Admin Key on demand, directly from KeyControl. See the section on "KeyControl Backup and Restore".