KMIP Concepts Used by HyTrust KMIP Client
The following KMIP concepts are part of HyTrust's implementation of KMIP.
External Key Server
KeyControl has the ability to interact with External Key Servers (EKS). Currently this is limited to servers that support KMIP. To set the parameters for utilizing KMIP, you configure the server, and then the client. KeyControl can also act as a KMIP server. To configure a HyTrust KeyControl KMIP server, see: "KMIP Server"
Once access is configured, your KMIP server can provide the following features to your KeyControl:
Entropy
KeyControl will contact the EKS server at each reboot to obtain a seed value for its Random Number Generator (RNG). This provides another source of entropy to help randomize values used in things like key generation. This seed will be gathered each reboot unless the option Disable Entropy Seed is set in the Configuration tab (see below).
Note: HyTrust supports SafeNet 8.x and above. Some implementations of the EKS do not support the entropy operation. This is a non-fatal error, and this failure will simply be logged and ignored.
Master Key Protection
KeyControl has an encrypted object store that protects keys and other sensitive information. The encryption key itself is protected by a Master Key. If KeyControl needs to be recovered or restored it is necessary to reconstruct this Master Key to unlock the its internal encryption key. With EKS the Master Key is protected and can be recovered if and only if KeyControl can contact the EKS with appropriate credentials.
KeyControl can act as an EKS. For details, see: "KMIP Server"
Configuring a KMIP Client Connection
To configure the KMIP client, click the Settings Icon and then click KMIP Client Settings. Then you must complete the following dialog boxes, filling in all applicable fields as set by your KMIP server. Whenever you finish a blank field, click Save and move to the next field. You must do this for all three tabs, including the Basic tab, the Advanced tab, and the Configuration tab.
When you have filled in all applicable settings under all three dialog tabs, follow the instructions in "Testing Your KMIP Connection" , below, to test your settings and then apply them permanently.
KMIP Client Settings: the Basic Tab
Fill in the Basic tab for KMIP Client Settings:
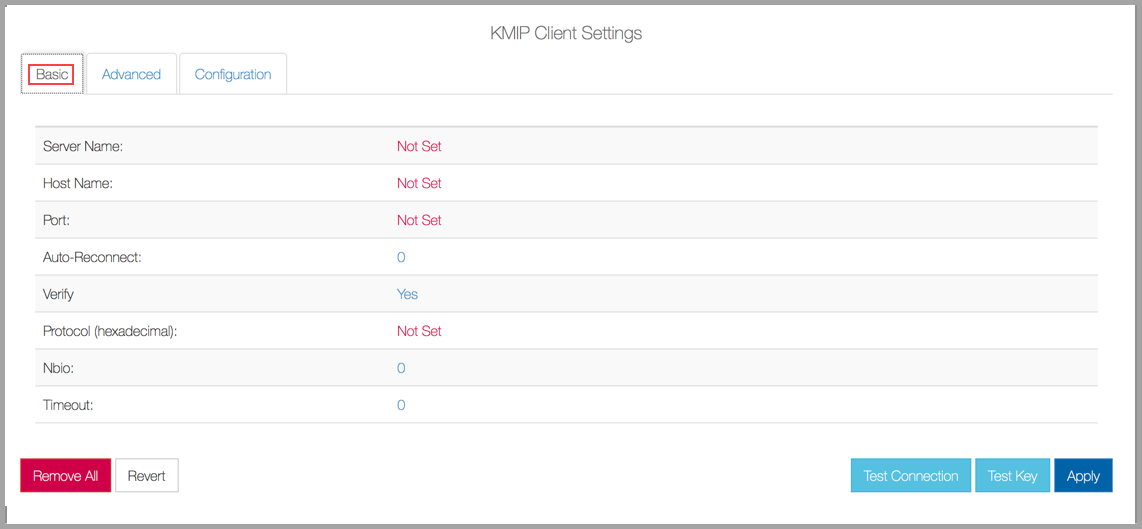
Details for the Basic tab for KMIP Client Settings:
- Server Name: name of the KMIP server
- Host Name: hostname or IP address of the KMIP server
-
Port: the default is from the KMIP standard:
5696, and is set by your KMIP server. -
Auto-Reconnect: the default is off:
0. Change to1if you want your client to automatically attempt reconnects. -
Verify: the default is on:
Yes. Client authentication is verified. This setting should be on. -
Protocol: the version of the KMIP protocol supported. The default is version 1,
KMIP1. -
Nbio:
0or1, whether non-blocking I/O is required. The default value is off,0. -
Timeout: the timeout, in seconds, for a client operation. The default is unlimited (
0).
KMIP Client Settings: the Advanced Tab
Fill in the Advanced tab for KMIP Client Settings, going from one sub-tab to the next:
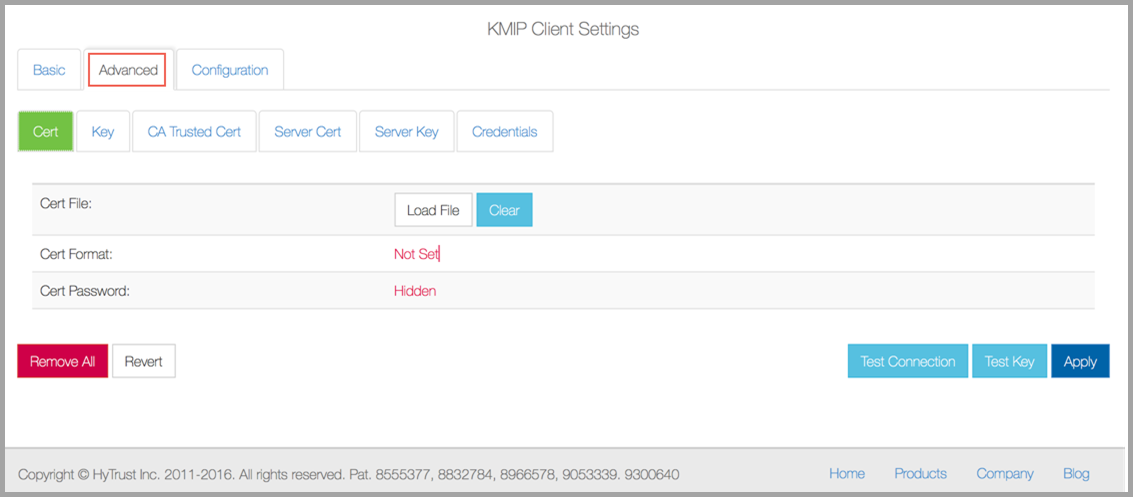
Details for the Advanced tab for KMIP Client Settings:
Cert sub-tab:
- Cert File: SSL certificate file
- Cert Format: PEM or P12: format of the key file
- Cert Password: password, if any, for the certificate file
- Load File: opens a browser for you to select the cert file to upload
- Clear: removes any previously-loaded file
Key sub-tab:
- Key File: SSL key file
- Key Format: PEM or P12: format of the key file
- Key Password: password, if any, for the key file
- Load File: opens a browser for you to select the cert file to upload
- Clear: removes any previously-loaded file
CA Trusted Cert sub-tab:
- CA Trusted Cert File: Trusted Certificate Authority file
- CA Trusted Cert Format: PEM or P12: format of the key file
- CA Trusted Cert Password: password for the trusted cert file
- Load File: opens a browser for you to select the trusted cert file to upload
- Clear: removes any previously-loaded file
Server Cert sub-tab:
- Cert: SSL certificate file for the server.
- Cert Format: PEM or P12: format of the server certificate file
- Cert Password: password, if any, for the server certificate file
- Load File: opens a browser for you to select the server cert file to upload
- Clear: removes any previously-loaded file
Server Key sub-tab:
- Server Key File: server key file for the server
- Server Key Format: PEM or P12: format of the server certificate file
- Server Key Password: password, if any, for the server key
- Load File: opens a browser for you to select the server key file to upload
- Clear: removes any previously-loaded file
Credentials sub-tab:
- Username: username for the KMIP server
- Password: password, if any, for the KMIP server
- Ciphers: ciphers to use
KMIP Client Settings: the Configuration Tab
Fill in the Configuration tab for KMIP Client Settings:
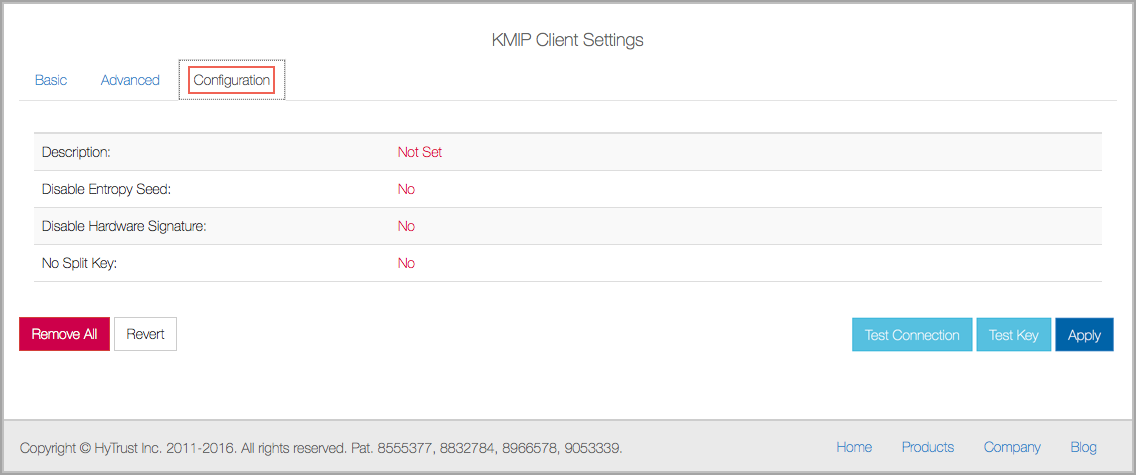
Details for the Configuration tab for KMIP Client Settings:
- Description: description of the KMIP server
- Disable Entropy Seed: disables the seeding of the KeyControl RNG from the KMIP server
- Disable Hardware Signature: currently not implemented
- No Split Key: currently not implemented
Testing Your KMIP Connection
Once you have finished filling in all appropriate settings, you have several options. We suggest that you begin by clicking the Test Connection button. This will test the connectivity of your settings, Then, click the Test Key button. This will ensure that a key can be generated on the EKS. When you are sure that your settings work, then click Apply. This will store the KMIP settings, and if you have enabled entropy in the Configuration step, the Random Number Generator will be automatically seeded. The Admin Key will be regenerated and will be stored on the KMIP server.
You can also click Revert to clear any applied changes, or Remove All to reset all settings to their defaults and to disable the KMIP client.
System Recovery from the External Key Server
If you need system recovery for your KeyControl, it can be done by accessing the EKS. You will be presented with an option for Recovery from External Key Server. Here the settings have to be entered as above and, once successfully applied, the Admin Key is recovered from the EKS and the KeyControl is restored.