Introduction
KeyControl supports a fully functional Key Management Interoperability Protocol (KMIP) Server implementation. When enabled, KMIP clients can connect and perform all standard KMIP operations.
Current limitations
- Server clustering of updates is manual. KMIP objects are fully replicated across the cluster, but servers running on nodes other than where a given object was created will need to be re-enabled to recognize the new object. Click Apply to re-enable the server at any time that you make changes.
- Similarly, if the KMIP server is enabled after a node has joined the cluster it will need to be manually enabled on all nodes. A node joining or rebooting when the KMIP server is enabled will have the server enabled and access to all existing objects automatically.
- Object count (for example, keys) is limited to 1000. Destroyed objects still count toward this limit.
- Users cannot be partitioned. That is, all users have access to all KMIP objects.
Accessing the KMIP Server Settings
In the GUI, click the Settings icon at the top of the screen, and then click KMIP Server Settings. There are two tabs: Basic, which enables the server and its options, and Users, which allows user certificate bundles to be created and downloaded.
Enabling the Server
In its simplest form, you can leave the defaults in place and simply enable the server. The following image gives you context, starting on the Basic tab:
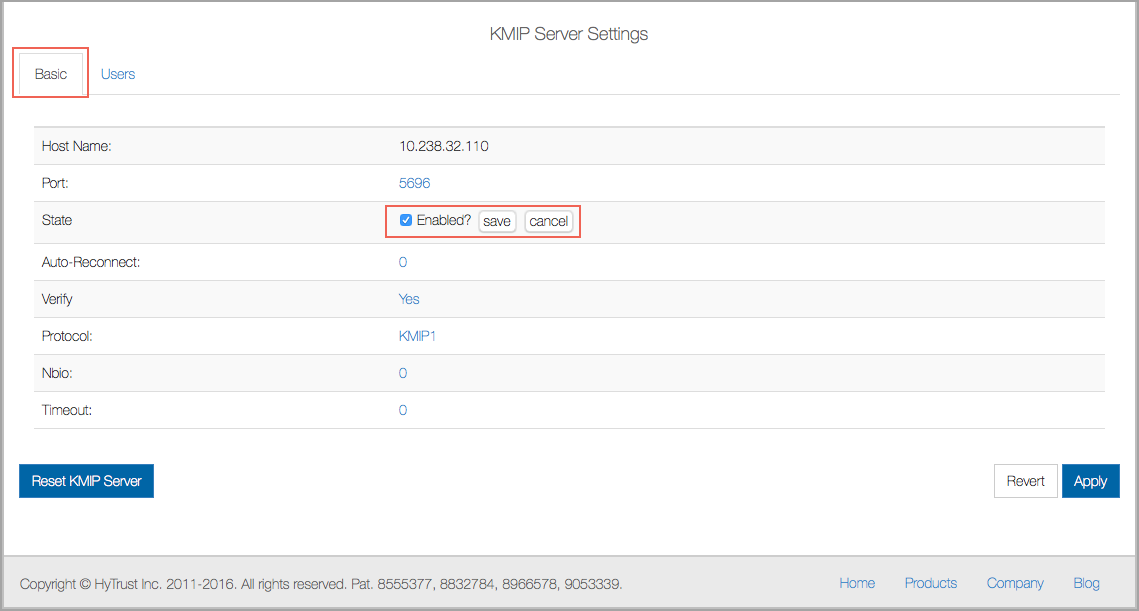
To enable the KMIP server:
- In the KMIP Server Settings dialog box, on the Basic tab, in the line labeled State, click DISABLED and then click the checkbox to change it to ENABLED.
- Click Save, and then click Apply.
The server will be enabled on the KeyControl to which you are connected, using the default connection options. If you need to change the defaults, you can do so. Values in general are taken from the KMIP standard and/or security recommendations:
- Port: the default is from the KMIP standard:
5696. - Auto-Reconnect: the default is off:
0. Change to1if you want your client to automatically attempt reconnects. - Verify: the default is on: Yes. Client identity is verified. This setting should be set to Yes.
- Protocol: the version of the KMIP protocol supported. The default is version 1,
KMIP1. - Nbio:
0or1, whether non-blocking I/O is required. The default value is off,0. - Timeout: the timeout, in seconds, for a client operation. The default is unlimited (
0).
Using the Apply button: clicking Apply will update the settings for the server. The server will be enabled or disabled as appropriate. If the server is already set to ENABLED, it will restart and refresh all of its settings and object list. When you click Apply, you will be prompted to confirm that you want to "Overwrite all existing KMIP Server settings." Click Proceed or Cancel.
Using the Revert button: Revert is used when settings have been changed but not applied, and you want to return to the original settings without making any changes.
Using the Reset KMIP Server button: Reset KMIP Server is used to disable the KMIP server, remove all its settings, AND destroy all current KMIP objects. It should be used with extreme caution.
Authorizing Users and Certificates
Certificates are used by the KMIP client to communicate securely with the KMIP server. At a minimum, the client needs:
- A User certificate
- A User key
- A CA certificate
To obtain these you need to create a KMIP user, and download a certificate bundle. The bundle will contain a combined user certificate/key file and a CAcert file. The user certificate/key can have an optional password. These certificates are then used by a client to connect.
To create a user and certificate bundle:
- In the KMIP Server Settings dialog box, click the Users tab, and under Actions, click Create User.
- Fill in a Username for the user you are adding.
- (Optional) Modify the Cert Expiration. The default is one year.
- Enter a Password and confirm it.
- Click Create.
To download a user certificate bundle:
- Click to highlight the user for whom you want to download the bundle.
- Under Actions, click Download Certificate. A bundle <username>.zip will be downloaded.
- Unzip the downloaded file, and you will see both a user cert/key file <username>.pem and a server cert/key file (cacert.pem). These can be used by clients to connect to the server.