Scripting Operations Using hicli
Contents
Introduction
This chapter describes hicli, which can be used for managing operations between the KeyControl cluster and a DataControl agent present in Linux virtual machines. hicli uses a combination of the KeyControl REST APIs to communicate with KeyControl and SSH to invoke hcl commands on Windows and Linux VMs.
The DataControl agent provides for encryption of devices within Linux and Windows virtual machines. The management of keys and the administration of the DataControl agent is through a KeyControl cluster. Administration can take place solely through the webGUI, through the RESTful APIs or using the hicli command.
The following figure shows the servers that are involved:
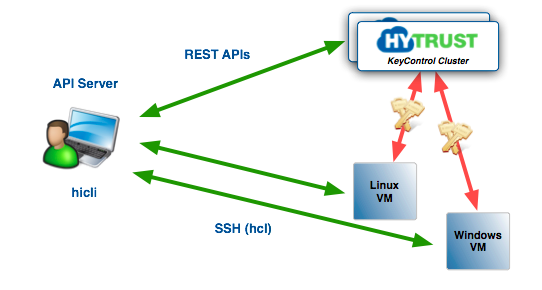
We will be operating with one or more clustered KeyControl nodes, a number of Linux VMs and the API Server, a server from which hicli will be invoked. This can be any UNIX-like server including Linux, BSD variants, OS/X and so on.
NOTE - to use hicli with Windows, we need an SSH server which is not available on Windows by default. Please install a server such as cygwin/SSH or puTTY.
Installation and Configuration
The first step is to download the API bundle which is included with the HyTrust DataControl agent software. Navigate to the CLOUD tab and select the DOWNLOAD HYTRUST DATACONTROL as shown below:
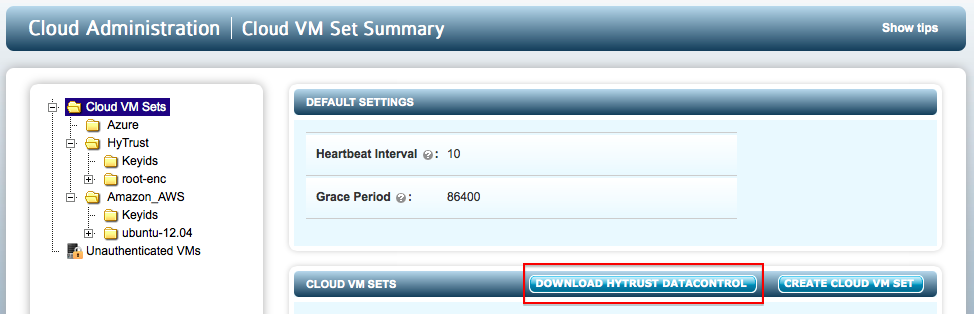
You will get a file called hcs-client-agent.zip, which contains the DataControl agent software for Windows and Linux as well as hcs-api-2.6.tgz, the HyTrust API package.
Installation is very straightforward. Simply navigate to a directory where you wish to install the package and untar it as follows:
$ cd ~
$ tar xvfz hcs-api-2.6.tgz
x hcs-api/
x hcs-api/hclcomm.py
x hcs-api/kpsapi.py
x hcs-api/docopt.py
x hcs-api/hicli
You will have a directory called hcs-api and all the files that are part of the package will be created within this directory.
After unpacking the software, you need to set up PYTHONPATH to point to the new directory and modify your PATH so that the shell can reference the hicli program. For example, if the install location is /Users/spate, the environment variables need to be set up as follows:
$ export PYTHONPATH=$PYTHONPATH:/Users/spate/hcs-api
$ export PATH=$PATH:/Users/spate/hcs-api
The next step is to set up a configuration file called ~/.hicli/hicli.cfg. This should contain information about the virtual machines to be managed. Here is an example of such a configuration file that contains two Linux VMs:
{
    "cvmlist":  {
          "ubuntu10.04": { "host":"192.168.140.129", "port":"22", "user":"root"},
          "ubuntu12.10": { "host":"192.168.140.130", "port":"22", "user":"root"}
    }
}
To add a new VM to the list, just add another entry. For example:
{
    "cvmlist":  {
          "ubuntu10.04": { "host":"192.168.140.129", "port":"22", "user":"root"},
          "ubuntu12.10": { "host":"192.168.140.130", "port":"22", "user":"root"},
          "ubuntu13.04": { "host":"192.168.140.131", "port":"22", "user":"root"}
    }
}
Note that the number and location of curly brackets is important.
By default, the hicli.cfg file is used to resolve VM names. If no entries are found, DNS is used to resolve the VM names.
Once you have everything in place, run the hicli command and you should see the following output:
$ hicli
Usage:
    hicli help
    hicli help <command>
    hicli kc
    hicli kc select <kchost>
    hicli group list
    hicli group new <name> [--privilege=<priv>] [--description=<desc>] [--members=<userlist>]
    hicli group (detail|rm) <name>
    hicli group set <name> [--description=<desc>] [--new_name=<name>]
    hicli group <name> add_user <username>
    hicli group <name> rm_user <username>
    hicli user [list]
    hicli user login <name> [--password=<pwd>]
    hicli user logout
    hicli user new <name> --email=<email> --password=<passwd> --roles=<privlist>
         --full_name=<full_name> [--account_state=(active|disabled)] [--password_expiration=<date>]
         [--account_expiration=<date>] [--groups=<grplist>]
    hicli user set <name> [--email=<email>] [--password=<passwd>] [--full_name=<full_name>]
         [--account_state=(active|disabled)] [--roles=<privlist>] [--password_expiration=<date>]
         [--account_expiration=<date>] [--groups=<grplist>]
    hicli user (detail|rm) <name>
    hicli user defaults [--authentication=(local|radius)] [--password_expiry=<days>] [--max_failed_logins=<count>]
         [--min_password_length=<pwdlen>]
    hicli domain [list]
    hicli domain (select|detail) <name>
    hicli domain set <name> [--description=<desc>] [--allow_reconnect=(yes|no)] [--require_passphrase=(yes|no)]
         [--hide_passphrase=(yes|no)] [--check_hardware_id=(yes|no)]
    hicli server list
    hicli server (detail|auth) <name>
    hicli server set <name> --description=<desc>
    hicli cvmset [list]
    hicli cvmset new <name> <group> [--description=<desc>] [--heartbeat=<hsec>] [--grace=<gsec>]
    hicli cvmset (detail|select|rm) <name>
    hicli cvmset set <name> [--description=<desc>] [--group=<group>] [--heartbeat=<hsec>]
         [--grace=<gsec>]
    hicli cert (detail|rm) <certid>
    hicli keyid list
    hicli keyid new <keyid> [--crypto_algo=<algo>] [--expiry=<days>] [--onexpiry=(no_use|shred)]
         [--description=<desc>]
    hicli keyid (detail|revoke|unrevoke|rm) <keyid>
    hicli keyid set <keyid> [--expiration=<date>] [--onexpiry=(no_use|shred)] [--description=<desc>]
    hicli s3 setstore <aws_access_key_id> <aws_secret_access_key>
    hicli s3 (create_bucket|delete_bucket|list_bucket) <bucketname>
    hicli cvm [list]
    hicli cvm (detail|status|revoke|reauth|select|renew) <name>
    hicli cvm new [--kc_list=<klist>] <name>
    hicli cvm clone [--kc_list=<klist>] <name> <newname>
    hicli cvm rm [--force] <name>
    hicli cvm set <name> [--description=<desc>] [--heartbeat=<hsec>] [--grace=<gsec>]
         [--reauth=<paramlist>]
    hicli cvm set <name> --kc_list=<klist>
    hicli cvm <name> (add_disk|detail_disk|revoke_disk|unrevoke_disk) <diskname>
    hicli cvm <name> (rekey_disk|rm_disk) [--force] <diskname>
    hicli cvm <name> set_disk <diskname> [--expiration=<date>] [--onexpiry=(no_use|shred)]
    hicli cvm <name> encryptfile <infile> [--out_file=<outfile>] [--keyid=<keyid>]
    hicli cvm <name> decryptfile <infile> [--out_file=<outfile>]
    hicli cvm <name> s3 add_file <bucketname> <file> [--keyid=<keyid>]
    hicli cvm <name> s3 get_file <bucketname> <file> [--out_file=<outfile>]
    hicli cvm <name> s3 rm_file <bucketname> <file>
    hicli alert list
    hicli alert detail <serialno>
    hicli alert rm <alertid>
    hicli global set [--heartbeat=<hsec>] [--grace=<gsec>]
    hicli version
If you see the same output, you're now ready to move to the last stage, setting up SSH key pairs to allow the API to communicate with the Linux VMs that you're managing. If you do not see the above output, check to make sure that your paths are set up correctly.
To set up SSH communication on each Linux host, generate an SSH key pair for the root user as follows and copy the public key to the API server (in this case 10.0.1.9):
$ cd ~/.ssh
$ ssh-keygen -t dsa
$ scp id_dsa.pub spate@10.0.1.9:~/.ssh/id_dsa.pub.vm_name
and on the API server:
$ cd ~/.ssh
$ cat id_dsa.pub.vm_name >> authorized_keys
Make sure that:
- SSH is enabled on the VM.
- You enable root login over SSH to the VM.
- Turn off SSH warnings.
To test that SSH access is working between your API server and your VM, run a command such as follows:
$ ssh root@192.168.140.129 hostname
ubuntu10.04
In this case, the server returned ubuntu10.04.
How to use the API
The hicli command is at the heart of the system. It's a Python executable that lets you communicate with both the KeyControl cluster and the VMs you wish to manage. It can be invoked from any scripting language, compiled binary or can be run from the command line.
The APIs are broken down in to the following categories:
- User and group administration.
- Cloud VM Set management.
- VM management.
There are certain user and group operations that only KeyControl security administrators can call, but anyone with cloud administration privileges can perform the other operations. The following table lists the hicli operations and which administrative privilege is required to perform each task.
| hicli command | Sub-command | Accessibility |
|---|---|---|
| group | list | SEC_ADMIN sees all groups. Others see the groups of which they are members |
| new | SEC_ADMIN | |
| detail | SEC_ADMIN sees all groups Others can see groups of which they are members | |
| rm | SEC_ADMIN | |
| set description | SEC_ADMIN | |
| add_user | SEC_ADMIN | |
| rm_user | SEC_ADMIN | |
| set name | SEC_ADMIN | |
| user | list | SEC_ADMIN sees all users Others see users of groups to which they belong |
| new | SEC_ADMIN | |
| set email | SEC_ADMIN, and the user himself or herself | |
| set password | SEC_ADMIN, and user himself or herself | |
| set full_name | SEC_ADMIN, and user himself or herself | |
| set account_state | SEC_ADMIN | |
| set roles | SEC_ADMIN | |
| detail | SEC_ADMIN, and user himself or herself | |
| rm | SEC_ADMIN | |
| set password_expiration | SEC_ADMIN | |
| set account_expiration | SEC_ADMIN | |
| set groups | SEC_ADMIN | |
| defaults | SEC_ADMIN | |
| domain | detail | DOMAIN_ADMIN |
| set description | DOMAIN_ADMIN | |
| set allow_reconnect | DOMAIN_ADMIN | |
| set require_passphrase | DOMAIN_ADMIN | |
| set hide_passphrase | DOMAIN_ADMIN | |
| set check_hardware_id | DOMAIN_ADMIN | |
| server detail | DOMAIN_ADMIN | |
| server set description | DOMAIN_ADMIN | |
| server auth | DOMAIN_ADMIN | |
| cvmset | list | CLOUD_ADMIN, list of cvmsets belonging to groups of which he or she is a member |
| new | CLOUD_ADMIN. must belong to group specified, which must be a CLOUD_ADMIN-type group | |
| detail | CLOUD_ADMIN, any cvmset listed by list | |
| rm | CLOUD_ADMIN, any cvmset listed by list, should be empty | |
| set description | CLOUD_ADMIN, any cvmset listed by list | |
| set group | CLOUD_ADMIN, to any group he or she is a member of, which is of type CLOUD_ADMIN | |
| set name | CLOUD_ADMIN, any cvmset listed by list | |
| set heartbeat | CLOUD_ADMIN, any cvmset listed by list | |
| set grace | CLOUD_ADMIN, any cvmset listed by list | |
| cert rm | CLOUD_ADMIN | |
| keyid add | GUEST_ADMIN | |
| keyid set expiration | CLOUD_ADMIN | |
| keyid set onexpiry | CLOUD_ADMIN | |
| keyid revoke | CLOUD_ADMIN | |
| keyid unrevoke | CLOUD_ADMIN | |
| keyid rm | GUEST_ADMIN | |
| cvm | list | CLOUD_ADMIN, all cvms belonging to currently selected cvmset |
| new | CLOUD_ADMIN, new cvm part of current cvmset | |
| rm | CLOUD_ADMIN | |
| status | CLOUD_ADMIN | |
| revoke | CLOUD_ADMIN | |
| reauth | CLOUD_ADMIN | |
| set description | CLOUD_ADMIN | |
| set heartbeat | CLOUD_ADMIN | |
| set grace | CLOUD_ADMIN | |
| set reauth | CLOUD_ADMIN | |
| add_disk | CLOUD_ADMIN | |
| revoke_disk | CLOUD_ADMIN | |
| unrevoke_disk | CLOUD_ADMIN | |
| rm_disk | CLOUD_ADMIN | |
| renew clone | CLOUD_ADMIN | |
| detail | CLOUD_ADMIN | |
| detail_disk | CLOUD_ADMIN | |
| set_disk expiration | CLOUD_ADMIN | |
| rekey_disk | GUEST_ADMIN | |
| s3 add_file | GUEST_ADMIN | |
| s3 rm_file | GUEST_ADMIN | |
| s3 get_file | GUEST_ADMIN | |
| s3 | set aws_access_key_id | GUEST_ADMIN |
| set aws_secret_access_key | GUEST_ADMIN | |
| create_bucket | GUEST_ADMIN | |
| delete_bucket | GUEST_ADMIN | |
| list_bucket | GUEST_ADMIN | |
| alert | list | user sees his or her alerts |
| rm | user removes own alert | |
| global | set heartbeat | SEC_ADMIN |
| set grace | SEC_ADMIN |
Selecting a KeyControl node
KeyControl nodes are typically clustered. For example, consider the following figure that shows a KeyControl cluster with three nodes:
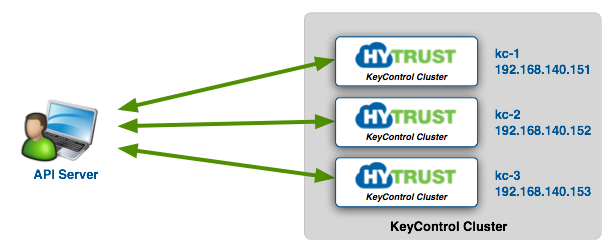
Before invoking hicli commands, you must first select a KeyControl node to talk to. In our example above, it really does not matter which KeyControl node is chosen. Since the three nodes operate in an active-active cluster, any change to any node is immediately reflected on all nodes in the cluster.
You select a node as follows:
$ hicli kc select kc-1
$ hicli kc
Current KeyControl: kc-1
$ hicli kc select 192.168.140.152
$ hicli kc
Current KeyControl: 192.168.140.152
DNS is used to resolve hostnames so either be sure to set up DNS for all your KeyControl nodes or use IP addresses as shown above.
User and Group Management
The following table displays the commands available for managing users and groups.
| hicli Command | Description |
|---|---|
| hicli group list | List the current administration groups |
| hicli group new | Create a new administration group |
| hicli group detail | Display information about the specified group |
| hicli group rm | Remove the specified group |
| hicli group set | Set group properties |
| hicli group add_user | Add a user to a group |
| hicli group rm_user | Remove a user from a group |
| hicli group set name | Change the name of a group |
| hicli user | Show the current "logged-on" user |
| hicli user list | Show all users and their privileges |
| hicli user login | Log on as the specified user |
| hicli user logout | Log out the current user |
| hicli user new | Create a new user |
| hicli user set | Change user attributes |
| hicli user detail | Display detailed information about a user |
| hicli user rm | Remove a user |
| hicli user set password_expiration | Set the time at which a password will expire |
| hicli user set account_expiration | Set the date at which an account will expire |
| hicli user set groups | Set the groups to which this user should belong |
| hicli user defaults | Set a number of defaults for the user |
Many user and group management functions can only be performed by security administrators. To get going, let's start with some simple commands that select one of the KeyControl nodes, login in as secroot, list users and groups, and then create a new user.
$ hicli kc select kc-1
$ hicli kc
Current KeyControl: kc-1
$ hicli user login secroot
Password for secroot: ********
$ hicli user list
Username    Full Name               Privileges
--------------------------------------------------------------------------------
secroot     Security Administrator  SEC_ADMIN,VMSET_ADMIN,DOMAIN_ADMIN,CLOUD_ADMIN
$ hicli group list
Group Name            Description                                       Members
--------------------------------------------------------------------------------
Cloud Admin Group     Default Group for Administering Cloud VMs         secroot
KeyControl Admin Group       Default Group for Administering KeyControl Domain        secroot
Storage Admin Group   Default Group for Administering Domains           secroot
VM Set Admin Group    Default Group for Administering VM Sets           secroot
$ hicli user new spate --email=spate@me.com --password=mypasswd236 --roles=CLOUD_ADMIN --full_name="Steve Pate" \
	 --groups="Cloud Admin Group"
$ hicli user list
Username    Full Name               Privileges
--------------------------------------------------------------------------------
secroot     Security Administrator  SEC_ADMIN,VMSET_ADMIN,DOMAIN_ADMIN,CLOUD_ADMIN
spate       Steve Pate              CLOUD_ADMIN
If there is more than one KeyControl node in the cluster, you can select any node. As soon as changes are made on one node, they are automatically reflected on all other nodes. In the example here, we have selected kc-1.
Since we are creating a new user, we must first log on as a security administrator. In the example here, we are prompted for the password. Alternatively, you can specify the password on the command line using --password=. Logon sessions are valid for one hour past the last command typed. We recommend that sets of commands be preceded by a logon call and followed by a logout call.
Once logged on, we list the current set of users (only secroot), list the administration groups, create a new user called spate with CLOUD_ADMIN privileges and then list the users once more.
In order to check the progress of your API calls, log on to the webGUI and view the results.
Logging in / Viewing users
To logon into the KeyControl, simple invoke hicli as follows:
$ hicli user login secroot
Password for secroot:
If you don't specify the --password option you will be prompted for it on the command line.
After logging on, a user context is set such that all subsequent operations will be performed as that user. To show which user is currently logged on, run the following command:
$ hicli user
Currently logged-on user: secroot
You can also request details about yourself as follows:
$ hicli user detail secroot
Login name               | secroot
Status                   | Active
Full name                | Security Administrator
Email                    | spate@me.com
Last login               | 2014-06-13 10:22:15 PDT
Password Expiration      | Never
Account Expiration       | Never
Failed logins            | 0
Privileges               | SEC_ADMIN,VMSET_ADMIN,DOMAIN_ADMIN,CLOUD_ADMIN
Groups                   | Storage Admin Group,KeyControl Admin Group,VM Set Admin Group,Cloud Admin Group
Only security administrators can request information about other users. If you are logged in as a non-SEC_ADMIN user, you can specify information about yourself. For example:
$ hicli user login spate
Password for spate: ********
$ hicli user detail spate
Login name               | spate
Status                   | Active
Full name                | Steve Pate
Email                    | spate@me.com
Last login               | 2014-06-13 10:21:03 PDT
Password Expiration      | Never
Account Expiration       | 06/09/2015
Failed logins            | 0
Privileges               | CLOUD_ADMIN
Groups                   | Cloud Admin Group
Defaults for new users may be set, For example:
$ hicli user defaults --authentication=local --password_expiry=60 \
     --max_failed_logins=4 --min_passwd_length=12
Once you have finished a current session, you can simply log out as follows:
$ hicli user
Currently logged-on user: spate
$  hicli user logout
$  hicli user
Login first
Group Management
Cloud VM Sets are assigned to specific Cloud Administration Groups. Thus, if Jim and Bob are members of the "Department A" cloud administration group, and Jim creates a cloud VM Set called Amazon within this group, the Amazon Cloud VM Set will also be visible by Bob. Also, consider the following figure:
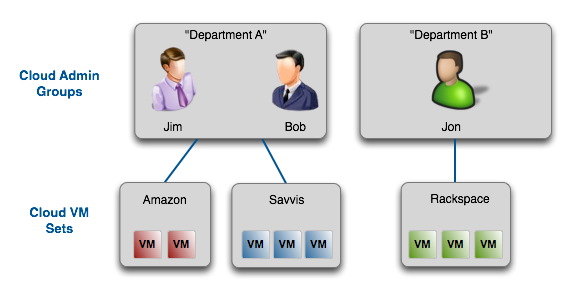
On the left of the figure, Jim and Bob are members of the "Department A" cloud admin group. Between them, they have created two Cloud VM Sets Amazon and Savvis. Jon is a member of the "Department A" cloud admin group and has created one Cloud VM Set called Rackspace. It is not possible for Jim and Bob to see Jon or his Cloud VM Sets. It is also not possible for Jon to see Jim or Bob or their Cloud VM Sets.
Operations that manipulate groups can only be performed by security administrators. To list the current set of groups:
$ hicli group list
Group Name            Description                                       Members
--------------------------------------------------------------------------------
Cloud Admin Group     Default Group for Administering Cloud VMs         secroot,spate
KeyControl Admin Group       Default Group for Administering KeyControl Domain        secroot
Storage Admin Group   Default Group for Administering Domains           secroot
To display more detailed information about a specific group:
$ hicli group detail "Cloud Admin Group"
Name                    Cloud Admin Group
Description             Default Group for Administering Cloud VMs
Type                    CLOUD_ADMIN
Number of objects       0
Users                   secroot,spate
Other group operations allow security admins to add/remove users from a group or create new groups / remove existing groups. The set description sub-command allows you to change the description of the group.
For group removal, one of the common problems is that if you remove all the users from a group, group removal fails because if the group holds one or more Cloud VM Sets. The only way to get out of this situation is to add a user (usually a security admin) to this empty-of-users group, remove the Cloud VM Sets, and then remove the group.
Creating new Users
Creation of users can only be performed by security administrators. Shown below is an example of a call to create a new user called spate with CLOUD_ADMIN privileges:
$ hicli user new spate --email=spate@me.com --password=mypasswd236 --roles=CLOUD_ADMIN --full_name="Steve Pate" \
	 --groups="Cloud Admin Group"
As you try out commands, you can always view the result graphically by going to the webGUI. For example, following the above call, we can view our new user as shown in the following screenshot:
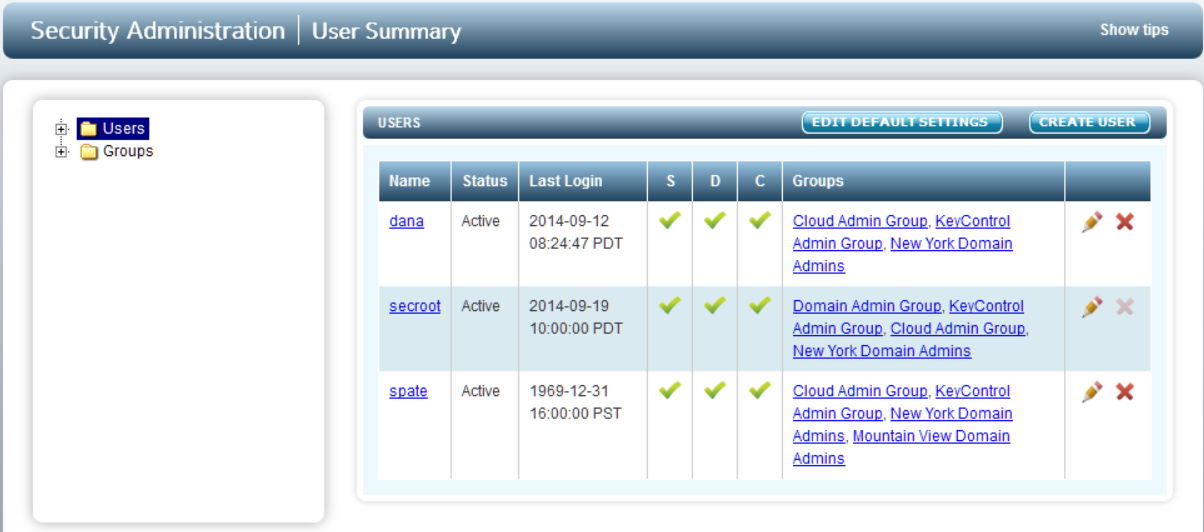
Passwords must be at least 8 characters in length. Roles are a comma-separated list of administrative types. The roles are:
- SEC_ADMIN - Security administration.
- DOMAIN_ADMIN - Domain administration.
- CLOUD_ADMIN - Cloud administration.
Examples of combining roles could be:
--roles=SEC_ADMIN,CLOUD_ADMIN
--roles=DOMAIN_ADMIN,CLOUD_ADMIN
--roles=SEC_ADMIN,DOMAIN_ADMIN,CLOUD_ADMIN
The --groups option is a comma-separated list of cloud administration groups. For example, looking at the list of available groups:
$ hicli group list
Group Name            Description                                       Members
--------------------------------------------------------------------------------
Cloud Admin Group     Default Group for Administering Cloud VMs         secroot,spate
KeyControl Admin Group       Default Group for Administering KeyControl Domain        secroot
Storage Admin Group   Default Group for Administering Domains           secroot
Assuming we want to create a new user called spate and have this user be a member of new groups called "Acme Finance" and "Acme Legal", we would make the hicli calls as follows:
$ hicli group new "Acme Finance"
$ hicli group new "Acme Legal"
$ hicli user new spate --email=spate@me.com --password=mypasswd236 --roles=CLOUD_ADMIN --full_name="Steve Pate" \
		 --groups="Acme Finance","Acme Legal"
$ hicli group list
Group Name            Description                                       Members
--------------------------------------------------------------------------------
Acme Finance          Acme Finance                                      spate
Acme Legal            Acme Legal                                        spate
Cloud Admin Group     Default Group for Administering Cloud VMs         secroot
KeyControl Admin Group       Default Group for Administering KeyControl Domain        secroot
Storage Admin Group   Default Group for Administering Domains           secroot
Modifying User Information
For existing users, the following properties can be changed using the hicli user set command:
- --email=<email>
- --password=<passwd>
- --full_name=<full_name>
- --account_state=<active|disabled>
- --roles=<privlist>
- --password_expiration=<date>
- --account_expiration=<date>
Note that non Security Admins can only change email, full name and password.
As an example, consider the following user:
$ hicli user detail spate
Login name               | spate
Status                   | Active
Full name                | Steve Pate
Email                    | spate@me.com
Last login               | 2014-06-13 10:21:03 PDT
Password Expiration      | Never
Account Expiration       | 06/09/2015
Failed logins            | 0
Privileges               | CLOUD_ADMIN
Groups                   | Cloud Admin Group
The following call adds security admin privileges and changes the email:
$ hicli user set spate --roles=SEC_ADMIN,CLOUD_ADMIN --email=spate@hytrust.com
$ hicli user detail spate
Login name               | spate
Status                   | Active
Full name                | Steve Pate
Email                    | spate@hytrust.com
Last login               | 2014-06-13 10:21:03 PDT
Password Expiration      | Never
Account Expiration       | 06/09/2015
Failed logins            | 0
Privileges               | SEC_ADMIN,CLOUD_ADMIN
Groups                   | Cloud Admin Group
Most parameters are self explanatory. For information about combining roles, review the section on creating new users above.
Please note that you must specify all privileges that you wish the user to have. If the user already has security administration privileges and you make the following call:
$ hicli user set spate --roles=CLOUD_ADMIN
the user will now only have cloud admin privileges.
Removing Users
Only security administrators can remove users. In the example below, we display the current list of users and then remove the user spate. Note that you need to specify the username.
$ hicli user list
Username    Full Name               Privileges
--------------------------------------------------------------------------------
secroot     Security Administrator  SEC_ADMIN
spate       Steve Pate              CLOUD_ADMIN
$ hicli user rm spate
$ hicli user list
Username    Full Name               Privileges
--------------------------------------------------------------------------------
secroot     Security Administrator  SEC_ADMIN
Note that all objects (Cloud VM Sets and VMs) are owned by administrative groups and not by the users themselves. Thus, if you remove a user, the object will stay intact.
Managing Domains
The table below shows the operations that can be performed on Domains:
| hicli Command | Description |
|---|---|
| hicli domain list | Display all domains |
| hicli domain select | Select a domain |
| hicli domain detail | Display information about a domain |
| hicli domain set description | Give the domain a new description |
| hicli domain set allow_reconnect | Display information about a domain |
| hicli domain set require_passphrase | Require a passphrase when adding a new node |
| hicli domain set hide_passphrase | Don't display the passphrase when adding a new node |
| hicli domain set check_hardware_id | Make sure that the hardware ID is checked |
| hicli domain server detail | Display detailed information about a server |
| hicli domain server set description | Give a server within a domain a new description |
| hicli domain server auth | Display information about a domain |
Examples of how to manage domains are shown below. First, let's list the current set of domains:
$ hicli domain list
Domain                  Admin Group                     Servers   Status
--------------------------------------------------------------------------------
KeyControl Domain       KeyControl Admin Group          1         Healthy
Storage Domain          Storage Admin Group             0         Healthy
And now get details about a specific domain:
$ hicli domain detail "KeyControl Domain"
Name					KeyControl Domain
Status					Healthy
Group					KeyControl Admin Group
Description				Domain of Clustered KeyControl Servers
Allow reconnect			Yes
Passphrase required		Yes
Passphrase hidden		No
Check hardware id		Yes
Server Count			2
Server Names			kc1.hytrust.com,kc2.hytrust.com
To set KeyControl domain attributes:
$ hicli domain set "KeyControl Domain" --description="New description" \
    --allow_reconnect=yes --require_passphrase=yes \
    --hide_passphrase=no --check_hardware_id=yes
For KeyControl server operations we need to select a domain first:
$ hicli domain select "KeyControl Domain"
To show the current domain:
$ hicli domain
KeyControl Domain
Get KeyControl server details:
$ hicli domain server detail kc1.hytrust.com
Name			kc1.hytrust.com
Status			Online
IP Address		192.168.140.151
Authenticated		Yes
Description		Primary KeyControl Server
Change KeyControl server description:
$ hicli domain server set kc1.hytrust.com --description="New description"
Authenticate KeyControl server:
$ hicli domain server auth kc1.hytrust.com
Managing Cloud VM Sets
The table below shows the Cloud VM Set operations that can be performed by individual cloud administrators:
| hicli Command | Description |
|---|---|
| hicli cvmset select | Select a Cloud VM Set |
| hicli cvmset | Display current Cloud VM Set |
| hicli cvmset detail | Display details about the specified Cloud VM Set |
| hicli cvmset list | List all Cloud VM Sets |
| hicli cvmset new | Create a new Cloud VM Set |
| hicli cvmset set | Change properties |
| hicli cvmset set name | Change the name of the Cloud VM Set |
| hicli cvmset set heartbeat | Set the value for the heartbeat in seconds (default is 10) |
| hicli cvmset set grace | Set the value for the grace period in seconds (default is 1 day) |
| hicli cvmset cert rm | Remove an unused certificate |
| hicli cvmset keyid add | Create a KeyID |
| hicli cvmset keyid set expiration | Set the expiration date for a KeyID |
| hicli cvmset keyid set onexpiry | When a KeyID expires, set the expiration policy |
| hicli cvmset keyid revoke | Revoke access to a KeyID |
| hicli cvmset keyid unrevoke | Unrevoke access to a KeyID |
| hicli cvmset keyid keyid rm | Remove a KeyID |
Cloud VM Sets are managed by any administrator with CLOUD_ADMIN privileges.
For example, consider the following list of Cloud VM Sets for user spate. There are three Cloud VM Sets.
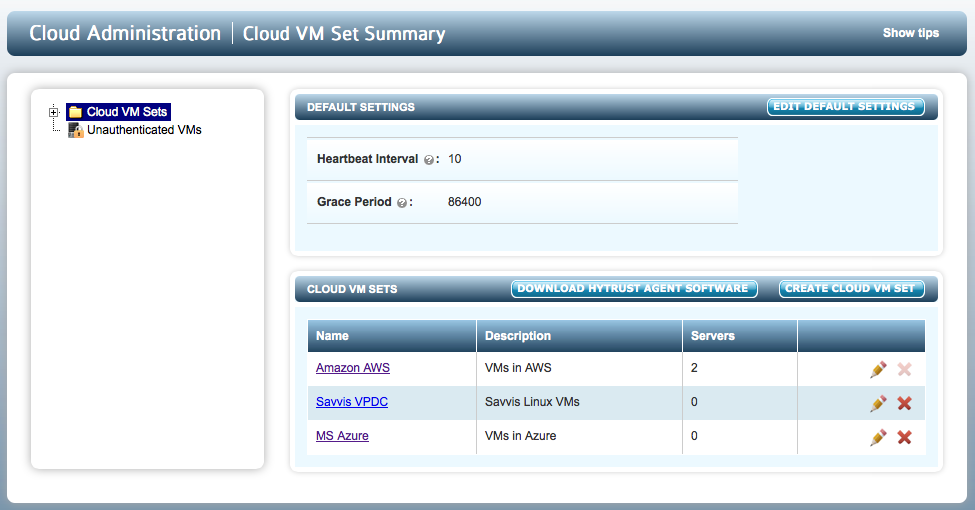
Cloud VM Sets can be listed using hicli as follows:
$ hicli cvmset list
Cloud VM Set Name     Admin Group           Description
--------------------------------------------------------------------------------
Amazon EC2            Cloud Admin Group     VMs running in Amazon
Seattle Office        Cloud Admin Group     VMs in our Seattle office
Savvis VPDC           Cloud Admin Group     VMs in Savvis
Windows VMs           Cloud Admin Group     Local, data center VMs
Below, we create a new Cloud VM Set called Rackspace then check to make sure that it has been created:
$ hicli cvmset new "Rackspace" "Cloud Admin Group" --description="VMs in Rackspace"
$ hicli cvmset list  | grep Rackspace
Rackspace             Cloud Admin Group     VMs in Rackspace
You can view details about an existing Cloud VM Set as follows:
$ hicli cvmset detail "Amazon EC2"
Name                    Amazon EC2
Admin Group             Cloud Admin Group
Description             VMs running in Amazon
Cloud VMs               Ubuntu-10.04,linux-12.10
Unused Certificate Ids  4c81a042a60b11e2b5cf000c29ed8423
KeyIDs                  aws_key,test_key
In this example, there are two VMs associated with this Cloud VM Set.
To change properties use the hicli cvmset set command. For example:
$ hicli cvmset set "Amazon EC2" --description="Amazon AWS"
More attributes (default Heartbeat and Grace Period) may be specified using Cloud VM Set creation and Modification:
$ hicli cvmset new "Rackspace" "Cloud Admin Group" \
    --description="VMs in Rackspace" --heartbeat=60 --grace=600
$ hicli cvmset set "Rackspace" --group="Cloud Admin Group" \
    --description="Rackspace" --heartbeat=60 --grace=600
For Certificate and KeyID operations, a Cloud VM Set has to be selected:
$ hicli cvmset select "Amazon EC2"
Show Unused Certificate description:
$ hicli cvmset cert detail 4c81a042a60b11e2b5cf000c29ed8423
Description             Created by spate at 2013-04-15 20:30:23
Delete Unused Certificate:
$ hicli cvmset cert rm 4c81a042a60b11e2b5cf000c29ed8423
Create a KeyID:
$ hicli cvmset keyid add aws_key -d "Key for Amazon"
Show KeyID details:
$ hicli cvmset keyid detail aws_key
Description		Key for secure migration
Algorithm		AES-256
Expires			Never
Onexpiry		Shred
Status			Active
Change KeyID attributes:
$ hicli cvmset keyid set aws_key --expiration="12/31/2015" --onexpiry=no_use
Revoke KeyID:
$ hicli cvmset keyid revoke aws_key
Unrevoke KeyID:
$ hicli cvmset keyid unrevoke aws_key
Remove a KeyID:
$ hicli cvmset keyid rm aws_key
Managing Cloud VMs
The table below shows the Cloud VM operations that can be performed. All operations can be performed by cloud administrators.
| hicli Command | Description |
|---|---|
| hicli cvm list | List the VMs in the current Cloud VM Set |
| hicli cvm new | Add a new VM |
| hicli cvm rm | Remove a VM |
| hicli cvm status | Get the status of the VM (as in hcl status) |
| hicli cvm detail | Get the status of the VM (KeyControl perspective) |
| hicli cvm revoke | Revoke access to the VM and its devices |
| hicli cvm reauth | Re-authorize a VM |
| hicli cvm set | Set properties of the VM |
| hicli cvm add_disk | Add a disk to be encrypted |
| hicli cvm revoke_disk | Revoke access to the specified disk |
| hicli cvm unrevoke_disk | Give permissions back to access the device |
| hicli cvm rm_disk | Remove a disk from HyTrust management |
| hicli cvm renew clone | Clone a VM certificate |
| hicli cvm detail_disk | Display details about a specified disk |
| hicli cvm set_disk expiration | Set the expiration date for a disk |
| hicli cvm rekey_disk | Perform rekey on the specified disk |
| hicli cvm s3 add_file | Add a file to an S3 bucket |
| hicli cvm s3 rm_file | Remove a file from an S3 bucket |
| hicli cvm s3 get_file | Retrieve a file from an S3 bucket |
All of these operations are performed in the context of a Cloud VM Set. So, before invoking any of these commands, you need to set the Cloud VM Set first. Let's first look at the current Cloud VM Set:
$ hicli cvmset
Current Cloud VM Set: Amazon EC2
You can change the current Cloud VM Set as follows:
$ hicli cvmset select "Savvis VPDC"
$ hicli cvmset
Current Cloud VM Set: Savvis VPDC
To list the VMs associated with a Cloud VM Set:
$ hicli cvm list
VM Name               Status
--------------------------------------------------------------------------------
ubuntu-10.04          Online
ubuntu-12.10          Online
To request more information about a specific VM. There are two options. The first is equivalent to running hcl status on the VM. For example:
$ hicli cvm status ubuntu-12.10
Host Status on ubuntu12.10
--------------------------------------------------------------------------------

Summary
--------------------------------------------------------------------------------
KeyControl: kc-1:443
KeyControl list: kc-1:443
Status: Connected

Registered Devices
--------------------------------------------------------------------------------
Disk Name         Clear                             Cipher      Status
--------------------------------------------------------------------------------
sdb2              /dev/mapper/clear_sdb2            AES-256     Attached
 '--> auto_attach=ENABLED, attach_handler=DEFAULT, detach_handler=DEFAULT
sdb1              /dev/mapper/clear_sdb1            AES-256     Attached
 '--> auto_attach=ENABLED, attach_handler=DEFAULT, detach_handler=DEFAULT

Available Devices
--------------------------------------------------------------------------------
Disk Name           Device Node                     Size (in MB)
--------------------------------------------------------------------------------
sde                 /dev/sde                        2048
sdd                 /dev/sdd                        2048
sdc                 /dev/sdc                        2048

Other Devices
--------------------------------------------------------------------------------
Disk Name           Device Node                     Status
--------------------------------------------------------------------------------
sda5                /dev/sda5                       Mounted (swap)
sda1                /dev/sda1                       Mounted (/)
And the second displays abbreviated information:
$ hicli cvm detail ubuntu-12.10
KeyControl Status for ubuntu12.10
--------------------------------------------------------------------------------
Name                            ubuntu12.10
Status                          Online
Description
Cloud VM Set                    HCS
OS                              Linux ubuntu 2.6.32-38-generic #83-Ubuntu SMP Wed Jan 4 11:12:07 UTC 2014 x86_64 GNU/Linux
Agent version                   2.6
Valid till                      02/01/2014
Heartbeat (sec)                 10
Grace period (sec)              3600
Reauth on H/W signature change  Yes
Reauth on IP address change     Yes
Reauth on reboot                No

Disks:
sdb1                            ACTIVE
sdb2                            ACTIVE
Adding a new VM and adding devices to be encrypted is very straightforward, as the following script shows:
hicli user login spate --password=********
hicli cvmset set 'Amazon EC2'
hicli cvm new ubuntu10.04
hicli cvm ubuntu10.04 add_disk sdb1
hicli cvm ubuntu10.04 add_disk sdb2
We log on to the KeyControl as user spate. Next we select the Cloud VM Set into which we wish to place the VM. The new subcommand is used to register and authenticate the new VM. We then add two disks. Note that we are using the abbreviated names sdb1 and sdb2 in place of /dev/sdb1 and /dev/sdb2.
The hicli cvm new command involves calling the KeyControl to create and download a new certificate which is then copied to the VM. It then calls hcl register from the VM and completes authentication. The call to add_disk is equivalent of hcl add which adds and attaches the device including getting access to the key. Following the call to add_disk, the encrypted device is now ready to use.
NOTE - the DataControl agent software must be installed prior to adding the VM.
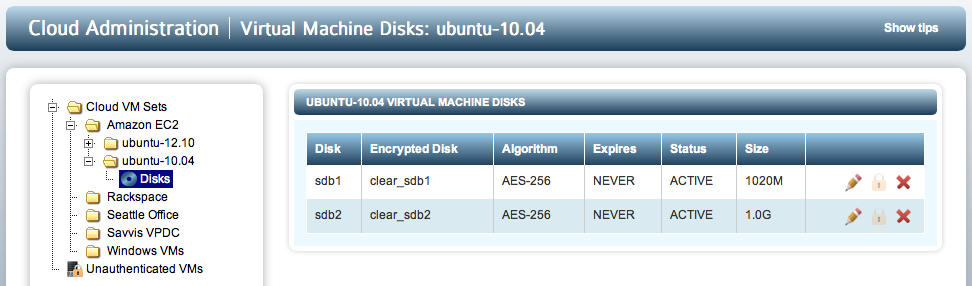
At this point, you can view the effects of your script through the webGUI as follows:
To undo the effects of the script above, to remove the devices and remove the VM, use the following script:
hicli cvmset select "Amazon EC2"
hicli cvm ubuntu-10.04 rm_disk sdb1
hicli cvm ubuntu-10.04 rm_disk sdb2
hicli cvm revoke ubuntu-10.04
hicli cvm rm ubuntu-10.04
At this point it will look like the original script was never run.
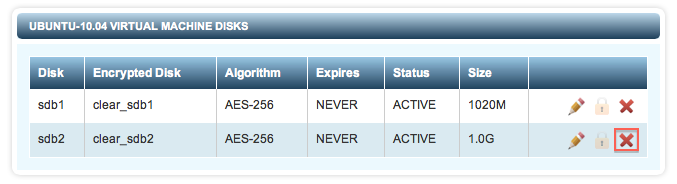
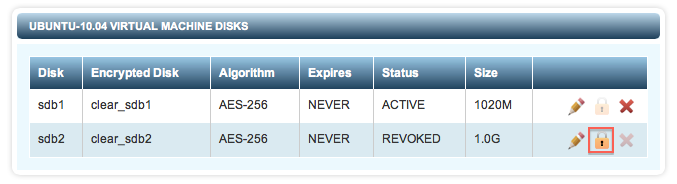
The revoke and unrevoke options allow you to forcibly remove access to clear-text data and then grant permissions back to a device. The following operation:
hicli cvm ubuntu-10.04 revoke_disk sdb2
is equivalent to pressing the X next to a device in the webGUI as follows:
...while the following operation:
hicli cvm ubuntu-10.04 unrevoke_disk sdb2
...is equivalent to pressing the padlock icon next to a device in the webGUI as follows:
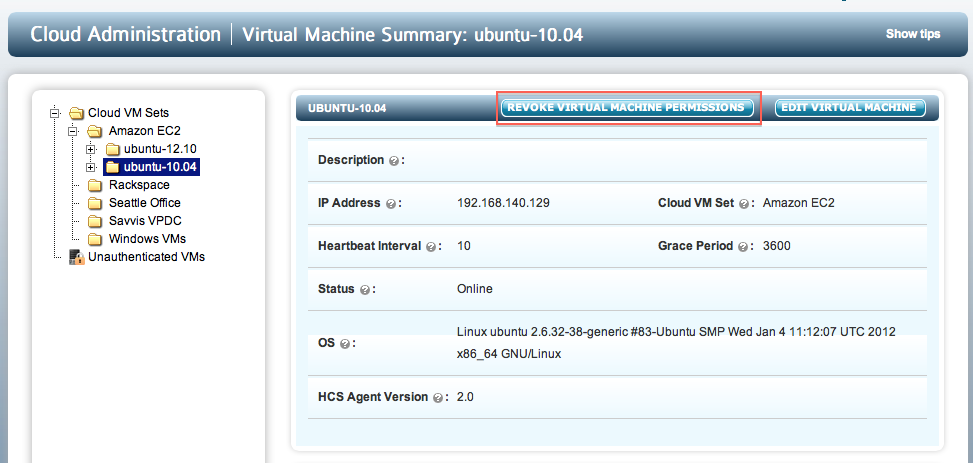
The revoke sub-comamnd:
hicli cvm revoke ubuntu-10.04
...is equivalent to pressing the REVOKE VIRTUAL MACHINE PERMISSIONS button next to a device in the webGUI as follows:
The opposite operation is the reauth of the VM:
$ hicli cvm reauth ubuntu-10.04
This will perform the equivalent of running hcl auth on the command line of the VM and then typing the passphrase in the webGUI.
Some additional examples are shown below:
Renew the certificate of a Cloud VM:
$ hicli cvm renew ubuntu-12.10
Clone a Cloud VM:
$ hicli cvm clone ubuntu-12.10 ubuntu-clone
Get details of a disk:
$ hicli cvm ubuntu-12.10 detail_disk sdb1
Name			sdb1
Mapped Device		clear_sdb1
Status			Active
Algorithm		AES-256
Expiration		Never
OnExpiry		Shred
Size (bytes)		104857600
Change disk attributes:
$ hicli cvm ubuntu-12.10 disk_set sdb1 --expiration="12/31/2015" --onexpiry=no_use
Rekey a disk:
$ hicli cvm ubuntu-12.10 disk_rekey sdb1
Encrypt a file:
$ hicli cvm ubuntu-12.10 encryptfile -k aws_key /tmp/files.zip
Decrypt a file:
$ hicli cvm ubuntu-12.10 decryptfile /tmp/files.zip.enc
Miscellaneous calls
Managing S3 storage
Set up S3 access:
$ hicli s3 set [--aws_access_key_id=<keyid>] [--aws_secret_access_key=<key>]
Create an S3 bucket:
$ hicli s3 create_bucket <bucketname>
Delete a bucket:
$ hicli s3 delete_bucket <bucketname>
List the contents of a bucket:
$ hicli s3 list_bucket <bucketname>
Add a file to a bucket:
$ hicli cvm <name> s3 add_file <bucketname> <file> [--keyid=<keyid>]
Remove a file from a bucket:
$ hicli cvm <name> s3 rm_file <bucketname> <file>
Pull out a file from a bucket:
$ hicli cvm <name> s3 get_file <bucketname> <file>
Alerts
Get all alerts for the user:
$ hicli alert list
1   10/08/11 17:06:52 Account disabled for spate due to repeated failures
2   10/08/11 17:08:00 VM Set Admin Group group has been granted access to datastore dedup on
Get details of an alert:
$ hicli alert detail 1
ID          b62c3bb3954611e3bfe6080027cbdf2a
Message     Account disabled for spate due to repeated failures
Date        10/08/11 17:06:52
Delete an alert:
$ hicli alert rm b62c3bb3954611e3bfe6080027cbdf2a
Set global default settings:
$ hicli global set --heartbeat=60 --grace=600