In addition to encrypting regular Windows data partitions, you can also encrypt your Windows boot disk (C:). Note that HyTrust does not support dual booting.
Encrypting the C: drive, in addition to data partitions, ensures that clear-text data never leaves the VM on its way to storage. This prevents virtualization and storage admins from being able to view the data.
The HyTrust Bootloader for Windows (the Bootloader) is a tool that is required to encrypt the Windows boot partition using keys that are retrieved, as needed, from the HyTrust KeyControl server during VM bootstrap. This means that keys are not kept with the encrypted boot partition, thus providing an extra layer of security.
There are a number of steps required to set up your Windows system for boot drive encryption. If you are running within a virtual infrastructure, we recommend that you go through this process once and set up a template VM from which new VMs can be created.
The supported versions of Windows for the Bootloader include:
We also require a Windows System Reserved Partition (SRP). We will create an SRP if one does not already exist.
The Windows Bootloader can only be installed on an MBR disk. GPT disks cannot be configured as encrypted boot drives.
This product will work with and without Service pack 1 installed on Windows 7 and Windows 2008 R2.
The Bootloader is added as an SRP of roughly 100 MB on Windows 7, Windows 8, Windows 8.1, Windows 10, and Windows 2008 R2, and 350 MB on Windows 2012 and above. As part of the installation process, the boot drive will shrink to free up space for the Bootloader (and Windows SRP if one does not already exist). If there is insufficient space on the boot drive, the Bootloader will fail to install. This whole process is automatic.
Make sure that the Disk Defragmenter service on each client computer is enabled before installing the Policy Agent software. This is needed for compatibility with boot drive encryption. The user account used for installing the software should have the SeRestorePrivilege and the SeTakeOwnershipPrivilege for the Bootloader installation to succeed. Additionally, the SeSecurityPrivilege is required for successful installation on Windows 2008R2.
Additional notes:
C: drive. Although Windows itself can boot from
alternate drive letters, the HyTrust DataControl Policy Agent is limited to the C: drive only. Note: the boot volume can only be encrypted if it is the C: drive, or if it is mapped to C:.The installation of the components necessary to boot an encrypted version of Windows is a three-step process.
First, you must install the Policy Agent software on Windows. You must reboot the Virtual Machine before the agent is activated. For installation instructions, see Encryption with Windows Virtual Machines.
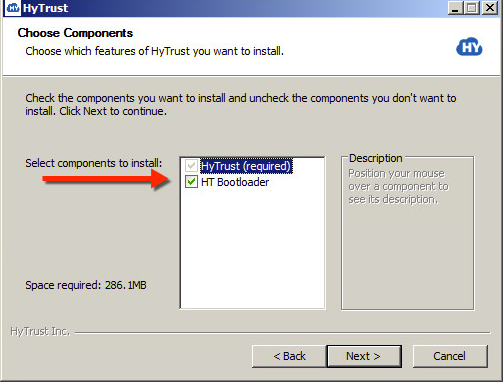
Be sure to check the box for HT Bootloader when you go through the installation.
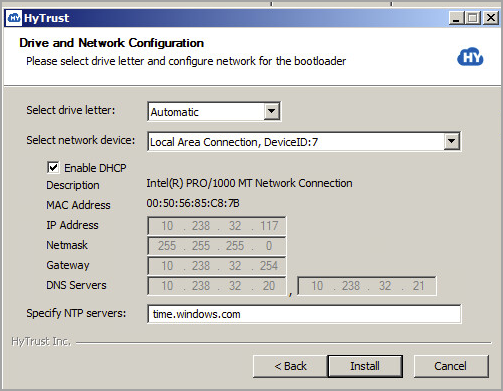
Your next dialog box is for Drive and Network Configuration. This configuration is used by the Bootloader to configure its drive letter and network configuration before trying to connect to the KeyControl Server. First, you select the drive letter to be used by the Bootloader. Then, you select the network interface you want to use for the connection. By default, this dialog box presents the current DeviceID (unique integer) and ConnectionID (e.g. Local Area Connection 2) from WMI class Win32_NetworkAdapter for the selected network interface. In most cases you should be able to leave the default choices checked, including Enable DHCP for the selected network interface. Click Install.
| Note: | If a previous Bootloader partition is found, you are prompted to remove it: |
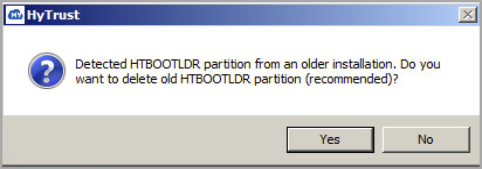
We recommend that you click Yes to delete the partition and continue the installation. Next you are reminded to save your key file for possible access to the debug console.
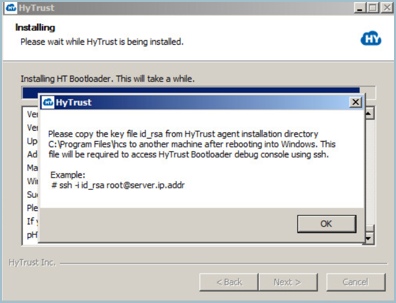
Click OK, and you are prompted to Reboot. Click Reboot now, and then click Finish. Remember that you will have to copy the key file id_rsa to another computer after you reboot.
| Note: | The id_rsa key file is stored on KeyControl during root device encryption and is available for download using the WebGUI or hicli. To download the key from the WebGUI, select the VM for which you want to download the id_rsa file. Click the Action button, and then click Download Bootloader SSH Key. |
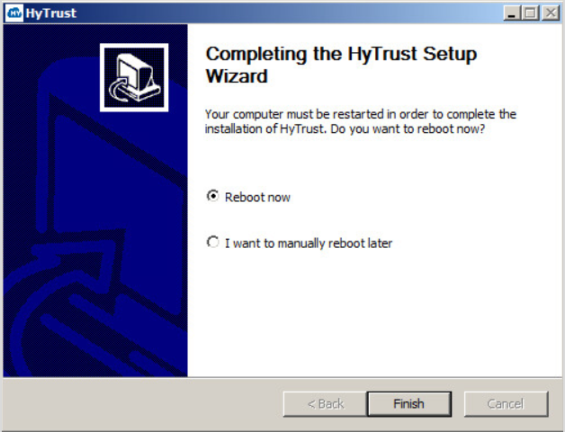
Note that you can manually reboot at a later time, but your Bootloader installation is not complete until you finish installation by rebooting. When you reboot, your computer will go through a scripted process that involves multiple automatic reboots, and will finally boot back into Windows.
There is no need to uninstall the Policy Agent software. Shut down your VM, expand the disk as needed, and then follow the instructions in Installing the Bootloader at a Later Time.
| Important: | You should copy the key file id_rsa to another computer. It is located in the Policy Agent installation directory, C:\Program Files\hcs. This is required to access the HyTrust Bootloader console using SSH, after you have encrypted the root drive of C:. Be certain that you copy the file once your computer has rebooted, and store it on another computer that you can reach via your network. You will need it if you need to troubleshoot your installation from the console. |
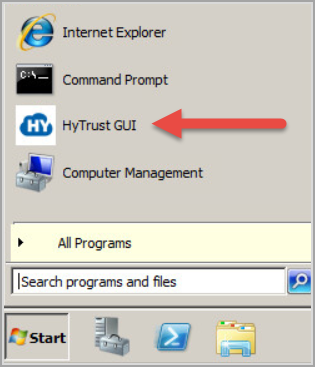
Once you have copied the id_rsa file, click Start and then click HyTrust GUI, as shown below.
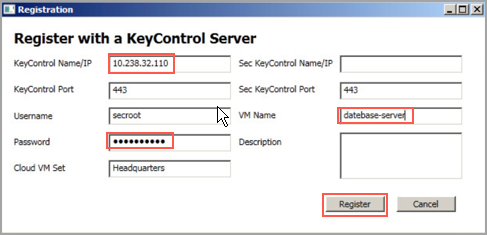
The HyTrust GUI starts, and presents a Registration screen. Fill in the KeyControl Name or IP address, the Username and Password, and the Cloud VM Set into which you will place this Policy Agent. Then click Register.
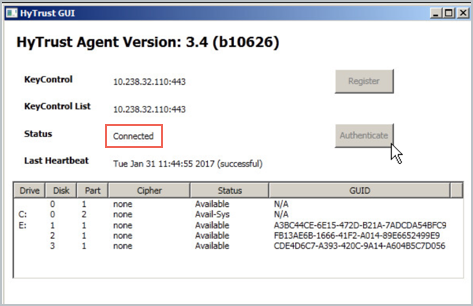
When registration is complete, your user interface in the HyTrust GUI will change to show Connected.
Note that you can see the distinction between the Windows boot partition and the root partition by running the Windows diskmgr utility. For example:

The small boot partition is listed as System Reserved, and the HyTrust Bootloader appears as HTBOOTLDR. No part of the Windows root C: is ever decrypted on disk, and the boot partition, added during the installation process, contains only a small part of the bootstrap process.
Next you need to encrypt the Windows root C: drive.
Run the HyTrust GUI, as shown below, and select your boot drive. Be aware that larger disks can take a while to encrypt, but the Status column shows you the percentage complete. However, even if the encryption process is not complete, you can continue to use the computer while the encryption process progresses. If you choose to shut down prior to full encryption, you can resume it, using the CLI command: hcl encrypt c:. All interrupted rekey/encryption operations will resume automatically when the VM is rebooted.
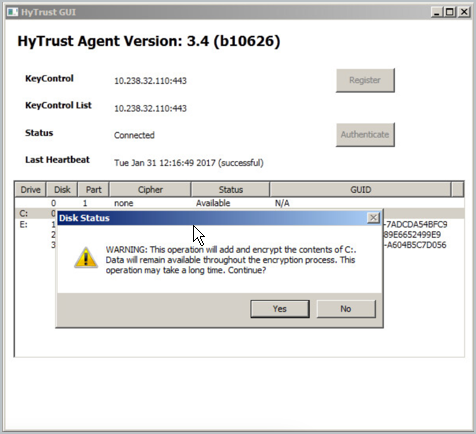
When encrypting the C: drive, the process will be displayed in the HyTrust GUI. When complete, the status will change to Attached and will show the algorithm used for the encryption, as shown below. Note that the default boot drive encryption algorithm is AES-XTS-512. If you have virtual machines encrypted prior to the 3.0 release, they will continue to use the AES-256 cipher.

At that point, the encryption process is complete and the VM can be safely shut down or rebooted, as you wish. Bear in mind that your boot-encrypted disk relies upon access to the KeyControl node to validate your access to the boot drive. This is described in the following sections.
The Bootloader uses a small pre-boot environment to retrieve encryption keys for the boot device each time the system starts up. The system is reconfigured to boot the Bootloader before booting Windows. Here are the steps:
C: drive.| Note: | Keys for the C: drive are never stored persistently on the VM, and are only stored on the remote KeyControl node. The following topics describe some of the possible outcomes in the boot process. |
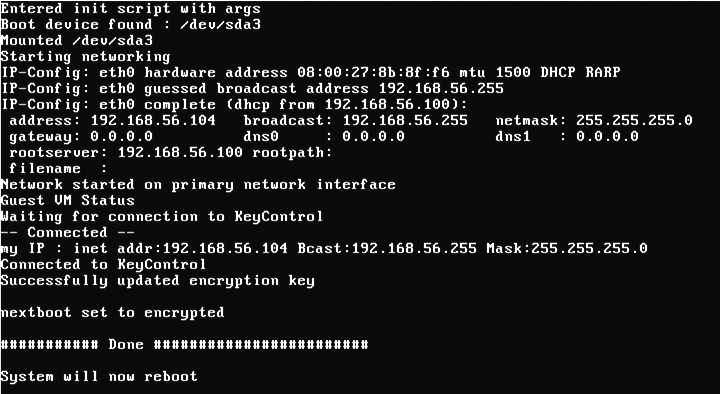
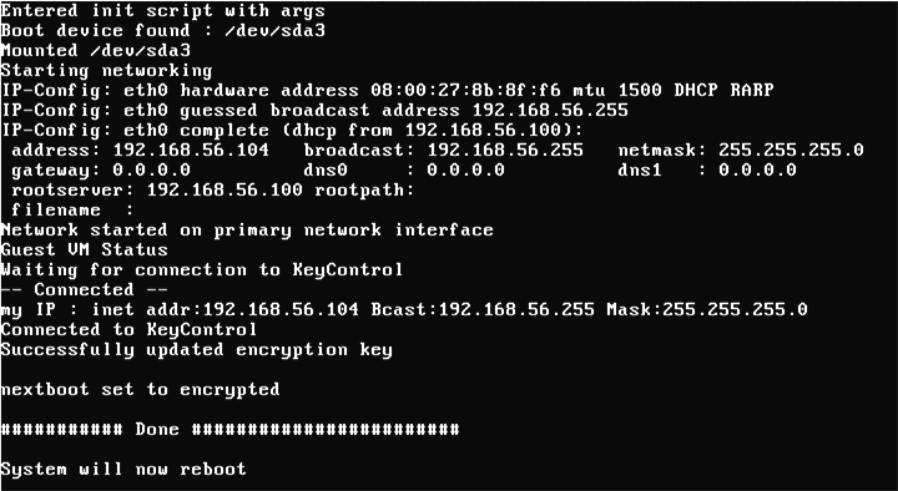
In the following screenshot, you can see the operation of the Bootloader. It indicates that it has successfully contacted the KeyControl node, presented credentials that allow it to retrieve the boot partition encryption key, and retrieved the key. When complete, it will once again reboot, this time into Windows.
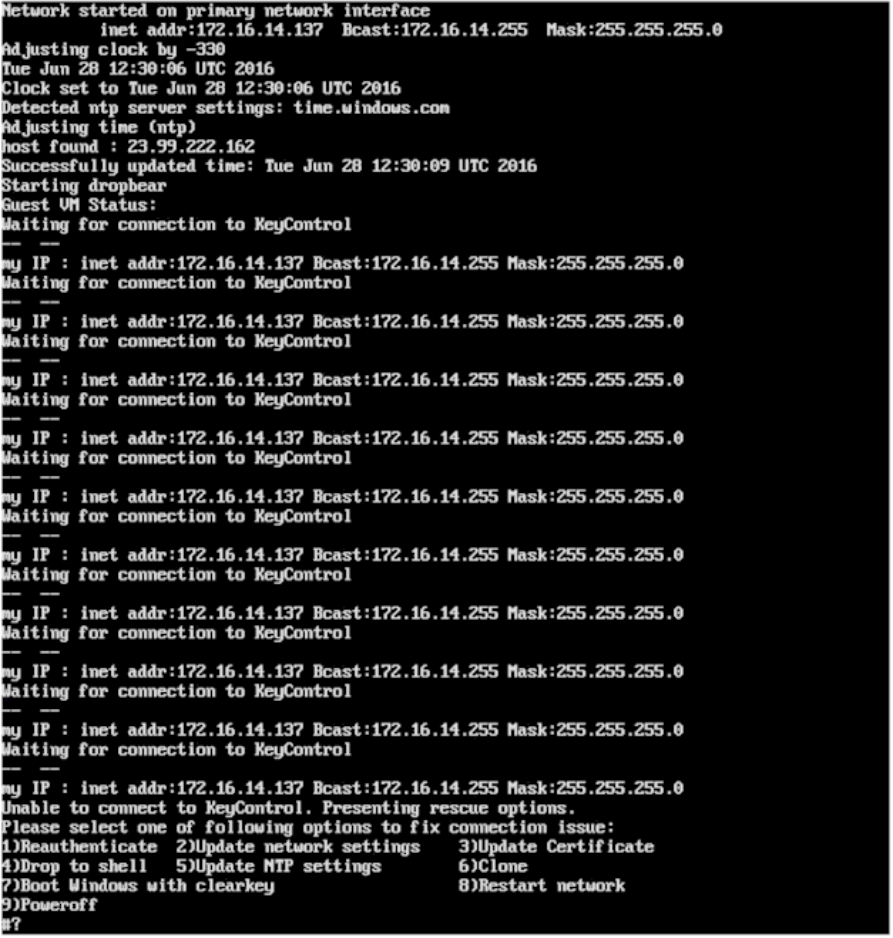
Since encryption keys are never stored locally, a VM will require access to a KeyControl node when booting. Failure to contact a KeyControl node will prevent the system from booting. If a KeyControl node is not available when the system is booted, it will repeatedly attempt to contact it for 30 seconds, at which time it presents a console menu that presents a number of options. If you are unable to view the console directly, for example in environments such as Amazon AWS, you can access the console using an SSH client. This will require the id_rsa key file that you copied earlier. You can use the following command to access the console menu to copy the id_rsa file:
# ssh -i id_rsa <root@server.ip.addr>
The console menu options are:
id_rsa key file. Key retrieval will proceed after this.
exit to leave the recovery shell. This is primarily for use by HyTrust Support. We recommend against customers using this option.
hcl register -c while cloning a non-boot-encrypted VM.
| Note: | The first four options appear on all platforms, including Amazon Web Services. The last two appear only in a CLI environment. The screenshot below shows what a failure to retrieve keys and accompanying "Restart Network" looks like: |
One of the important features offered by this system is the ability to control remote access to the encrypted data from the KeyControl. HyTrust boot encryption also offers this feature. The C: drive is presented in the KeyControl GUI as simply another disk to be managed. Keys can be revoked and access granted in the same manner as non-root disks.
If access to the encrypted C: drive is revoked, the Policy Agent, upon the next heartbeat, will immediately present the BSOD. The BSOD status code will be set to the value "DEADDEAD" so that it can be quickly determined that a key revocation is the reason for the BSOD.

The BSOD will eventually result in the VM attempting to reboot. Of course, at this time, the key is no longer available, since access has been revoked. Key retrieval will fail, and the boot will fail. In the following screenshot you can see that the Bootloader was unable to fetch keys.
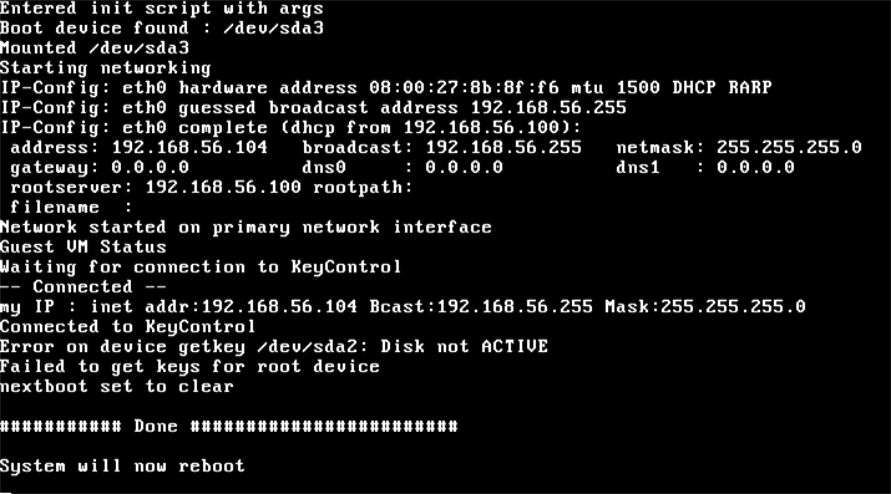
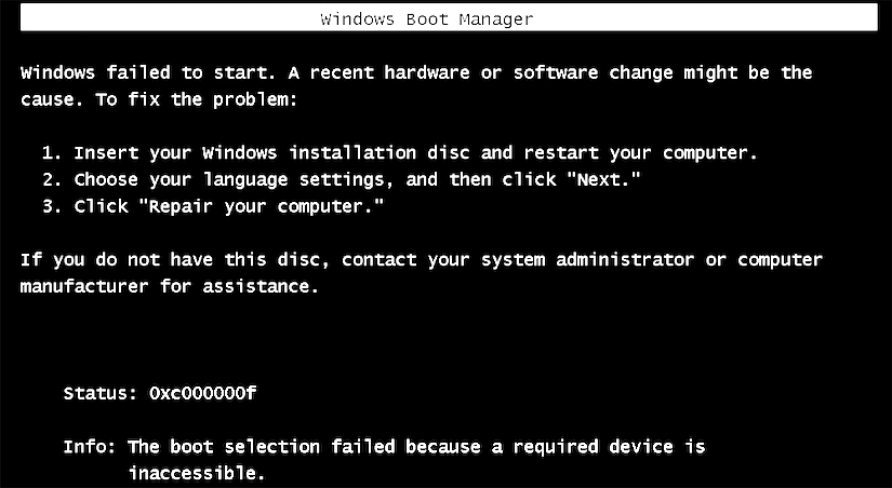
Windows will now fail to boot, because the encryption key cannot be retrieved. Thus, when it attempts to boot, it will fail with the status code 0xC00000f, indicating a failure to read the disk. This is shown in the screenshot below. Subsequent boot attempts after the key access is granted will not result in this error.
Attempts to boot the disk will fail until the VM is granted access to the encryption key. Once the key has been provided, restarting the VM will once again proceed normally. The encryption key will be retrieved and passed to the Windows Bootloader, allowing the VM to operate normally. Here is a normal boot process, once the encryption key has been retrieved:
The Bootloader can also be installed at a later date. To do such an installation, you must have PowerShell installed. If you are running Windows Server 2008 R2 Core, and do not have PowerShell installed, see the following Microsoft KB article for instructions. Once you have PowerShell installed, you execute a PowerShell script InstallHTBootloader.ps1, which is located in your default installation directory (<installation_dir>/bin). The script is non-interactive, and takes no parameters. It is shown below:
powershell -ExecutionPolicy Unrestricted -File
"C:\Program Files\hcs\bin\InstallHTBootloader.ps1"The PowerShell script should return an exit code of zero. Any other exit code indicates an error, which will print in the log. The log appears in C:\Program Files\hcs\InstallhtBootloader.log. An example of a successful execution appears below:
PS C:\users\administrator\desktop> powershell -ExecutionPolicy
		Unrestricted -File "C:\Program Files\hcs\bin\InstallHTBootloader.ps1”
		This system already has a separate System volume and Boot volume.
		Creating new primary partition 1 of 1
		Failed, trying to free up space
		Shrinking C: by 360 MB, this may take some time
		DiskPart successfully shrunk the volume by: 360 MB
		Trying to create partition again
		Successfully created primary Partition 3 on Disk 0
		Formatting
		DiskPart successfully formatted the volume.
		DiskPart successfully assigned the drive letter or mount point.
		Creating SRP
		Boot files successfully created.
		Successfully created SRP on Partition 3 Disk 0
		Copying bootloader files
		Updating bootloader configuration
		Adding boot menu entries
		Marking new SRP active
		Winldr serial: 40604346 , Bootldr serial: 1155100468
		Please reboot for changes to take effect.
		If you have executed this script from Power Shell directly, please
execute SetupHTBootloaderNetwork.ps1 before rebootingBootloader network settings can be changed by running a different PowerShell script, SetupHTBootloaderNetwork.ps1, which is located in your default installation directory (<installation_dir>/bin). The script is interactive, and requires user input. It is shown below:
powershell -ExecutionPolicy Unrestricted -File
"C:\Program Files\hcs\bin\SetupHTBootloaderNetwork.ps1"
These settings can also be changed using the Update network settings choice on the rescue menu. Note that if you change your static IP configuration in Windows, you must update your Bootloader with this script to reflect those changes.
Note that you can also set the drive letter for the Bootloader by using the -drive parameter. In the following example, the Bootloader is set to drive P:
powershell -ExecutionPolicy Unrestricted -File \ "C:\Program Files\hcs\bin\InstallHTBootloader.ps1" -drive P:
The PowerShell script should return an exit code of zero. Any other exit code indicates an error, which will print in the log. The log appears in C:\Program Files\hcs\SetupHTBootloaderNetwork.log. Several examples of a successful execution appear below, with user input in bold type.
PS C:\users\administrator\desktop> powershell -ExecutionPolicy \
Unrestricted -File "C:\Program Files\hcs\bin\SetupHTBootloaderNetwork.ps1"
Configuring HT Bootloader Network:
----------------------------------
Following network interfaces are available:
1) Intel(R) PRO/1000 MT Network Connection 00:0C:29:45:59:93
2) RAS Async Adapter 20:41:53:59:4E:FF
Select the primary interface by number or press Q to quit: 1
DHCP is currently enabled for the selected network interface.
Use DHCP during boot? [y/n] :y
Successfully updated HT Bootloader network configuration
PS C:\users\administrator\desktop> powershell -ExecutionPolicy \
Unrestricted -File "C:\Program Files\hcs\bin\SetupHTBootloaderNetwork.ps1"
Configuring HT Bootloader Network:
----------------------------------
Following network interfaces are available:
1) Intel(R) PRO/1000 MT Network Connection 00:0C:29:45:59:93
2) RAS Async Adapter 20:41:53:59:4E:FF
Select the primary interface by number or press Q to quit: 1
DHCP is currently enabled for the selected network interface.
Use DHCP during boot? [y/n] : n
Setting up static IP for use during boot
Current configuration:
Network parameters provided:
IP address : 172.16.14.222
Gateway address : 172.16.14.2
Netmask : 255.255.255.0
DNS server address : 172.16.14.2
Host Name : WINQ2FCCC3ALIH
DNS Domain : localdomain
Is this correct? [y/n] : ySuccessfully updated HT Bootloader network configuration
PS C:\users\administrator\desktop> powershell -ExecutionPolicy \
Unrestricted -File "C:\Program Files\hcs\bin\SetupHTBootloaderNetwork.ps1"
Configuring HT Bootloader Network:
----------------------------------
Following network interfaces are available:
1) Intel(R) PRO/1000 MT Network Connection 00:0C:29:45:59:93
2) RAS Async Adapter 20:41:53:59:4E:FF
Select the primary interface by number or press Q to quit: 1
DHCP is currently enabled for the selected network interface.
Use DHCP during boot? [y/n] : n
Setting up static IP for use during boot
Current configuration:
Network parameters provided:
IP address : 172.16.14.222
Gateway address : 172.16.14.2
Netmask : 255.255.255.0
DNS server address : 172.16.14.2
Host Name : WINQ2FCCC3ALIH
DNS Domain : localdomain
Is this correct? [y/n] : n
Please provide network parameters:
IP address : 172.16.14.22
Netmask : 172.16.14.2
Gateway address : 255.255.255.0
DNS server address : 172.16.14.3
Host Name : MYPC
DNS Domain : localdomain
Network parameters provided:
IP address : 172.16.14.22
Netmask : 172.16.14.2
Gateway address : 255.255.255.0
DNS server address : 172.16.14.3
Host Name : MYPC
DNS Domain : localdomain
Is this correct? [y/n] : y
Successfully updated HT Bootloader network configuration
The SetupHTBootloaderNetwork.ps1 script has been enhanced to support automation. In keeping with the GUI installer, when used in interactive mode, this script displays the ConnectionId and DeviceID of the network adapter identification instead of just the hardware description.
The DeviceID displayed is the value of the DeviceID property of the Win32_NetworkAdapter WMI class.
Note that value of DeviceID is the same as the Index property of the Win32_NetworkAdapterConfiguration class.
To use this script in interactive mode, do not use the -silent flag. In interactive mode, any parameters supplied to the script will be ignored.
When used in non interactive mode, using the -silent flag, the network adapter to be configured is specified through the -deviceid parameter (similar to /NET in the silent installer). The script will detect current settings of the specified network adapter and use them if they are not overridden by any of the following optional parameters:
-dhcp:
Use -dhcp for configuring the adapter. This choice overrides all other settings-ip:
IP address
-netmask:
Netmask
-gw:
Gateway IP address
-dns:
IP address of one or more DHCP servers, separated by commas-hostname:
Hostname
-domain:
Domain
If the -silent flag is used without the -deviceid parameter, the script will try to detect the preferred network adapter, that is, the one used to connect to the KeyControl, and configure it.
For the purpose of automation, available network adapters can be listed by using the -listadapters parameter. The output is printed on the console. This flag overrides any other parameter.
Use -listadapters to get available devices and parse it to figure out the value of the -deviceid parameter you want to use. Note that the value of DeviceID can also be found by querying the Win32_NetworkAdapter or Win32_NetworkAdapterConfiguration WMI classes and using the DeviceID or Index property of the respective classes, so you are free to determine the value for DeviceIDusing your own methods.
PS C:\users\administrator\desktop>SetupHTBootloaderNetwork.ps1 -listadaptersDeviceID|Description|IPAddress|MACAddress|DhcpEnabled|ConnectionID|Preferred
7|Intel(R) PRO/1000 MT Network Connection|172.16.14.222|00:0C:29:45:59:93|True|Local Area Connection|False
10|Intel(R) PRO/1000 MT Network Connection #2|192.168.100.34|00:0C:29:45:59:9D|False|Connection 2|False
Once the DeviceID has been determined, specify it as the value for the -deviceid parameter. This will configure the Bootloader to use the specified interface with its current configuration.
PS C:\users\administrator\desktop>SetupHTBootloaderNetwork.ps1 -deviceid 10Successfully updated HT Bootloader network configuration
PS C:\users\administrator\desktop> cat T:\hcs\etc\ipconfig
DHCP=false
IP="192.168.100.34"
NETMASK="255.255.255.0"
GATEWAY=""
IPV4DNS0=""
DNSDOMAIN=""
If you wish to override any of the default configuration, specify the required value with any of the parameters documented in previous section. The following example adds Gateway and DNS server information.
PS C:\users\administrator\desktop>SetupHTBootloaderNetwork.ps1 -silent -deviceid 10 /
-gw 192.168.100.1 -dns 192.168.100.1,192.168.1.1 Successfully updated HT Bootloader network configuration
PS C:\users\administrator\desktop> cat T:\hcs\etc\ipconfig
DHCP=false
IP="192.168.100.34"
NETMASK="255.255.255.0"
GATEWAY="192.168.100.1"
IPV4DNS0="192.168.100.1 192.168.1.1"
DNSDOMAIN=""
There are other potential issues that may appear with Bootloader installation. They are less likely to be found:
ISSUE: Your certificates don't match, and the diagnostic reports that the time on the Bootloader system clock is wrong.
Cause: The Bootloader is based on Linux, which initializes its clock during boot from the RTC/hardware clock. During this initialization the RTC time is assumed to be UTC. However this is not true because Windows by default syncs the RTC clock with local time.
Solution: There are two approaches that can be used to solve this problem: 1) Change the system time on the Bootloader by taking the time zone being used by Windows into account. We can do this by simply storing the difference in local time and UTC time on the Bootloader and applying the difference to the system time during boot. 2) Change the system time using a Network Time Protocol (NTP) client to fetch the correct time from an NTP server.
How it works: We now store two more bits of information in the Bootloader:
hcs/etc/tzdiff — the time difference between local time and UTC
hcs/etc/ntpsrv — a comma-separated list of NTP servers
Two new PowerShell scripts have been added:
SetHTBootloaderTzDiff.ps1, which
accepts no parameters and creates hcs/etc/tzdiff on the Bootloader drive.
UpdateHTBootloaderNtpServers.ps1, which is
used to create hcs/etc/ntpsrv, is meant for automation.
Usage:
UpdateHTBootloaderNtpServers.ps1 [-ntpsrv <server list>] [-default]
ntpsrv
— list of comma-separated NTP servers in quotes. The default is to use NTP server settings from the host system, which overrides the ntpsrv parameter.
The final state of installation can be inferred from four empty files created by the installer in the same directory as the installer executable:
HTDone: This indicates that the installation ended. You should poll for creation of this file to ensure that the installer process finished. If no other file is created, it means that a successful installation completed.
| Note: | Boot drive encryption is not available until AFTER a successful installation and reboot. |
We provide tools for defining the Bootloader drive and network configuration. They include:
htblconf.exeThis executable provides a user interface for updating the Bootloader drive and network configuration after installation has been completed. This is based on the installer and presents the same drive and network configuration options as are presented during the Bootloader installation.
The "preferred network adapter" is the adapter used to communicate with the KeyControl. When encrypting the boot device, hcl checks to make sure that the preferred adapter is the adapter configured in the Bootloader. If not, the user is prompted to update the network configuration. This can be done either by using SetupHTBootloaderNetwork.ps1 or htblconf.exe. Both utilities clearly identify the preferred adapter when presenting options.
When using the GUI, it automatically opens htblconf.exe if the user agrees to updating the Bootloader network settings. This is meant to be a safety net that ensures that the Bootloader will be able to communicate with the KeyControl once the boot partition has been encrypted. However the user can choose to override this behavior.
When using the hcl command line, the ‘-N’ option has been added to the ‘hcl encrypt’ command to override the check for the preferred network adapter.
C:) After Installing the BootLoaderThe BootLoader installation involves creation of a new partition that immediately follows the boot partition (typically C:) on the disk.To extend the boot partition we need to move the BootLoader partition, labeled HTBOOTLDR, to the end of the disk. This can be achieved through the MoveHTbootloader.ps1 PowerShell script.
Here is the workflow for extending the boot drive:
MoveHTBootloader.ps1.Usage:
powershell -ExecutionPolicy Unrestricted -File "C:\Program Files\hcs\bin\MoveHTBootloader.ps1"The script creates a new BootLoader partition at the end of the recently extended disk and reboots the virtual machine
On reboot, MoveHTBootloader.ps1 will again be executed automatically and will delete the old BootLoader partition and then extend the boot partition to take up the available free space.
| Note: | This operation changes the drive letter for the HTBOOTLDR drive. The original drive letter can be restored by either using the htblconf.exe GUI utility or the ChangeHTBootloaderDrive.ps1 script. |