
When booting off the ISO you will see a screen asking if you want to install the software. Select OK and press Enter.
If the installer detects that a previous version of the software was installed, you will see the following screen and be asked whether you wish to upgrade the system or install the version on the ISO.
Choose the appropriate option and press Enter.
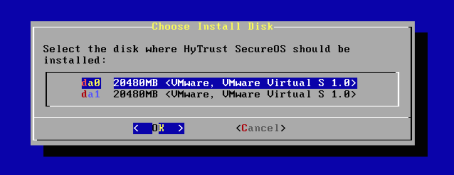
The HyTrust installer will scan for available disks which will then be presented to you. Select a disk on which to install the software. It is recommended that two disks are chosen for the insdtall, to allow the HyTrust software to be mirrored between these two disks. Note that if you are installing KeyControl as a VM and the storage on the datastore is already redundant, you only need to install the software on one disk.
Use the arrow keys to select a disk and press Enter (or tab to OK) to select the first disk.
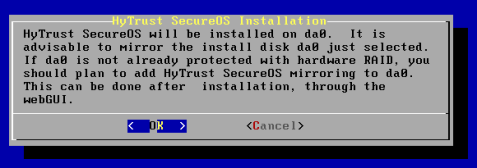
Once you have selected the first disk, you will then be prompted to choose the disk to mirror the software to:

If you do not need to mirror the install, select None and then select OK and press Enter.
Before starting the install, you will be prompted one last time to confirm use of the disks selected and start the installation process. If you cancel at this point you will have the option of retrying the installation from the first menu, or shutting down the system.

The installation is very quick and should not take more than a minute or two. Pressing Enter will result in the machine being rebooted to perform the final steps of the installation setup. When you press Enter, the ISO CD/DVD will be ejected and the newly installed KeyControl node will boot. You should remove the CD/DVD at this point.
If you are running as a VM please make sure that you disconnect the CD drive. For example, on vSphere, make sure that the Connect at power on button is not checked.

Once the machine has rebooted, you will be prompted to choose the type of system that you are installing:

Select option 1 (Initial KeyControl Appliance). You will be asked for confirmation that you wish to install the initial KeyControl node.
You will then be prompted to set the system password. You will be required to enter the password twice. Passwords must be a minimum of eight characters. Remember, the login name itself ("root") does not change; only the password.

The system password enables access to a console menu that provides system diagnostics and settings. Without the password, access to the system for these tasks is impossible. It is critical that the password be stored safely somewhere.
Note that this is not a general login account. Since this is a secure node you cannot get a shell prompt. You only have access to a basic menu system that allows for hardware change, network setup and general debugging capabilities. We cover these topics later.
| Note: | When logging in through the webGUI for the first time you will need a username/password combination of "secroot" / "secroot". For more information, see Logging into the WebGUI for the First Time. |
Next you will go through the process of setting up networking:
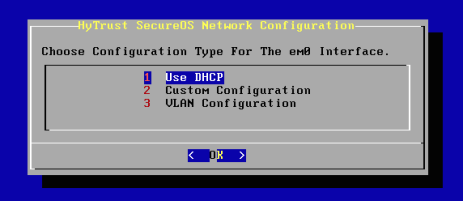
You will be asked whether you wish to Use DHCP, do a Custom Configuration for the network, or perform VLAN Configuration. The network you set up on the new server will be the one used by other HyTrust KeyControl nodes for management communications. It will also be the network used for communications between the KeyControl nodes and the VMs where the DataControl Policy Agent is running.
| Note: | Even if you use DHCP elsewhere in your network, you must use static IPs for all KeyControl nodes. |
For network setup, you will first select the NIC to be used, if there are multiple NICs on the server. If there is only one interface you will proceed directly to choosing a network setup type.
The next screen will show networking settings. If DHCP was chosen in the previous screen, many of the parameters will be filled in. For more information, see Detailed Network Configuration.

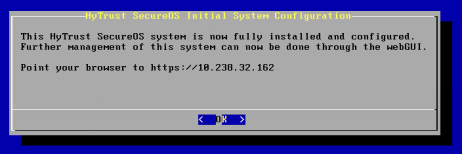
Once networking is set up, the first KeyControl node is now ready to use. The final notice will display the IP address of this KeyControl node from which further setup and configuration can be done from within the webGUI.
After installing the KeyControl node and before using the system, we highly recommend that you familiarize yourself with backing up the KeyControl node. For more information, see KeyControl Backup and Restore.
A subsequent login using root and the system password will result in the configuration / reconfiguration menu being displayed.
You will have the choice of three types of network setup: 1) using DHCP, 2) creating a custom configuration, or 3) creating a VLAN configuration.
For all setup types you will be assigning:
For NTP configuration, there is a built-in default to pooled servers through ntp.org appropriate for installations in the United States. This assumes Internet connectivity.
If you are using DHCP, the system will gather any of the seven settings that are available from the DHCP server. Any settings not provided will have to be entered on the following Network Configuration form.

Creating a custom configuration and creating a VLAN are identical in that you will be filling in the assignments for all seven items. If creating a VLAN connection, you will be prompted for the VLAN ID. You will need to have the VLAN ID that the switch will be using for the connection.
The KeyControl servers in the cluster communicate with each other using HTTPS. At the time of installation of the first KeyControl node, KeyControl generates a certificate for itself. There is a certificate authority, pre-existing on the KeyControl as part of the installation image. The KeyControl certificate contains the hostname, both short and FQDN, as well as the IP address of the KeyControl node. When the KeyControl node reboots, it checks for change of IP address and recreates a certificate if the IP address has changed.
The CA certificate pre-installed on all the KeyControl nodes is the same, as they are derived from the same installer image. This ensures that every KeyControl is able to verify certificates generated by other KeyControl nodes. The following diagram shows the architecture:

When a KeyControl cluster is installed, the first KeyControl node creates a new Certificate Authority. The other KeyControl nodes in the cluster receive this Public CA through the KeyControl’s object store, when they are added to the KeyControl cluster.
The Public CA is used to generate user-facing server certificates for each KeyControl, as well as certificates for the guest VMs. The KeyControl nodes in the cluster coordinate to create unique certificates for themselves as well as the guest VMs. The guest VM certificate is used by the KeyControl to verify the identity of the VM, for example, when it requests encryption keys.
The Public CA is a Root Certificate Authority, and KeyControl allows users to download its CA certificate through the console menu. To download the CA certificate select Manage CA Certificates and then Download CA Certificate as shown in the screenshot below:
![]()
The administrator connects to KeyControl using a web browser on his/her computer. The web browser will give a security warning, as the default certificate on KeyControl is signed by its Public CA and this Public CA is not known to the administrator’s browser.
The administrator can add the CA certificate downloaded from the KeyControl console to the set of trusted CAs on his/her computer. When the CA certificate is added, the browser is able to verify the validity of the KeyControl certificate and will not present the administrator with future security warnings.
| Warning: | Do not rename the downloaded certificate. The name of the certificate has additional information, and a renamed certificate will fail. |
KeyControl creates a certificate for the guest VM. This certificate is signed by the Public CA that was created on KeyControl during installation. The certificate is manually copied to the guest VM and used when the guest VM is registered with KeyControl. The certificate bundle that is copied to the guest VM also includes the CA certificate of the Public CA on KeyControl.
All of the communications from the guest VM to KeyControl enable peer verification. The guest VM uses the CA certificate to verify the identity of the KeyControl. Note that there is more than one KeyControl node in the cluster, but one CA certificate is enough, as the same CA is used to create certificates for all the KeyControl nodes.
The guest VM includes its own certificate in the communication, which is used by KeyControl to verify the identity of the guest VM.
The above-mentioned Public CA setup was added as part of the HyTrust DataControl 3.1 release. If you have a KeyControl node installed with version 3.1 or later then the new CA setup will already be enabled.
The enabling of a new CA setup is a two-step process:
One: Login to the KeyControl console and navigate to Manage CA certificates. Click Enable new CA to enable the new CA setup. The following dialog box appears, informing you of the various options:

Two: Update the certificate on all the existing guest VMs, by either of the following methods:
hcl updatecert -a on the guest VMhcl updatecert <certfile>.In older versions, the KeyControl did not provide a way to download a CA certificate. In the absence of a CA certificate, the WebGUI access and API access could not verify the identity of a KeyControl. When you accessed the KeyControl from the browser, it would flash a security warning and the KeyControl certificate had to be added as an exception.
Another issue was that the KeyControl used a pre-created CA setup. This meant that the CA was part of the installation ISO, which is less secure. Starting with version 3.1, the public CA is created during KeyControl installation, thus every KeyControl cluster has its own CA.
It is now possible to download the CA certificate, which can be used to establish the identity of KeyControl nodes.
Even so, concern has been expressed about the use of a “self signed certificate” by the KeyControl. Note that the KeyControl certificate is technically not “self signed,” although the CA is co-located on KeyControl.
The guest VM gets a copy of the CA certificate when the VM certificate bundle is copied to the VM. The certificate bundle can be downloaded from the KeyControl and copied out-of-band to the VM. The VM uses the CA certificate to verify the identity of the KeyControl, so a "man-in-the-middle" attack is not possible. On the other hand, as the KeyControl uses its own CA to sign the VM’s certificate, it can verify the identity of the VM.