Encrypting Windows Boot Drives
Contents
- Introduction
- Requirements
- Setup and encryption of the boot partition
- Step 1 - Install the HyTrust DataControl Policy Agent
- Step 2 - Register the HyTrust DataControl Policy Agent
- Step 3 - Encrypt the Windows Boot Partition
- The Boot Process
- Installing the Bootloader at a Later Time
- Modifying Bootloader Network Settings
Introduction
In addition to encrypting regular Windows data partitions, you can also encrypt your Windows boot disk (C:). Note that HyTrust does not support dual booting.
Encrypting the C: drive, in addition to data partitions, ensures that clear-text data never leaves the VM on its way to storage. This prevents virtualization and storage admins from being able to view the data.
The HyTrust Bootloader for Windows (theBootloader) is a tool that is required to encrypt the Windows boot partition using keys that are retrieved, as needed, from the HyTrust KeyControl server. This means that keys are not kept with the encrypted boot partition, thus providing an extra layer of security.
There are a number of steps required to set up your Windows system for boot drive encryption. If you are running within a virtual infrastructure, we recommend that you go through this process once and set up a template VM from which new VMs can be created.
Requirements
The supported versions of Windows for the Bootloader include:
- Windows 7
- Windows 2008 R2
- Windows 2012
- Windows 2012 R2
We also require a Windows System Reserved Partition (SRP). \We will create an SRP if one does not already exist
This product will work with and without Service pack 1 installed.
The Bootloader is added as an SRP of roughly 100 MB on Windows 7 and Windows 2008 R2, and 350 MB on Windows 2012 and above. As part of the installation process, the boot drive will shrink to free up space for the Bootloader (and Windows SRP if one does not already exist). If there is insufficient space on the boot drive, the Bootloader will fail to install. This process is automatic.
Additional notes:
- The encrypted boot partition must be on the Windows
C:drive. Although Windows itself can boot from alternate drive letters, the HyTrust DataControl Policy Agent is limited to theC:drive only.
Setup and Encryption of the Boot Partition
The installation of the components necessary to boot an encrypted version of Windows is a three-step process.
Step 1 - Install the HyTrust DataControl Policy Agent
First, you must install the HyTrust DataControl Policy Agent (the Policy Agent) software on Windows. You must reboot the Virtual Machine before the agent is activated. For installation instructions, please refer to the Encryption Within Windows Virtual Machines chapter.
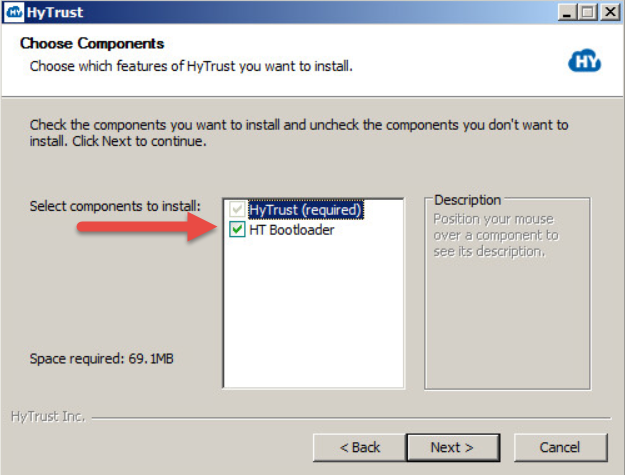
Be sure to check the box for HT Bootloader when you go through the installation.
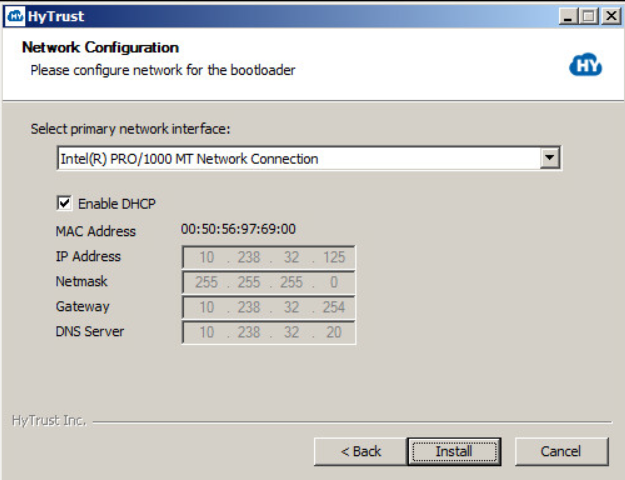
Your next dialog box is for Network Configuration. This configuration is used by the Bootloader to configure its network before trying to connect to the KeyControl Server. It allows you to select the network interface you want to use for the connection, and by default presents the current configuration for the selected network card. In most cases you should be able to leave the default choices checked, including Enable DHCP for the selected network interface. Click Install.
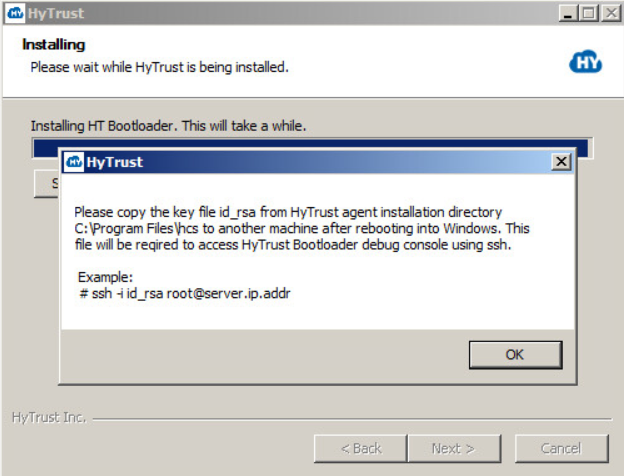
Click OK, and you are prompted to Reboot. Click Reboot now, and then click Finish. Remember that you will have to copy the key file id_rsa to another computer after you reboot.
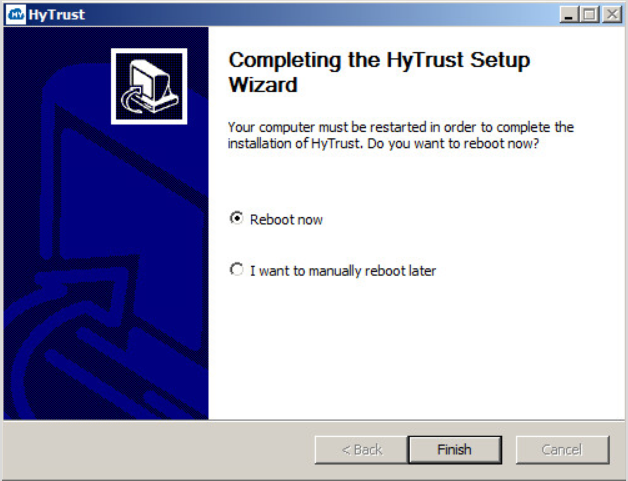
Note that you can manually reboot at a later time, but your Bootloader installation is not complete until you finish installation by rebooting. When you reboot, your computer will go through a scripted process that involves multiple automatic reboots, and will finally boot back into Windows.
What to do if your Bootloader installation fails for lack of disk space
There is no need to uninstall the Policy Agent software. Shut down your VM, expand the disk as needed, and then follow the instructions here.
IMPORTANT: HyTrust instructed you to copy the key file id_rsa to another computer. It is located in the Agent installation directory, C:\Program Files\hcs. This is required to access the HyTrust Bootloader console using SSH, after you have encrypted the root drive of C:. Be certain that you copy the file once your computer has rebooted, and store it on another computer that you can reach via your network. You will need it if you need to troubleshoot your installation from the console.
Start the HyTrust GUI
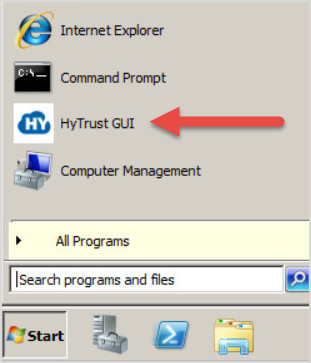
Once you have copied the id_rsa file, click Start and then click HyTrust GUI, as shown below.
Step 2 - Register the Policy Agent
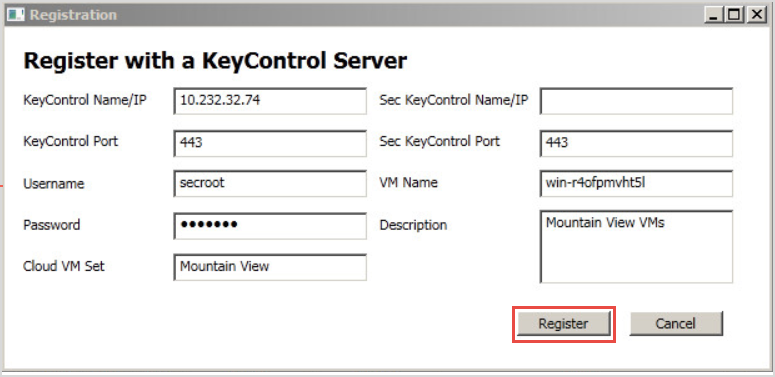
The HyTrust GUI starts, and presents a Registration screen. Fill in the KeyControl Name or IP address, the Username and Password, and the Cloud VM Set into which you will place this Policy Agent. Then click Register.
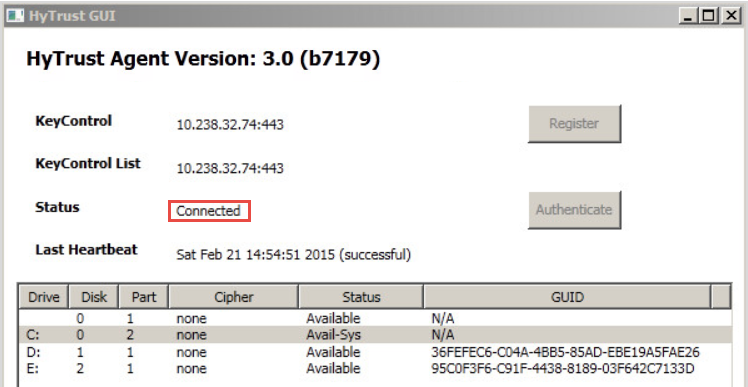
When registration is complete, your user interface in the HyTrust GUI will change to show Connected.
Note that you can see the distinction between the Windows boot partition and the root partition by running the Windows diskmgr utility. For example:
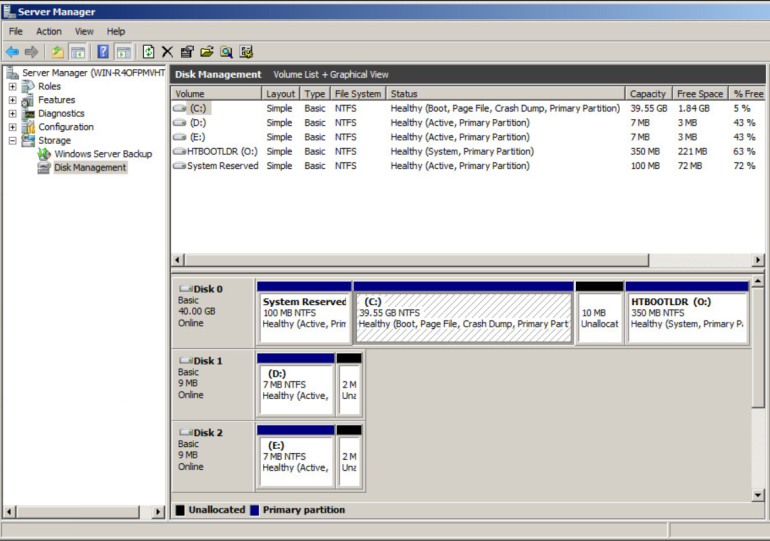
The small boot partition is listed as System Reserved, and the HyTrust Bootloader appears as HTBOOTLDR. No part of the Windows root C: is ever decrypted on disk and the boot partition, added during the installation process, contains only a small part of the bootstrap process.
Step 3 - Encrypt the Windows Boot Partition
Next you need to encrypt the Windows root C: drive. Here is the sequence of events that happen:
- Run the HyTrust GUI, as shown below. Be aware that larger disks can take a while to encrypt, but the Status column shows you the percentage complete. However, even if the encryption process is not complete, you can continue to use the computer while the encryption process progresses. If you choose to shut down prior to full encryption, you can resume it, using the CLI command:
hcl encrypt c:. In version 3.0, all interrupted rekey/encryption operations will resume automatically when the VM is rebooted.

When encrypting the C: drive, the process will be displayed in the HyTrust GUI. When complete, the status will change to Attached and will show the algorithm used for the encryption, as shown below. Note that the default boot drive encryption algorithm is AES-XTS-512. If you have virtual machines encrypted prior to the 3.0 release, they will continue to use the AES-256 cipher.
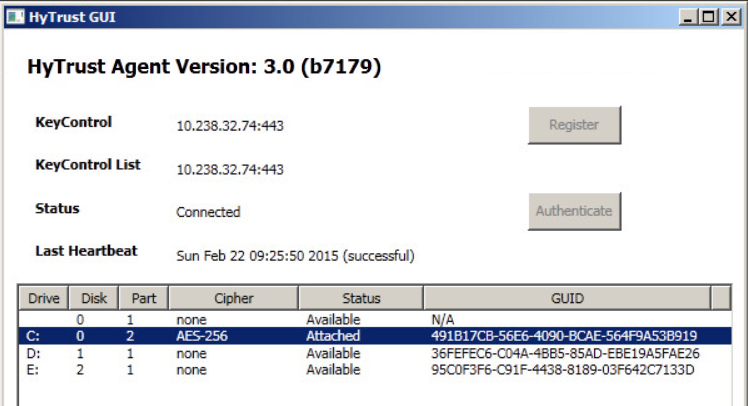
At that point, the encryption process is complete and the VM can be safely shut down or rebooted, as you wish. Bear in mind that your boot-encrypted disk relies upon access to the KeyControl node to validate your access to the boot drive. This is described in the following sections.
The Boot Process
The Bootloader uses a small pre-boot environment to retrieve encryption keys for the boot device each time the system starts up. The system is reconfigured to boot the Bootloader before booting Windows. Here are the steps:
- You reboot a computer that has an encrypted boot drive.
- The Bootloader intercepts the boot request, and sends a request to the KeyControl node to retrieve your encryption key for the C: drive.
- The Bootloader retrieves the key from the KeyControl node and then supplies it to the secondary boot stage which will boot Windows.
- Windows boots normally.
NOTE: Keys for the C: drive are never stored persistently on the VM, and are only stored on the remote KeyControl node. The following topics describe some of the possible outcomes in the boot process.
Normal Bootstrap
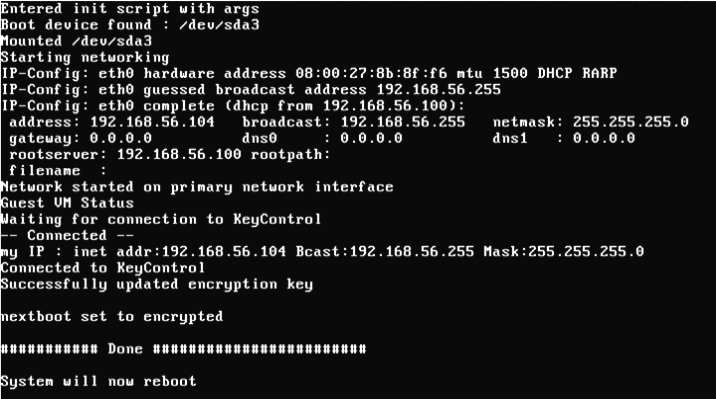
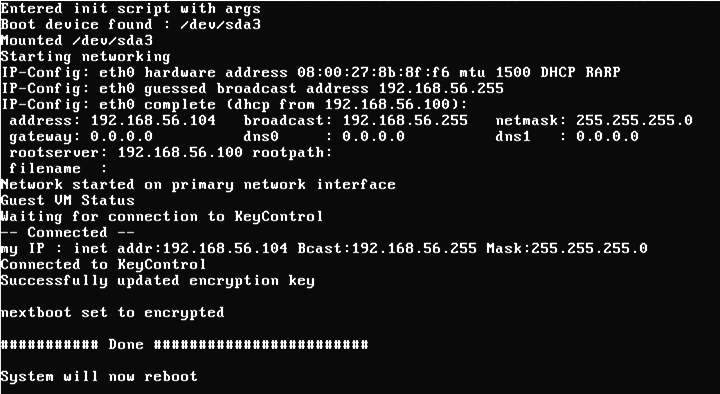
In the following screenshot, you can see the operation of the Bootloader. It indicates that it has successfully contacted the KeyControl node, presented credentials that allow it to retrieve the boot partition encryption key, and retrieved the key. When complete, it will once again reboot, this time into Windows.
Failure to Retrieve Keys When Booting
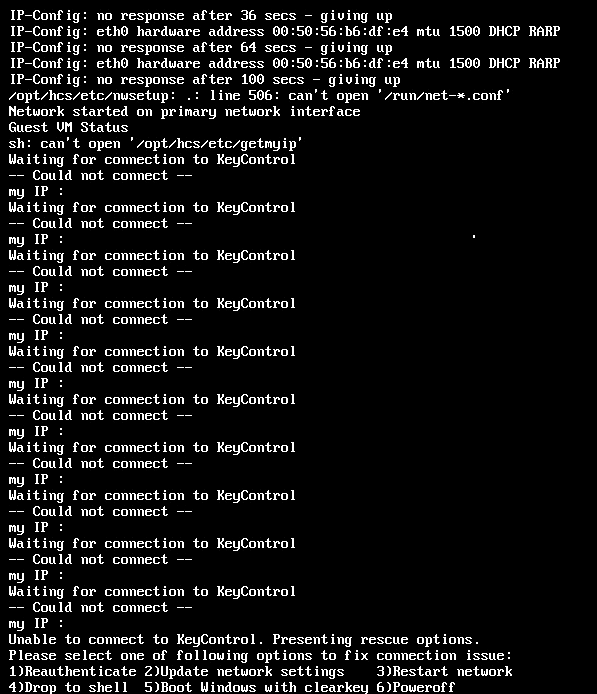
Since encryption keys are never stored locally, a VM will require access to a KeyControl node when booting. Failure to contact a KeyControl node will prevent the system from booting. If a KeyControl node is not available when the system is booted, it will repeatedly attempt to contact it for 30 seconds, at which time it presents a console menu which allows a number of options. If you are unable to view the console directly, for example in environments such as Amazon AWS, you can access the console using an SSH client. This will require the id_rsa key file that you copied earlier. You can use the following command to access the console menu to copy the id_rsa file:
# ssh -i id_rsa <root@server.ip.addr>
The console menu options are:
- Reauthenticate. If the credentials of the VM become stale, then it must be re-authenticated to the KeyControl node in much the same way as a running VM would have to do. The most likely reason this might include the grace period expiring. Another possibility is that your boot drive's IP address is configured via DHCP, which means it may have changed. We recommend static IPs for boot drives, or disabling the IP address check feature in your KeyControl. Choosing this option allows you to re-enter the credentials, using your
id_rsakey file. Key retrieval will proceed after this. - Update network settings. This takes you back to the network settings screen so that you can update the settings.
- Restart network. This option instructs the VM to reattempt to contact the KeyControl server and once again retrieve the encryption key. If no selection is made in this menu after 30 seconds, then this option will be taken automatically. You can see this in the first example, below.
- Drop to shell. Provides a simple recovery shell. Use the command exit to leave the recovery shell. This is primarily for use by HyTrust Support. We recommend against customers using this option.
- Boot Windows with clearkey. This option instructs the Bootloader to boot without an encryption key, and is done automatically if we detect that the boot partition is not encrypted.
- Poweroff. Power down the computer.
Note: The first four options appear on all platforms, including Amazon Web Services. The last two appear only in a CLI environment. The screenshot below shows what a failure to retrieve keys and accompanying "Restart Network" looks like:
Key Management
One of the important features offered by this system is the ability to control remote access to the encrypted data from the KeyControl. HyTrust boot encryption also offers this feature. The C: drive is presented in the KeyControl GUI as simply another disk to be managed. Keys can be revoked and access granted in the same manner as non-root disks.
If access to the encrypted C: drive is revoked, the Policy Agent, upon the next heartbeat, will immediately present the BSOD (”Blue Screen Of Death”). The BSOD status code will be set to the value “DEADDEAD” so that it can be quickly determined that a key revocation is the reason for the BSOD.

The BSOD will eventually result in the VM attempting to reboot. Of course, at this time, the key is no longer available, since access has been revoked. Key retrieval will fail, and the boot will fail. In the following screenshot you can see that the Bootloader was unable to fetch keys.
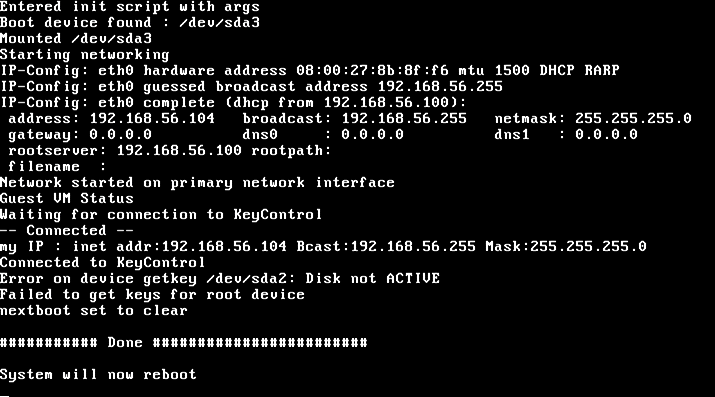
Windows will now fail to boot, because the encryption key cannot be retrieved. Thus, when it attempts to boot, it will fail with the status code 0xC00000f, indicating a failure to read the disk. This is shown in the screenshot below. Subsequent boot attempts after the key access is granted will not result in this error.
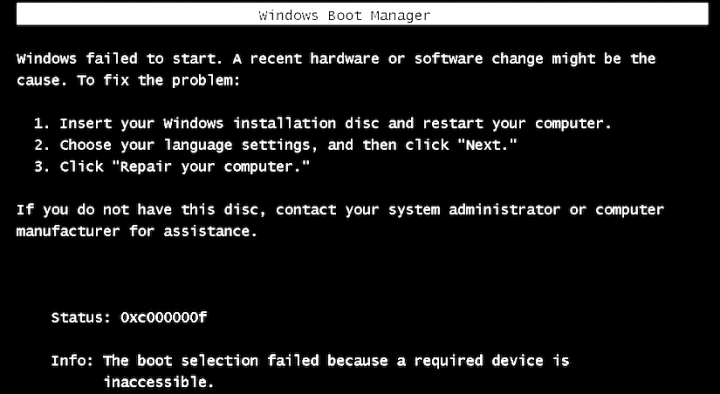
Attempts to boot the fail will fail until the VM is granted access to the encryption key. Once the key has been provided, restarting the VM will once again proceed normally. The encryption key will be retrieved and passed to the Windows Bootloader, allowing the VM to operate normally. Here is a normal boot process, once the encryption key has been retrieved:
Installing the Bootloader at a Later Time
InstallHTBootloader.ps1, located in your <installation_dir>/bin directory. The command, given from the default installation directory, is shown below:powershell -ExecutionPolicy Unrestricted -File
"C:\Program Files\hcs\bin\InstallHTBootloader.ps1" Modifying Bootloader Network Settings
Bootloader network settings can be changed by running a different PowerShell script, SetupHTBootloaderNetwork.ps1, as shown below:
powershell -ExecutionPolicy Unrestricted -File

      "C:\Program Files\hcs\bin\SetupHTBootloaderNetwork.ps1"
These settings can also be changed using the Update network settings choice on the rescue menu. Note that if you change your static IP configuration in Windows, you must update your Bootloader with this script to reflect those changes.