Encryption With Linux Virtual Machines
Contents
- Introduction
- Installation
- Installing the DataControl Agent on Linux
- Uninstalling the VM Software on Linux
- Upgrading the DataControl Agent on Linux
- VM Management
- Creation of Certificates
- Registration of The VM
- Simplified Registration
- Checking The VM Post Registration
- Setting Up A Device For Encryption on Linux
- Fast Initial Encryption on Linux
- Encrypting An Existing Device on Linux
- Removing and/or Decrypting an Existing Device
- Resizing a Device on Linux
- Automatically Mounting Filesystems On Linux
- Revoking VM Permissions
- VM Handlers For Attach/Detach
Introduction
This chapter describes installation and management of the HyTrust DataControl agent on Linux platforms. We also describe DataControl features that are specific to Linux. We assume that you have read the introductory Encryption Within Virtual Machines with the DataControl Agent chapter which covers the architectural aspects as well as operations that are common to both Windows and Linux.
Platforms supported
We have currently tested on the following Linux platforms for encryption of devices other than root/swap. We do not support 32-bit versions:
- Centos 5.8 (see notes below), 6.2 and 6.3
- Ubuntu 10.04 server and desktop, 12.04 server, 12.10 server
- Red Hat Enterprise Linux 6
- Debian 6.0.7 (requires cryptsetup to be installed)
- Savvis Linux VMs:
- Red Hat Enterprise Linux Server 5.3 and 6.1
- Amazon Linux AMIs:
- Ubuntu 10.04, Ubuntu 12.04.1, AmazonLinux 2012.03
However, the DataControl agent should work on any modern version of 64-bit Linux. If the version you are running is not listed above, please contact us at info@hytrust.com and provide us with information about the version of Linux and the problems seen.
For Linux root/swap encryption, we have tested on the following platforms:
- Ubuntu 12.10, 12.04, 13.10, 10.04
- CentOS 6.4
- AWS Ubuntu 12.10, 13.10 14.04
- AWS CentOS 6.4
- AWS RedHat 6.5
- AWS Amazon Linux (amzn-ami-pv-2014.03.0.x86_64-ebs (ami-b8f69f88))
Support is not currently available for the RHEL 7.0, CentOS 5.x, and CentOS 7.0, which was not available at the time of launch.
NOTE: Ubuntu 11.10 is no longer supported by Amazon.
Prerequisites
We currently require access to the unzip command and the openSSL package. Please check to make sure that both are available.
Installation
The following sections describe how to install, upgrade and uninstall the DataControl agent on Linux.
Installing the DataControl Agent on Linux
The DataControl agent software is embedded within the KeyControl cluster. Click on the CLOUD tab in the webGUI, select Cloud VM Sets in the file browser and click the DOWNLOAD HYTRUST DATACONTROL button. This is shown below:
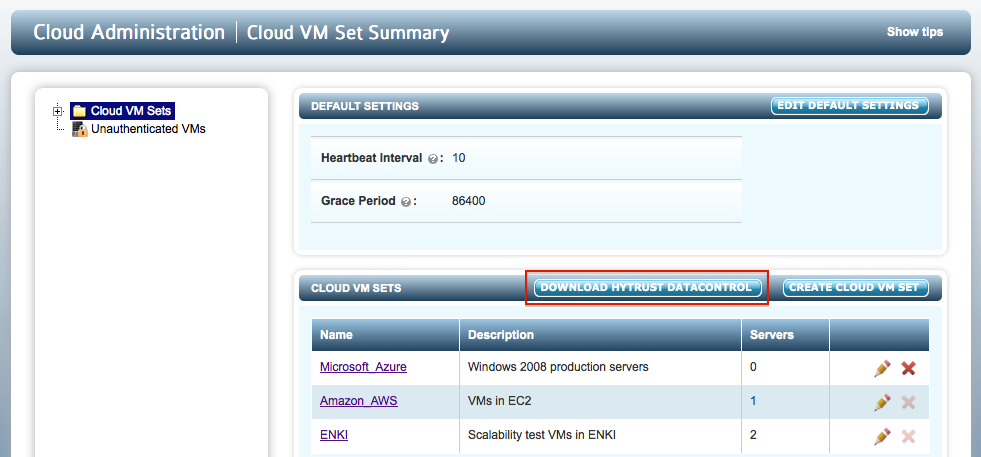
The download process will start and you will get a file called hcs-client-agent.zip placed in your default download directory. The zip file will most likely be unzipped but if not and you're downloading on Linux, you will need to install unzip. There are two directories, one for Linux and one for Windows. Within the linux directory is the hcs-client-agent-2.6.run package for Linux. This should be copied to the VM.
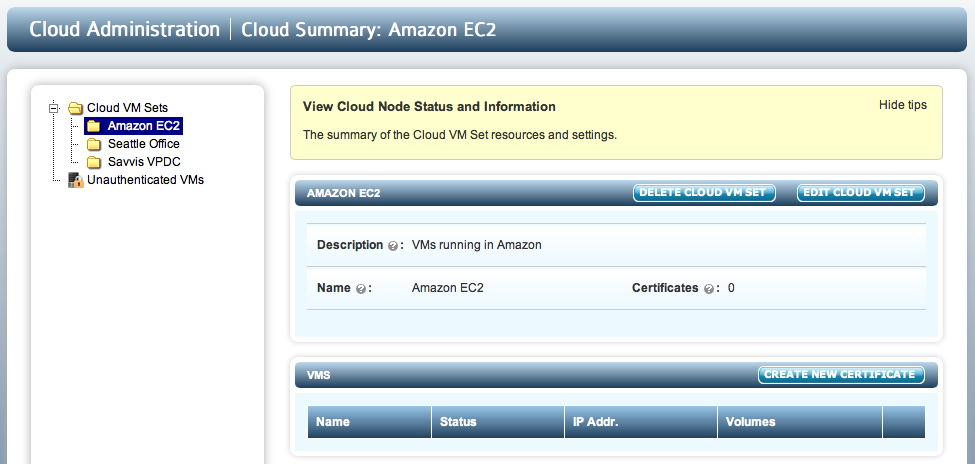
You also need to generate a certificate that will be used during registration of the VM. To obtain a certificate, select the Cloud VM Set to which you want to associate the VM. For example, let's assume that we wish to generate a certificate for the "Amazon EC2" group.
- Expand the Cloud VM Sets tab in the file browser.
- Click on the Amazon EC2 node in the file browser.
- Select CREATE NEW CERTIFICATE - see screenshot below.
- Enter a passphrase to encrypt the certificate and the date that you wish the certificate to expire. The passphrase is optional. If you supply one, you will need to enter it again when you register the VM. Note that prior to certificate expiration, you will receive warnings and if you wish the VM to continue running, you will need to apply a new certificate prior to expiration.
- Click Create.
You should get a .bin file downloaded to your default download folder (browser specific). For example, the certificate file will have a name similar to 24bcc80a-9096-11e1-b701-000c29de5d41_120427182353.bin
Now click on Back to return to the list of Cloud VM Sets.
The next stage is to upload both the files (the VM agent software and the certificate .bin file) obtained from the KeyControl cluster to the VM. You then need to log on to the VM with root privileges. The rest of the document assumes that you have logged in as root. If you are not logged in as root, you must prefix each command with sudo so that all commands are run with root privileges.
If you have copied the software zip file to the Linux VM on which you will install it, unzip it and navigate to the directory where the package is located:
$ unzip hcs-client-agent.zip
Archive:  hcs-client-agent.zip
   creating: hcs-client-agent/
   creating: hcs-client-agent/linux/
  inflating: hcs-client-agent/linux/hcs-client-agent-2.6.run
   creating: hcs-client-agent/windows/
  inflating: hcs-client-agent/windows/hcs-client-agent-2.6.exe
 extracting: hcs-client-agent/hcs-api-2.6.tgz
$ cd hcs-client-agent/linux
$ ls
hcs-client-agent-2.6.run*
You can check the version of the packed software as follows:
# sh hcs-client-agent-2.6.run version
Verifying archive integrity... All good.
Uncompressing hcs-client-agent-2.6.run........................
HyTrust Agent version 2.6 (b4830_4834M)
Next, you need to install the software by running the self-extracting, downloaded software as follows:
# sh hcs-client-agent-2.6.run
Verifying archive integrity... All good.
Uncompressing hcs-client-agent.run.............
 Adding system startup for /etc/init.d/hcld ...
   /etc/rc0.d/K20hcld -> ../init.d/hcld
   /etc/rc1.d/K20hcld -> ../init.d/hcld
   /etc/rc6.d/K20hcld -> ../init.d/hcld
   /etc/rc2.d/S20hcld -> ../init.d/hcld
   /etc/rc3.d/S20hcld -> ../init.d/hcld
   /etc/rc4.d/S20hcld -> ../init.d/hcld
   /etc/rc5.d/S20hcld -> ../init.d/hcld
Run once hcld
Installation successful
Note that the exact output displayed will depend on the version of Linux used. On some versions, the output will be less verbose.
The next step is to register the VM.
Uninstalling the DataControl Agent on Linux
Uninstalling the VM agent software is done simply by running the .run script and passing the uninstall option. This is shown below:
Note: by uninstalling the VM agent software, all configuration information will be lost including access to all encrypted devices.
# sh hcs-client-agent-2.6.run uninstall
Creating directory hcs-agent-agent
Verifying archive integrity... All good.
Uncompressing hcs-agent-agent.run.............
Data on all encrypted volumes will be lost. Proceed with uninstall? (yes/no) yes
Encrypted device /dev/sdb1 detached; decrypted contents no longer visible
Encrypted device /dev/sdc1 detached; decrypted contents no longer visible
Encrypted device /dev/sdd1 detached; decrypted contents no longer visible
Stopping hcld... done
Uninstall successful
Upgrading the VM Agent on Linux
Upgrade of the VM is achieved simply by running the new .run script. The existing configuration is preserved. You can check the current version of the software as follows:
# hcl version
2.4 (b4907)
Note on upgrading for AWS users: HyTrust is building in functionality for future upgrades to the AWS installation. This section describes upgrading using the command line, hcl. That form of upgrade is not available for AWS installations. Future versions of HyTrust KeyControl will support all upgrades through the webGUI, including AWS.
And to upgrade, simply run the installer as follows and enter y when prompted to upgrade. You can check:
# sh hcs-client-agent-2.6.run
Creating directory hcs-agent-agent
Verifying archive integrity... All good.
Uncompressing hcs-agent-agent.run.............
HyTrust Agent version 2.4 already installed
Upgrade existing install? (y/n): y
Stopping hcld... done
Run once hcld
Starting hcld... done
Installation successful
You can verify the version of the software as follows:
# hcl version
2.6 (b5248)
VM Management
In the following sections, we describe the operations that can be performed on the VM including registration, authentication, encrypting devices, and obtaining and understanding status messages.
Creation of Certificates
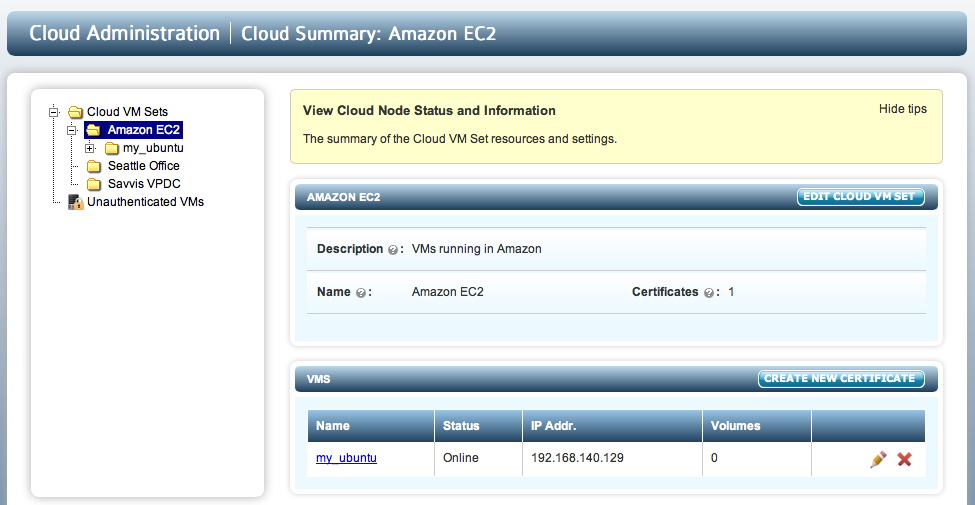
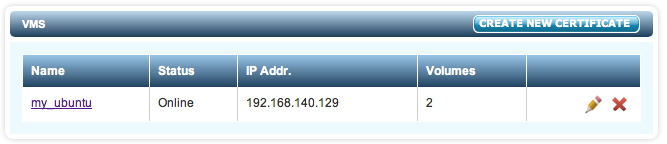
Once you have created a Cloud VM Set and wish to add a VM, you first need to create a certificate. From within the file browser, select a Cloud VM Set. For example, in the screenshot below, we have selected the Amazon VMs Cloud VM Set:
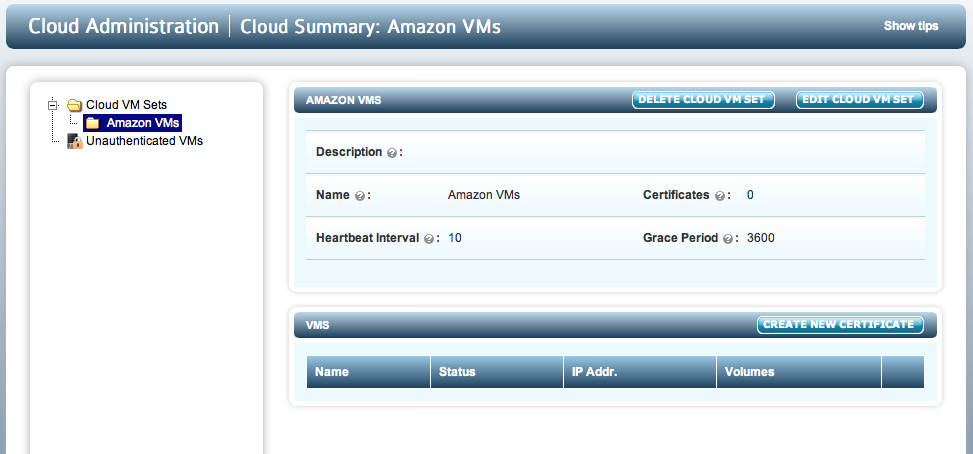
From here click the CREATE NEW CERTIFICATE button and you will see the following screen:
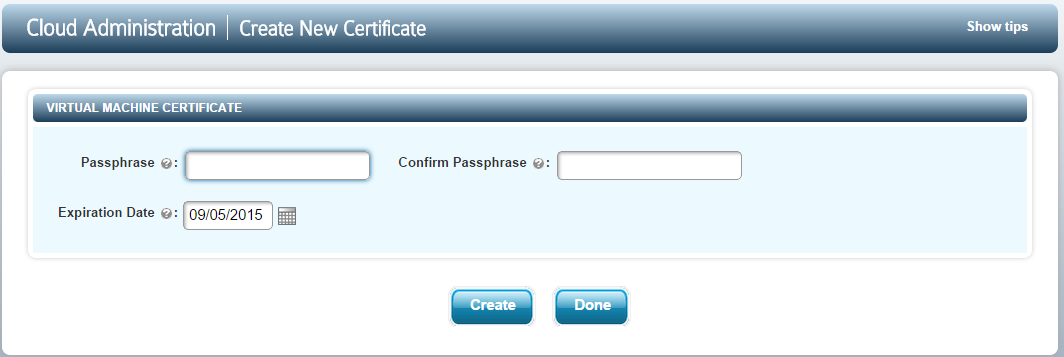
Type the passphrase for the certificate. You will be prompted to re-type this passphrase when you register the VM. You can also specify the length of time for which the certificate is valid. By default this is 365 days. At this point you need to click the Create button. The certificate will then be downloaded and should be copied, together with the agent software, to the VM. Then click Done to return to the previous screen. Note that you can generate multiple certificates in this screen before returning. Just keep clicking Create.
Registration of The VM
There are two methods of registration. The first method, which is described below, involves creating a certificate for each VM and authenticating on both the VM and on the KeyControl cluster. The second method is a simplified form which only requires typing KeyControl credentials on the VM. This is described here. In the simplified form, you are required to enter KeyControl credentials on the VM itself, which may not be acceptable to all users. First we explain the main form of registration, which requires typing a passphrase on both the VM and authenticating within the KeyControl cluster.
The hcl command is your gateway to VM encryption services. To register a VM, start up an xterm or other suitable terminal window. There are a number of options available. You can view the options by typing man hcl. The manual page is also available here.
Run the following command to register the VM with the KeyControl cluster. Note that you must first copy the certificate to the VM from which you will register, and make sure that you switch to the directory where you place the certificate.
# hcl register -h my_ubuntu -d "This is my 10.04 VM" 192.168.140.130 ad85837b-9862-11e1-afd5-000c29de5d41_120507163538.bin
Enter Import Password: Enter certificate passphrase

Enter passphrase (min 16 characters): onetimepassword16chrsmin
Registered as my_ubuntu with KeyControl node 192.168.140.130

Please login to the KeyControl node to complete the authentication of this node
-h and -d arguments are optional. The name of the VM (the -h argument) is any user-selected name. In this case, we just entered the name "my_ubuntu." It will appear in the webGUI next to this VM. If the argument is omitted, the hostname will be used by default. The IP address references the KeyControl appliance and the certificate filename is the last parameter. The -d argument is optional and will appear in the webGUI as a hint.
In the example above, the ad85....bin file was the certificate file obtained from the CREATE NEW CERTIFICATE step.
The Import Password is the password used to encrypt the certificate while generating it.
The passphrase is the one-time password used to authenticate the VM with the KeyControl appliance. This must be a minimum of 16 characters.
You can perform this in a single step as follows:
# hcl register -h VM_name -d Description -p CertPass -o OneTimePass kps1:443,kps2:443,kps3:443 /path/to/cert.bin
In the example here, we are registering with a cluster of three KeyControl appliances. It is important to maintain the KeyControl list correctly. If KeyControl appliances are added or removed, you should call hcl updatekc with the new list.
Certificates are valid for 365 days by default. However, the actual expiration date can be specified when certificates are created. We discuss certificate management further in the section Certificate Handling.
Once you have issued the register command, go back to the KeyControl cluster. There, you should see an entry labelled "my_ubuntu" in the Unauthenticated VMs list under the Cloud Admin tab.
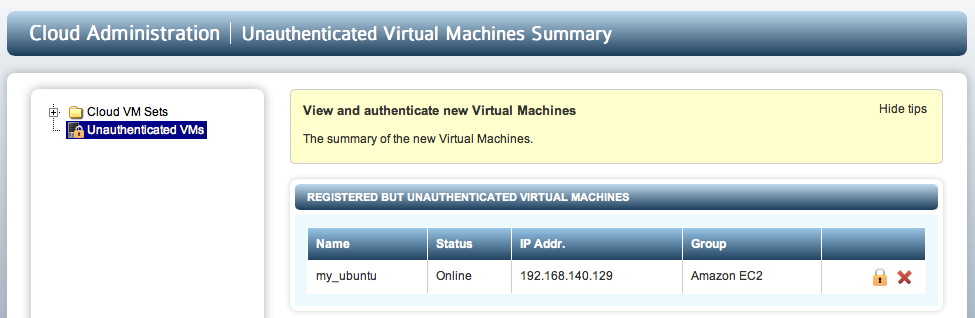
Click on the padlock icon and enter the same passphrase as during VM registration (onetimepassword16chrsmin). Note that if you entered a description during registration from the VM (-d option) it will appear on this screen. You can change this and it will be retained as the VM's description.
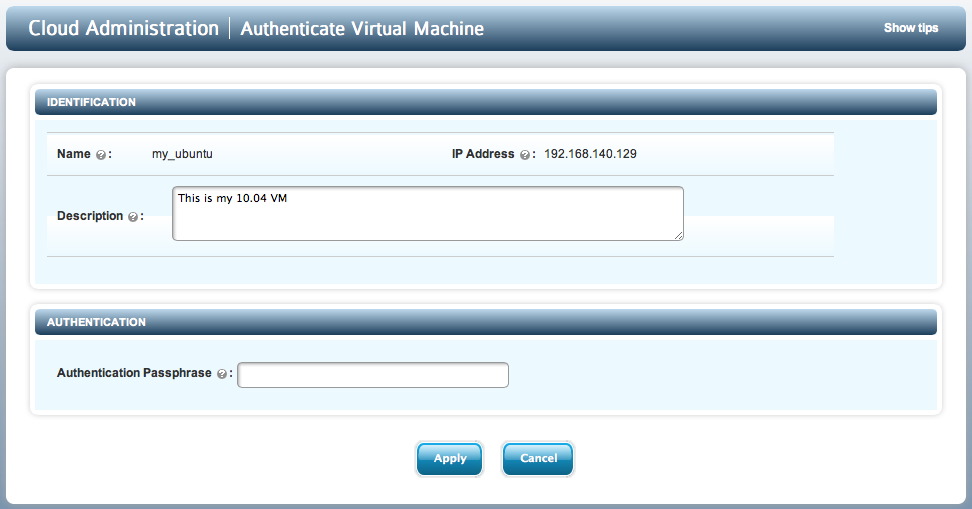
Enter the correct passphrase and click Apply, and you now see the VM move into its rightful place under the Amazon EC2 group.
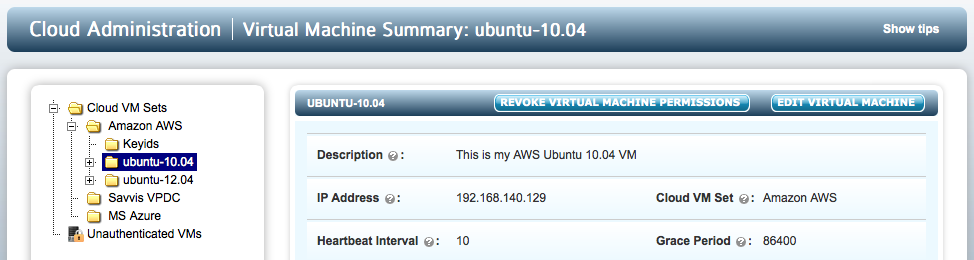
Click on the VM (using the highlighted link or expanding the file tree) and you will see the VM details (such as OS, IP address) as shown below. Clicking on the EDIT VM button enables you edit the Heartbeat, Grace Period and Description.
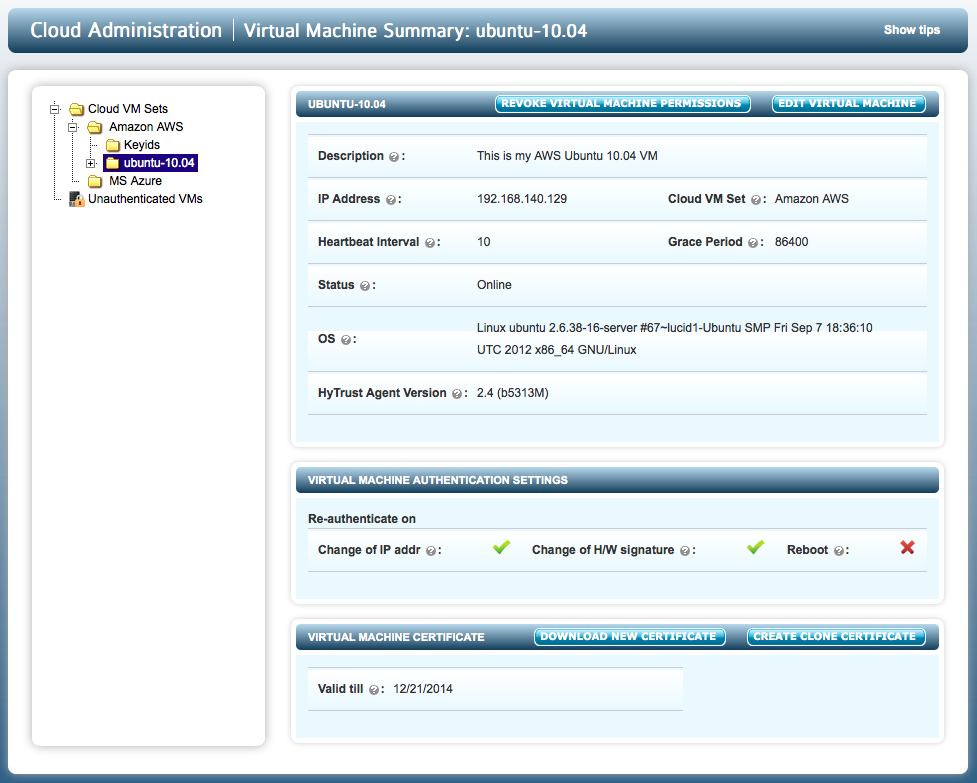
Description of the fields shown for each VM:
- Description - The is a user-defined description of the VM. It can be set by editing the VM properties.
- IP Address - The VM's IP address as seen by the KeyControl cluster. If some VMs are behind a NAT gateway, then they will all show the same IP address: that of the gateway.
- Cloud VM Set - The Cloud VM Set to which this VM belongs.
- Heartbeat - The interval (in seconds) at which the VM pings a KeyControl appliance. Any actions such as device revocation or revocation of the VM itself will be performed the next time that the VM heartbeats into the KeyControl cluster.
- Grace Period - If the KeyControl cluster does not hear from the VM within the grace period (in seconds), the VM is forced to go through authentication once more. Access to all encrypted devices will be revoked at this point, so be sure to set the grace period to a value that is acceptable. To avoid simple problems such as networking disconnects which could easily be hit for several heartbeat attempts, the Grace Period should be at least 10 times the Heartbeat value.
- Status - this will be Online if the VM can be reached and Unreachable if the VM is not accessible. This could occur if the VM is not reachable due to network errors or if the VM is shut down.
- OS - Operating system level information about the VM.
- HyTrust Agent Version - The HyTrust software version that the client is running.
The VIRTUAL MACHINE AUTHENTICATION SETTINGS show the events in which the VM will be forced to be re-authenticated. The parameters are:
- Change of IP addr: If the IP address is changed, re-authentication is needed.
- Change of H/W signature: Currently, we use the MAC address of the first Ethernet card as the hardware signature. If this value changes, re-authentication is needed. Typically, when a VM is copied, the hypervisor changes the MAC address of the new copy so be warned.
- Reboot: This option is disabled by default. However, one could force re-authentication every time the VM boots. This is similar to having a boot-time password to enable the VM to come up completely.
If a VM is already registered and you attempt to register again, you will see the following warning:
# hcl register -p rootroot -o HyTrust -h ubuntu-10.04 -d "This is my 10.04 VM" 192.168.140.151 *bin
Already registered, remove from server and cleanup locally (hcl destroy)
At this point, go to the webGUI and authenticate the VM by typing the passphrase. If you have forgotten the passphrase, remove the VM from the unauthenticated list and run the register command on the VM again.
Simplified Registration
A simpler form of registration is available by which you do not need to manually create a certificate and copy it to the VM. You can quickly register and authenticate a VM by providing your KeyControl credentials and selecting the Cloud VM Set. For example, using the -a option to hcl:
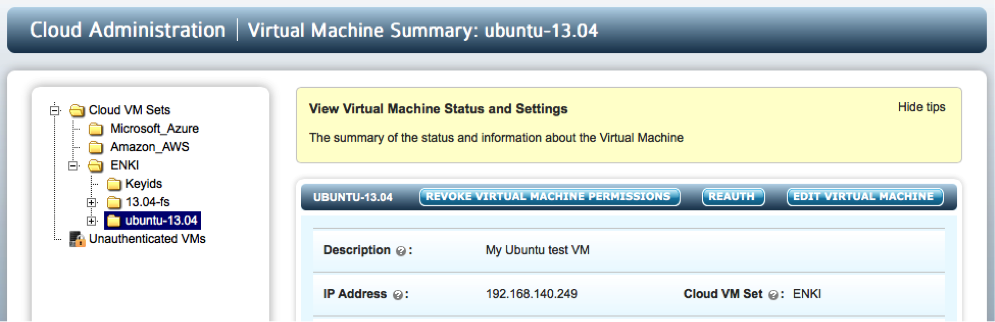
# hcl register -a -h "Ubuntu-13.04" -d "My Ubuntu test VM" -192.168.140.151
Please provide the KeyControl login details
username: spate
password: ********

Available Cloud VM Sets
--------------------------------------------------------------------------------
Microsoft_Azure
Amazon_AWS
ENKI
--------------------------------------------------------------------------------

Please specify Cloud VM Set to which this VM should be added: ENKI

Certificate passphrase might be required
Certificate successfully unpacked
Registered as Ubuntu-13.04 with KeyControl node(s) 192.168.140.151

Completing authentication for Ubuntu-13.04 on KeyControl node(s) 192.168.140.151
Authentication complete, machine ready to use
Here, we invoke hcl register as before, but pass the -a option. First, hcl prompts for your username and password. It authenticates against KeyControl and then lists the available Cloud VM Sets. All you need to do now is to select the Cloud VM Set in which to place the VM. A certificate is created, copied to the VM and registration/authentication takes place. You can then find your VM in the correct Cloud VM Set as the following figure shows:
Checking The VM Post Registration
The status of the VM can be checked at any time using the hcl command. For example, following a successful registration, run the command as follows:
# hcl status

Summary
--------------------------------------------------------------------------------
KeyControl: 192.168.140.151:443
KeyControl list: 192.168.140.151:443,192.168.140.152:443
Status: Connected

Registered Devices
--------------------------------------------------------------------------------
Disk Name         Clear                             Cipher            Status
--------------------------------------------------------------------------------

Available Devices
--------------------------------------------------------------------------------
Disk Name           Device Node                     Size (in MB)
--------------------------------------------------------------------------------
sde                 /dev/sde                        2048
sdd                 /dev/sdd                        2048
sdc                 /dev/sdc                        2048
sdb2                /dev/sdb2                       1027
sdb1                /dev/sdb1                       1019

Other Devices
--------------------------------------------------------------------------------
Disk Name           Device Node                     Status
--------------------------------------------------------------------------------
sda5                /dev/sda5                       Mounted (swap)
sda1                /dev/sda1                       Mounted (/)
The status is shown as Connected. The list of devices detected is shown along with information about whether the device is available or in use. It displays all physical devices and logical volumes that are in use or available.
Setting Up A Device For Encryption on Linux
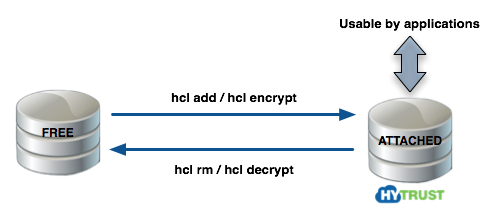
Please see the following figure. A free disk can be in one of two stages. Either the disk is free or it is under HyTrust control, in which case it must be attached before applications can access it.
Please review the section Moving Disks Between VMs for further details.
You can use hcl add if you are starting with a new disk. If you already have data on your disk (for example, a filesystem or files) you can use hcl encrypt which will encrypt the contents. Note that you should partition disks first. HyTrust DataControl requires disks to be self-identifying. This is achieved by writing a private region near the start of the disk through which we can associate keys and key versions. You can use a full disk but we strongly recommend that you do not. If disks are removed, for example, /dev/sdb is removed, /dev/sdc will then become /dev/sdb and we will not be able to retrieve the correct keys for the device. If disks are partitioned, you will not see this problem.
To add a new disk for encryption, you simply invoke hcl add as follows. Note that we add, attach and make an ext3 filesystem on the disk by default. You can change the filesystem type by specifying -F fstype or you can avoid creation of a filesystem by specifying -F none.
# hcl add sdb1
WARNING: This operation will destroy the contents of the disk.
If you wish to preserve them, run "hcl encrypt" instead.
Do you want to proceed? (y/n) y

In case of error remove the disk using "hcl rm" and run "hcl add" again

Encrypted device sdb1 (/dev/sdb1) attached; decrypted contents visible at /dev/mapper/clear_sdb1

Creating file system ext3 on /dev/mapper/clear_sdb1
--------------------------------------------------------------------------------
mke2fs 1.41.11 (14-Mar-2010)
...
This filesystem will be automatically checked every 22 mounts or
180 days, whichever comes first.  Use tune2fs -c or -i to override.
--------------------------------------------------------------------------------
# hcl add -c AES-128 sdc2
WARNING: This operation will destroy the contents of the disk.
If you wish to preserve them, run "hcl encrypt" instead.
Do you want to proceed? (y/n) y
...
Note that there is no need to specify the full device pathname so sdb1 will suffice.
Once you have added disks for encryption you can go to the KeyControl GUI and see the disks encrypted by expanding the my_ubuntu tab in the file browser. By default we will use AES-256 but you can also specify AES-128 as an option to hcl add using the -c option. This is shown above with /dev/sdb2.
Once devices have been added, they are listed when running hcl status as follows:
# hcl status

Summary
--------------------------------------------------------------------------------
KeyControl: 192.168.140.151:443
KeyControl list: 192.168.140.151:443,192.168.140.152:443
Status: Connected

Registered Devices
--------------------------------------------------------------------------------
Disk Name         Clear                             Cipher            Status
--------------------------------------------------------------------------------
sdb2              /dev/mapper/clear_sdb2            AES-128     Attached
 '--> auto_attach=ENABLED, attach_handler=DEFAULT, detach_handler=DEFAULT
sdb1              /dev/mapper/clear_sdb1            AES-256     Attached
 '--> auto_attach=ENABLED, attach_handler=DEFAULT, detach_handler=DEFAULT

Available Devices
--------------------------------------------------------------------------------
Disk Name           Device Node                     Size (in MB)
--------------------------------------------------------------------------------
sde                 /dev/sde                        2048
sdd                 /dev/sdd                        2048
sdc                 /dev/sdc                        2048

Other Devices
--------------------------------------------------------------------------------
Disk Name           Device Node                     Status
--------------------------------------------------------------------------------
sda5                /dev/sda5                       Mounted (swap)
sda1                /dev/sda1                       Mounted (/)
The unencrypted path to the /dev/sdb1 disk is through /dev/mapper/clear_sdb1. Note however that the unencrypted path is not accessible when a disk is detached. The following figure summarizes the layers at which encrypted and unencrypted data is available:

Once the encrypted device has been set up you should NOT access the unencrypted device through /dev/sdb1. The Linux kernel caches data in the kernel which may be periodically flushed. If you write to the raw device without going through the /dev/mapper interface, you could end up with corrupted data.
Fast Initial Encryption on Linux
One of the features of versions 2.5 and above is that we have an extra option to hcl encrypt that allows us to query the filesystem, get the list of allocated blocks and only encrypt those blocks.
This is best shown with an example. Running hcl status, we have a 2 GB disk (sdb1).
hcl status

Available Devices
------------------------------------------------------------
Disk Name           Device Node                  Size (in MB)
------------------------------------------------------------
sde                 /dev/sde                     2048
sdd                 /dev/sdd                      102
sdc1                /dev/sdc1                       9
sdb1                /dev/sdb1                    2047
Let's put a filesystem on it and add a single file to it:
# mkfs /dev/sdb1
...
# mount /dev/sdb1 /mnt
# cp /etc/passwd /mnt
# df -h /mnt

Filesystem      Size  Used Avail Use% Mounted on
/dev/sdb1       2.0G  3.1M  1.9G   1% /mnt
# umount /dev/sdb1 /mnt
We have only used 1% of the 2GB disk. Now let's encrypt it and measure the amount of time it takes:
# time hcl encrypt sdb1
All the data on sdb1 will be encrypted
The cleartext data will be available on /dev/mapper/clear_sdb1
This operation may take long time
Do you want to proceed? (y/n) y

Encrypted device sdb1 (/dev/sdb1) attached; decrypted contents visible at /dev/mapper/clear_sdb1

total device size 2096128 KB

Processing: 100% Time left: 00:00:00
Completed encryption of sdb1 successfully

real0m49.663s
user0m0.052s
sys0m10.313s
49 secs is not a lot of time but for real-life situations, we are often dealing with terabytes of data so downtime will be significant.
Now let's repeat the operation with the -s option:
# time hcl encrypt -s sdb1
All the data on sdb1 will be encrypted
The cleartext data will be available on /dev/mapper/clear_sdb1
This operation may take long time
Do you want to proceed? (y/n) y

Encrypted device sdb1 (/dev/sdb1) attached; decrypted contents visible at /dev/mapper/clear_sdb1

total device size 2096128 KB

Processing:   2% Time left: 00:00:49
Completed encryption of sdb1 successfully

real0m2.203s
user0m0.018s
sys0m0.267s
Note that the encryption takes only 2.2 seconds this time! And of course, since we are only encrypting the blocks that the filesystem has allocated, it will be 2.2 seconds whether the disk is 2 GB or 4 TB!
The -s option currently works for ext2, ext3 and ext4 filesystems.
Automatically Mounting Filesystems On Linux
On Linux, it is normal to add entries to /etc/fstab to have the filesystems automatically mount on boot. Since the HyTrust daemons start later in the boot cycle, we require a different procedure for automatically mounting filesystems on encrypted devices.
First, after you have attached a device and created the filesystem on it, for example:
# hcl add sdb1
WARNING: This operation will destroy the contents of the disk.
If you wish to preserve them, run "hcl encrypt" instead.
Do you want to proceed? (y/n) y

In case of error remove the disk using hcl rm and run hcl add again

Encrypted device sdb1 (/dev/sdb1) attached; decrypted contents visible at /dev/mapper/clear_sdb1

Creating file system ext3 on /dev/mapper/clear_sdb1
...
you need to call hcl to specify the mount point and mount options. For example:
# hcl set mntpt=/my_mountpoint sdb1
# hcl set mntopts="-o rw" sdb1
hcl will check to make sure that the mount point exists and then mount the filesystem on each boot. The mntopts are passed to the mount command so if you wish to make a call such as:
# mount -t ext4 -o ro,noatime /dev/mapper/clear_sdb1 /my_mountpoint
You need to set mntopts as follows:
# hcl set mntpt=/my_mountpoint sdb1
# hcl set mntopts="-t ext4 -o ro,noatime" sdb1
You can check for the mount point and options using hcl status as follows:
# hcl status

Summary
--------------------------------------------------------------------------------
KeyControl: 192.168.140.151:443
KeyControl list: 192.168.140.151:443,192.168.140.152:443
Status: Reauth needed (Identity verification failed)

Registered Devices
--------------------------------------------------------------------------------
Disk Name         Clear                             Cipher      Status
--------------------------------------------------------------------------------
sdb1              /dev/mapper/clear_sdb1            AES-256     Not attached
 '--> auto_attach=ENABLED, mntpt=/my_mountpoint, mntopts="-t ext4 -o ro,noatime",
      attach_handler=DEFAULT, detach_handler=DEFAULT
sdb2              /dev/mapper/clear_sdb2            AES-256     Not attached
 '--> auto_attach=ENABLED, mntpt=/clrtxt2, mntopts="rw", attach_handler=DEFAULT,
      detach_handler=DEFAULT
Encrypting An Existing Device on Linux
If you have a device that already contains data that you want to be encrypted, you can run the hcl encrypt command instead of running hcl add. To demonstrate how this works, let's make a filesystem on /dev/sdb2, mount it, create a file and unmount it:
# mkfs /dev/sdb2
mke2fs 1.41.11 (14-Mar-2010)
Filesystem label=
OS type: Linux
Block size=4096 (log=2)
...
This filesystem will be automatically checked every 22 mounts or
180 days, whichever comes first.  Use tune2fs -c or -i to override.
# mount /dev/sdb2 /mnt
# echo hello > /mnt/my_file
# umount /mnt
Next, we call hcl encrypt. This both encrypts the device and then adds/attaches it:
# hcl encrypt sdb1
All the data on sdb1 will be encrypted
The cleartext data will be available on /dev/mapper/clear_sdb1
This operation may take long time
Do you want to proceed? (y/n) y

Encrypted device sdb1 (/dev/sdb1) attached; decrypted contents visible at /dev/mapper/clear_sdb1

total device size 1044193 KB

Processing: 100% 	Time left: 00:00:00
Completed encryption of sdb1 successfully
At this point, the encrypted device is now ready to use, so it can be mounted as follows:
# mount /dev/mapper/clear_sdb2 /mnt
# ls /mnt
lost+found/ my_file
# cat /mnt/my_file
hello
If the operation did not complete because it was interrupted or the system crashed unexpectedly, running hcl encrypt again will produce the following warning:
# hcl encrypt sdb1
All the data on sdb1 will be encrypted
The cleartext data will be available on /dev/mapper/clear_sdb1
This operation may take long time
Do you want to proceed? (y/n) y

Device sdb1 already registered
WARNING: Incomplete encryption operation detected for device sdb1
Continue encryption
...
and the operation will continue.
Once the operation is completed and you wish to revert back to the unencrypted image, run the following command:
# hcl decrypt sdb1
Starting undo of encryption operation on sdb1;
In case of failure run 'hcl encrypt -u sdb1' again
total device size 523264 KB
undo size 88576 KB

Processing: 100% 	Time left: 00:00:00
Completed undo for sdb1 successfully
We highly recommend that before you encrypt production data you become familiar with these commands. Make sure you back up up your data before adding or encrypting devices.
Removing and/or Decrypting an Existing Device
If you have a device that is encrypted and you wish to remove it from HyTrust control and decrypt the contents, the process is outlined below. First of all, make sure that the disk is not mounted. While still under HyTrust control, you should run hcl decrypt as shown below:
# hcl decrypt sdb1
All the data on /dev/mapper/clear_sdb1 will be decrypted
The clear text data will be available on /dev/sdb1
This operation may take long time

Do you want to proceed? (y/n) y

total device size 1044193 KB

Processing: 100% 	Time left: 00:00:00
Completed decryption of sdb1 successfully
Removed device sdb1
At this point the disk is available as a standalone device and can be mounted using /dev/sdb1.
If you do not wish to preserve the contents of the disk, you can simply remove it as follows:
# hcl rm sdd1
WARNING: Removal of devices will cause any data stored on them to be permanently lost.
Do you want to proceed? (y/n) y

Removed device sdd1
Note: this operation is destructive. You will lose all data that is stored on the disk.
Resizing a Device on Linux
There are times that you need to resize a device, for example, to increase the filesystem size. If the device is under HyTrust management, for example /dev/sdb1, you would do the following:
- hcl detach sdb1
- Resize the underlying volume
- hcl attach sdb1
- Resize the filesystem on top of
/dev/mapper/clear_sdb1
Note that you do not need to reboot the OS for these effects to take place.
Revoking VM Permissions
You can revoke access to all devices for a VM and prevent further access between this VM and the KeyControl cluster until it is re-authenticated. Within the file browser, select one of the Cloud VM Sets and click the X next to the VM. The particular VM will immediately be moved back to the Unauthenticated list.
One can also revoke VM access by selecting the VM from the file browser and clicking the REVOKE VIRTUAL MACHINE PERMISSIONS button.
On the VM, hcl status still shows that everything's fine (Connected).
# hcl status
KeyControl: 192.168.140.151:443
KeyControl list: 192.168.140.151:443,192.168.140.152:443
Status: Connected
However, after the next heartbeat (10 seconds), the status changes as follows:
# hcl status

Summary
--------------------------------------------------------------------------------
KeyControl: 192.168.140.151:443
KeyControl list: 192.168.140.151:443,192.168.140.152:443
Status: Reauth needed (Virtual Machine not authenticated)

Registered Devices
--------------------------------------------------------------------------------
Disk Name         Clear                             Cipher            Status
--------------------------------------------------------------------------------
sdb1              /dev/mapper/clear_sdb1            AES-256     Not attached
 '--> auto_attach=ENABLED, attach_handler=DEFAULT, detach_handler=DEFAULT
sdb2              /dev/mapper/clear_sdb2            AES-256     Not attached
 '--> auto_attach=ENABLED, attach_handler=DEFAULT, detach_handler=DEFAULT
Filesystems on /dev/mapper/sdb1/2 have been force-unmounted and the devices have been detached. The VM needs to be re-authenticated again before the encrypted devices can be accessed. This is achieved as follows:
# hcl auth

Enter passphrase (min 16 characters): onetimepassword16chrs
Sent an authentication request to KeyControl 192.168.140.128

Please log on to the KeyControl appliance to complete the authentication of this node
Return to the webGUI on the KeyControl cluster, navigate to the and click the padlock icon next the VM, and give the same passphrase (onetimepassword16chrs), and it will go back to its usual place in the Cloud VM Set.
On the VM, one can now do an hcl attach -a to access your encrypted disks again.
After the VM has been moved to the Unauthenticated VMs list, if you now delete the node (using the X icon) it will be permanently deleted from the KeyControl cluster. No re-authentication is possible, all keys are destroyed, and thus all storage using those keys are effectively useless. A new certificate must be created if the node is to be brought back to the fold.
VM Handlers For Attach/Detach
There are scripts that are invoked when a device is either attached or detached. These scripts can be found under the /opt/hcs/handlers directory. The attach handler (default.attach) is invoked when a new device is attached and the detach handler (default.detach) is invoked when a new device is detached
The default attach handler is fairly simple and is shown below:
#!/bin/sh

# Post-attach handlers are called with at least 2 and at most 4 arguments:
# 1. the absolute path of the cleartext device e.g. /dev/mapper/clear_sda
# 2. the absolute path of the encrypted_device e.g. /dev/sda
# 3. (optional) mountpoint
# 4. (optional) mount options
# If the mountpoint and mount options are supplied, then the default handler
# will fsck and mount the cleartext device on the given mount point.

if [ $# -lt 2 -o $# -gt 4 ]; then
    exit 1
fi
if [ $# -eq 2 ]; then
    exit 0
fi

cleardev=$1
if [ $# -ge 3 ]; then
    mntpt=$3
fi
if [ $# -eq 4 ]; then
    mntopts=$4
fi

fsck -a "$cleardev"
if [ $? -eq 0 ]; then
    mount $mntopts "$cleardev" "$mntpt"
else
    exit 2
fi
The mount point and mount options are collected along with the clear-text path to the device and a mount call is made.
The handlers can be changed freely. We recommend that you back up your handlers.