Establishing a Trusted Connection with a KeyControl-Generated CSR
The following procedure describes how to create a certificate bundle on the HyTrust KMIP server that uses a Certificate Signing Request (CSR) generated by KeyControl. The KMIP certificate can then be uploaded to vSphere to establish a trusted connection between vSphere and the HyTrust KMIP server.
You can also establish a trusted connection using a vSphere-generated CSR. For details, see Establishing a Trusted Connection with a vSphere-Generated CSR.
Note: The following procedure is based on vCenter Web Client in vSphere 6.5. If your version of the vCenter Web Client is different from what is described below, please see your vCenter documentation to determine how to add the KMS cluster.
- Log into the KeyControl webGUI using an account with Security Admin privileges.
- In the top menu bar, click KMIP.
- Click the Client Certificates tab.
- Select Actions > Create Certificate.
-
In the Create a New Client Certificate dialog box:
- Enter a name in the Certificate Name field.
-
Set the date on which you want the certificate to expire in the Certificate Expiration field. If the certificate expires, communication between vSphere and KeyControl will be disrupted until a new certificate is uploaded.
Important: Do not enter a password for the certificates. Due to a vSphere limitation, you cannot upload encrypted certificates.
The following example creates a certificate bundle called
vSphereKMSwith a certificate expiration date of December 31, 2019.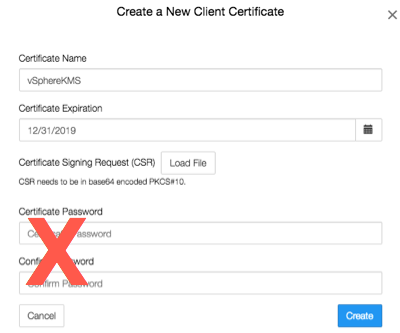
- Click Create.
- On the Client Certificates tab, select the certificate bundle you just created.
- Select Actions > Download Certificate. The webGUI downloads
<certname_datetimestamp>.zip, which contains a user certification/key file called<certname>.pemand a server certification file calledcacert.pem. - Unzip the file so that you have the
<certname>.pemfile available to upload into vCenter. In the example above the certificate file would be namedvSphereKMS.pem. - Launch the vSphere Web Client and select the vCenter server to which you added the KeyControl KMS cluster.
- Click the Configure tab for the server.
- In the left-hand pane, click More > Key Management Servers.
- Select the KeyControl KMS cluster in the list then select All Actions > Establish Trust with KMS.
- In the Establish Trust with KMS dialog box, select Upload certificate and private key then click OK.
- In the Upload Certificate and Private Key dialog box, you need to upload the
<username>.pemfile you created twice, once for the KMS certificate and once for the private key. To do so:- Click Upload file under the KMS certificate text box.
- Select the
<username>.pemfile and click Open. - Click Upload file under the private key text box.
- Select the
<username>.pemfile again and click Open. - Click OK.
The following illustration shows a certificate called
vSphereKMS.pembeing uploaded to vSphere: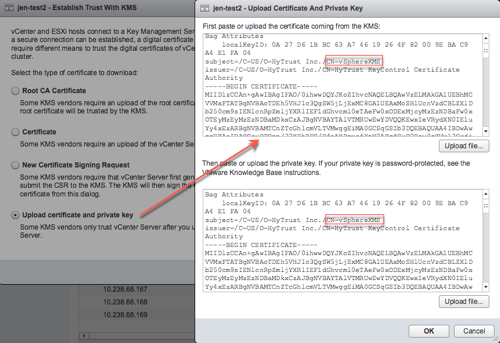
- After
<username>.pemhas been uploaded, click OK. - Wait until vCenter reports that the connection status for the KMS cluster has changed to "Normal".
- For a multi-node cluster, add the additional KeyControl server IP addresses to the same vSphere KMS cluster to provide a failover mechanism:
- Select the HyTrust KMS you created.
- Click Add KMS.
- In the KMS Cluster field, make sure the HyTrustKMS cluster is selected.
- Enter the server alias, address, and port for the additional KeyControl KMIP server.
- Click OK.
- In the Trust Certificate dialog box, click Trust.
The following illustration shows a HyTrust KMS with three KMIP servers:

The critical information is the Connection Status for each KMIP server in the cluster and the Certificate Status for the overall KMS cluster. The certificate status for the individual KMIP servers in the cluster can be ignored.
