Establishing a Trusted Connection with a vSphere7-Generated CSR
The following procedure describes how to generate a Certificate Signing Request (CSR) in vCenter and then use that CSR to create a certificate bundle on the Entrust KMIP server. The KMIP certificate can then be uploaded to vSphere to establish a trusted connection between vCenter and the Entrust KMIP server.
You can also establish a trusted connection using a KeyControl Vault-generated CSR. For details, see Establishing a Trusted Connection with a KeyControl Vault-Generated CSR.
- Log in to vCenter 7, and select Hosts and Clusters.
- In the navigation, select the Top Host (the vCenter Host).
- Select Configure > Security > Key Providers.
- Select Add Standard Key Provider.
-
Configure the key provider:
Option Description Name
The name of the KMS cluster. vCenter identifies the KMS by this case-sensitive name.
If the Key Provider is deleted and a new one is created with the same name, vCenter will treat them as the same Key Provider.
KMS
The host name where the KMIP server is running. It is name the
Address
The IP address of the KMIP server, which is the KeyControl Vault VM's IP address.
Port
The port number used by the KMIP server. The default is 5696.
Proxy configuration
Expand this area and make sure that the Proxy server and Proxy port fields are empty.
Password protection
Expand this area and make sure that the Username and Password fields are empty
For example they are not filled in automatically with irrelevant values by the browser or another local password manager.
Select ADD KEY PROVIDER.
- In the dialog that appears to confirm the KMIP server information, select TRUST.
- The new cluster is listed in the Key Providers table. Click the dot in the first column of the row to select your KeyControl Vault KMS.
- The KeyControl Vault server appears in the second table on the page. Select the arrow next to it to expand the ESTABLISH TRUST relationship diagram.
-
Select Create New Certificate Signing Request (CSR), select NEXT, DOWNLOAD, then DONE.The .pem file contains the information about vCenter for the KeyControl Vault certificate.
- Log in to the KeyControl KMIP Tenant GUI.
- From the KeyControl KMIP Tenant GUI, select Security > Client Certificates.
- On the Client Certificates tab, click the + icon on right top corner to create new client certificate.
-
In the Create Client Certificate dialogue, specify the options you want to use and click Create.
Field
Description
Certificate Name
A user-defined name for this bundle. If you are going to create multiple KMIP certificate bundles, this name should be descriptive enough that you can tell the certificate bundles apart.
The name can only contain letters, numbers, dashes, periods, underscores, and spaces, and cannot be changed after the bundle is created.
Certificate Expiration
The date on which the certificates in the bundle will expire. If the certificates expire, communication between the KeyControl Vault KMIP server and the client will be disrupted until a new certificate bundle is uploaded to the client.
Important: The KeyControl KMIP Tenant GUI does not show any alert about expiring KMIP client certificates. Users should monitor and periodically update client certificates that are about to expire.
Certificate Signing Request (CSR)
If you want the KMIP server to use an external CSR, click Load File and upload the CSR you want to use. The custom CSR must:
- Be in PKCS#10 format.
- Have a non-empty Common Name.
- If keyUsage is specified, it must include 'digitalSignature'.
If you do not specify an external CSR, KeyControl Vault uses an internally-generated CSR to create the certificate.
Certificate Password/Confirm Password
If you have selected Encrypt Certificate Bundle, provide a passphrase to encrypt the certificates in the bundle.
Whether the certificates need to be encrypted depends on the way your security is configured and the type of implementation you are using. Not all third-party KMIP clients can accept encrypted certificates.
For example, if you are integrating KeyControl Vault with VMware vSphere Encryption, you cannot specify a certificate passphrase due to limitations with vSphere.
- Select the certificate bundle you just created.
-
Click the Download button on right top corner to download the certificate bundle.
The webGUI downloads
<certname_datetimestamp>.zip, which contains a user certification/key file called<certname>.pemand a server certification file calledcacert.pem. - Unzip the file so that you have the
<certname>.pemfile available to upload into vCenter. In the example above the certificate file would be namedKMIPvSphereCert.pem. - Go back to the New Certificate-Signing Request dialog box in the vSphere Web Client and click Upload file.
-
Navigate to the KMIP certificate
<username>.pem, select the file, and click Open. vSphere displays the certificate in the lower half of the New Certificate-Signing Request dialog box.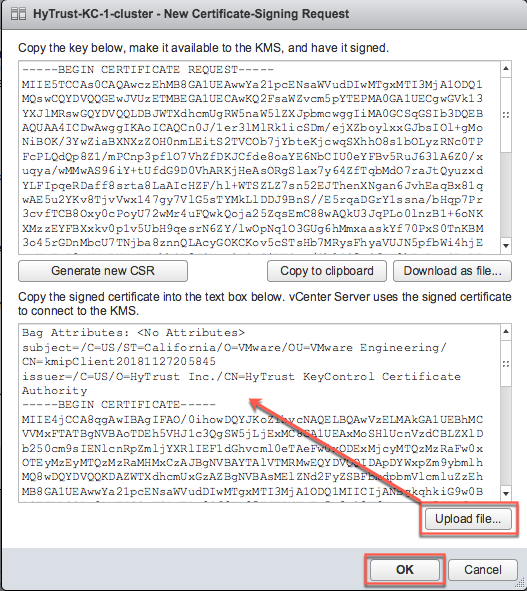
- Click OK and wait until vCenter reports that the connection status for the KMS cluster has changed to "Normal".
- For a multi-node cluster, add the additional KeyControl Vault server IP addresses to the same vSphere KMS cluster to provide a failover mechanism:
- Select the Entrust KMS you created.
- Click Add KMS.
- In the KMS Cluster field, make sure the EntrustKMS cluster is selected.
- Enter the server alias, address, and port for the additional KeyControl Vault KMIP server.
- Click OK.
- In the Trust Certificate dialog box, click Trust.
The following illustration shows a Entrust KMS with three KMIP servers:

The critical information is the Connection Status for each KMIP server in the cluster and the Certificate Status for the overall KMS cluster. The certificate status for the individual KMIP servers in the cluster can be ignored.
