Select Compliance > Hosts.
On the Hosts page, click Add.
On the Add Host Wizard, select the type of host you are adding, and click Next.
On the Host Login page, enter the following:
The fully qualified hostname or IP address of vCenter Server (or Host).
The administrator User ID and Password for vCenter Server (or root credentials for a host).
| Note: | You will not be able to add a host with a password that contains both, the left angle bracket (<) and the right angle bracket (>) characters. However, passwords with either character are supported. |
Optionally, you can modify the values in the Advanced Properties section which define the ports on which CloudControl communicates with the vCenter. In most cases, the default values can be used.
| Note: | The advanced properties apply to all vCenters in the ELM setup. |
Click Next.
The ELM SetUp Details page appears.
When vCenter version 6.x is detected, CloudControl performs auto discovery and discovers all vCenters, PSC and WCS in the ELM setup and displays them in the ELM Setup Detail page.
The initial display shows:
Consolidated VC/WCS details.
PSC details.
PIP and Netmask values.
When a specific PIP is assigned to a host CloudControl looks up the hostname and, if found, assigns it to target.
WCS list with HTTPS Port value. For vSphere 6.x the default is 443.
Optionally, you can:
Define a Friendly Name and Description for each vCenter.
Establish a PIP range in the Published IP Range pane that CloudControl will assign to vCenters in the ELM setup.
A PIP range can be defined in addition to existing published IP and Netmask values displayed in the VC/WCS Details pane. A combination of both the PIP range and the existing published IPs is allowed.
When you define a IP range it must not be less than the number of vCenters in the ELM setup.
Name extra IP that can be used later to auto-protect discovered vCenters in the ELM setup.
Configure a port number to be used for each WCS. For vSphere 6.x, the default port number is 443.
CloudControl protects all vCenters that are discovered in the ELM setup.
Click Next.
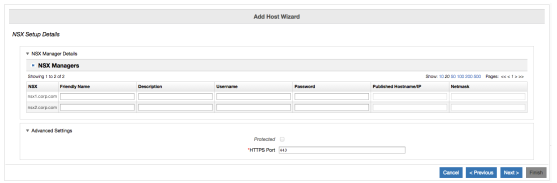
The NSX Details page displays the:
NSX endpoints with PIP and Netmask columns.
Protected checkbox for all the NSX managers.
| Note: | The resource tree for NSX Manager is shown under PSC as a peer of the vCenter. |
If there is a separate NSX account, the same values can be configured as a Service Account on this page.
|
v 5.4 |
Copyright © 2018 HyTrust, Inc. All Rights Reserved. |
Follow us: |

